A helpful troubleshooting video
A helpful video guide
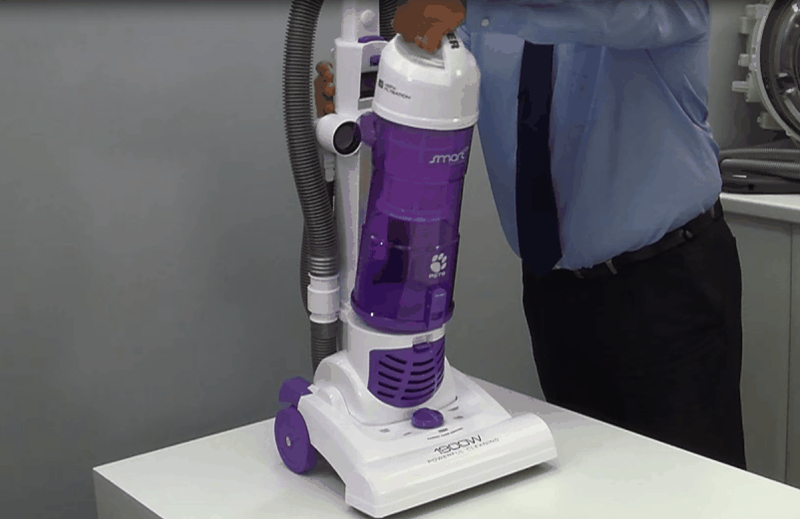
Check the dust container is not full
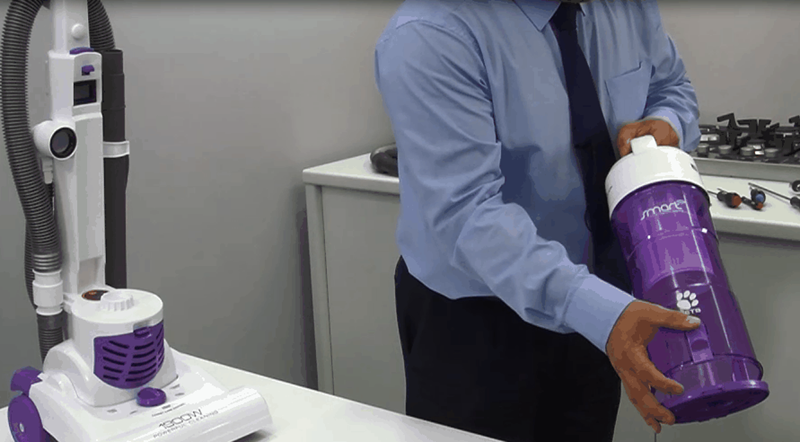
Simply lift the dust container as shown to remove if from the cleaner and take it to your bin. Flip the catch to open the flap and shake the contents out into your bin. We recommend to keep your cleaner working efficiently that it is emptied out when its 2/3 full.
Simply lift the dust container as shown to remove if from the cleaner and take it to your bin. Flip the catch to open the flap and shake the contents out into your bin. We recommend to keep your cleaner working efficiently that it is emptied out when its 2/3 full.
lift the container up at a slight angle as shown on the right
This solution applies to the following models:
Vacuum Cleaners
- HFC216R 001 - 39400360
- HFC324U 001 - 39400361
- SI216RB - 39400305
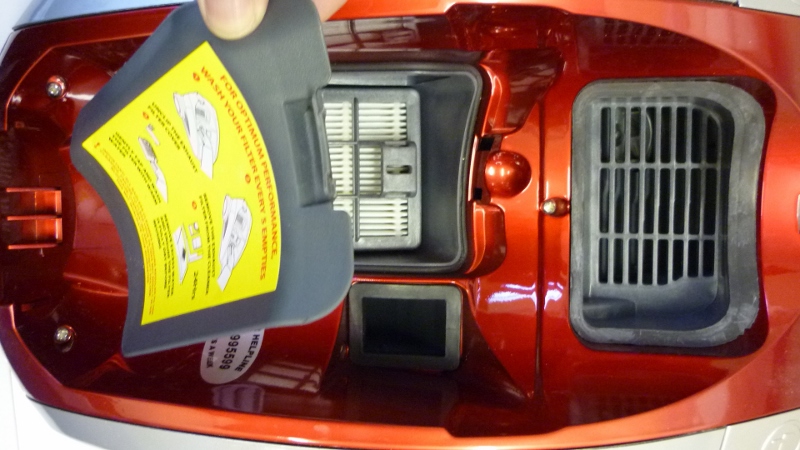
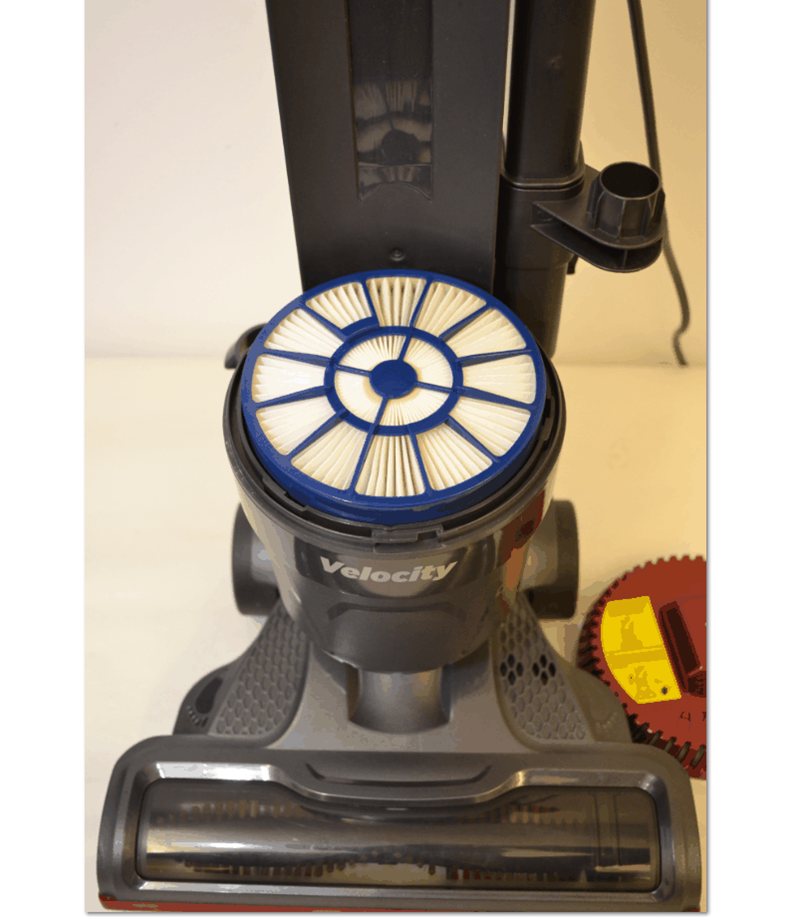
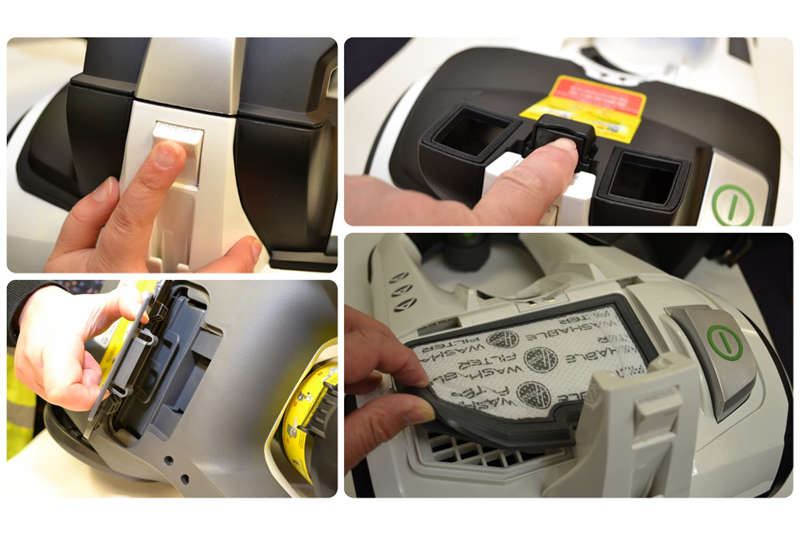
Clean the filters
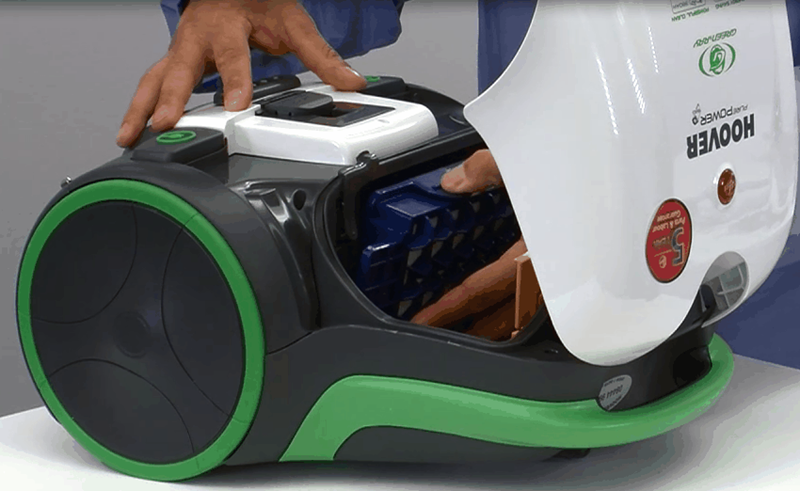
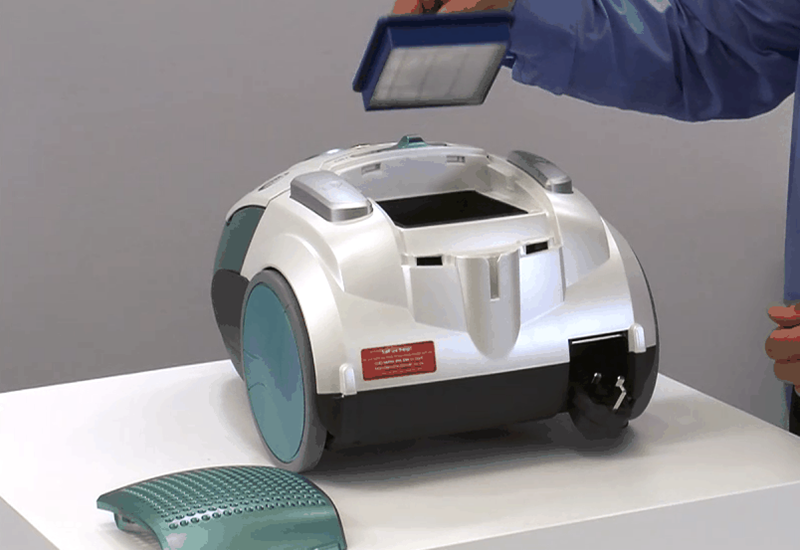
To keep your cleaner working efficiently the 2 filters will need to be regularly cleaned. The first filter is found at the front behind the cover as shown. This is the exhaust filter.
To keep your cleaner working efficiently the 2 filters will need to be regularly cleaned. The first filter is found at the front behind the cover as shown. This is the exhaust filter.
peel the black foam filter out of the cover and wash in warm water, make sure it is dry before re fitting
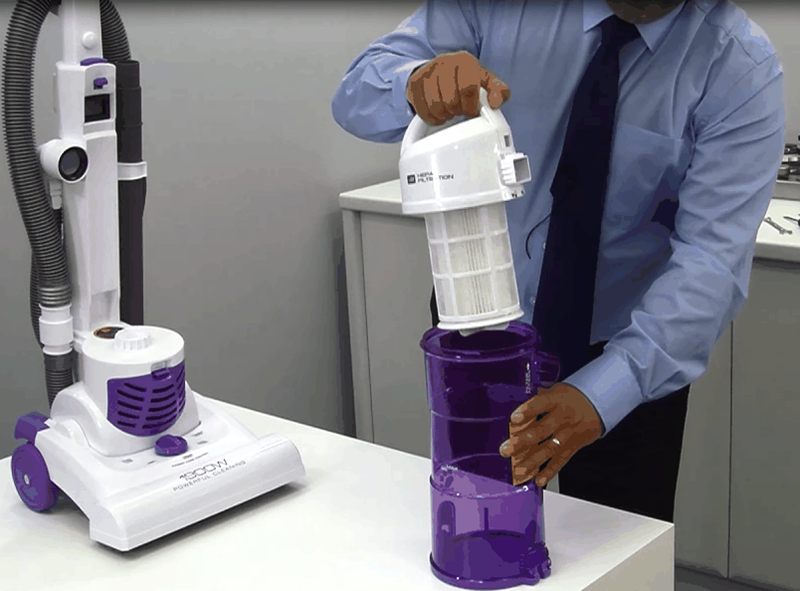
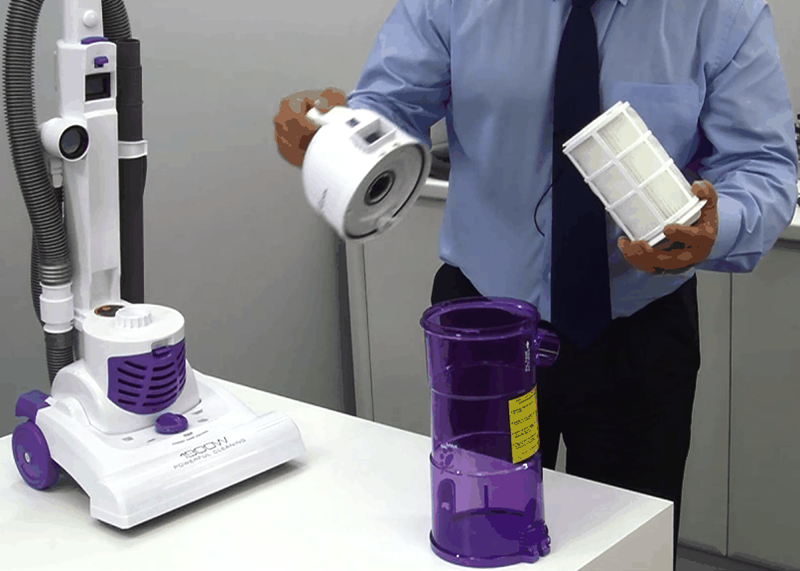
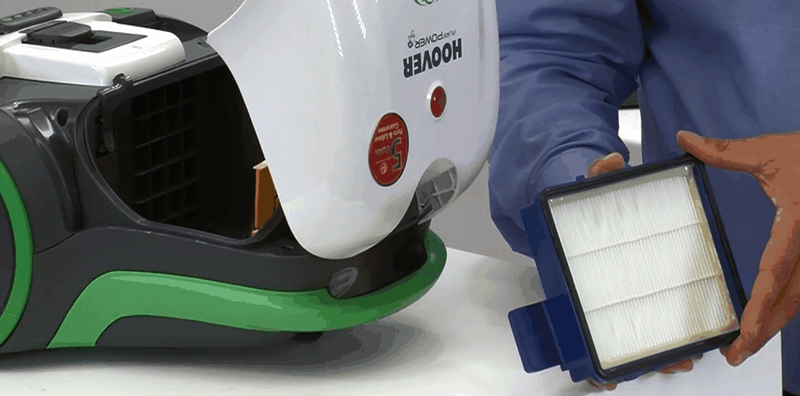
The other filter is found inside the dust box and is the hepa filter. This filter has been designed to catch microscopic dust particles so will need to be dusted out regularly and washed in warm water from time to time. We recommend that you replace this hepa filter at least once per year to ensure that you continue to get the maximum suction from the cleaner. Filters can be purchased by clicking on the spares section of this web site.
Start by removing and emptying the dust box. Press the release button at the top of the dust container and take to your dustbin or a bin bag. Press the catch at the top and the flap at the bottom will open releasing the dust. Shake the container to remove all of the dust inside.
the flap opens to release all of the dust
To remove the filter you will need to twist the lid off the dust box and lift it off. Twist the filter to remove it from the lid and separate from the mesh screen. Dust everything out but for best results wash in warm water and let dry thoroughly.
It is a great idea to have a spare set of filters so that you can continue your house work while the filters that you have washed are drying out! Click on the web site to purchase a spare set.
When everything is clean and dry re assemble the product ready for use.
This solution applies to the following models:
Clean the filters (10)
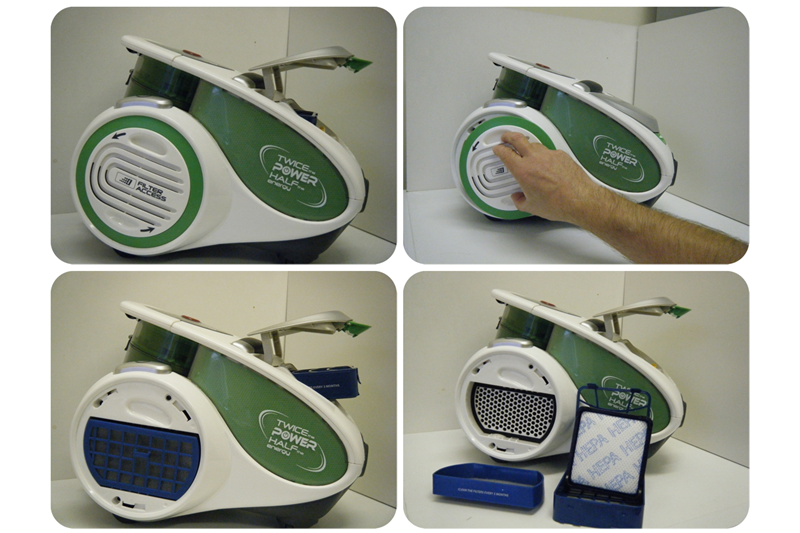
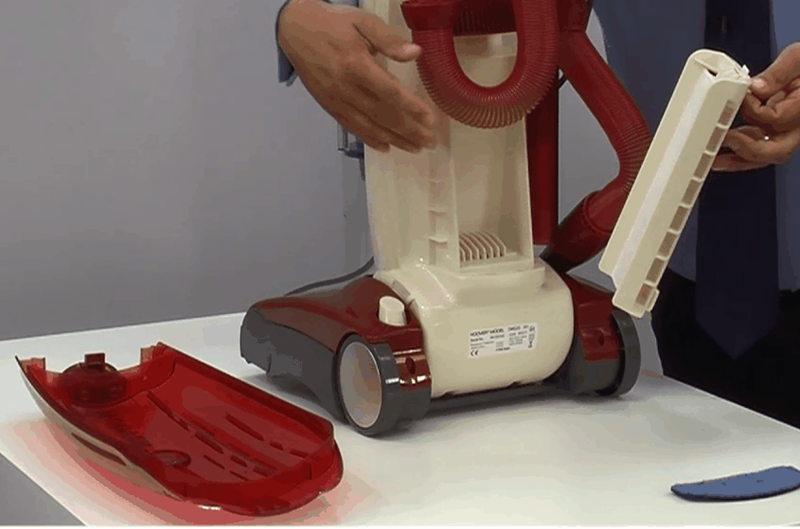
There are two filters fitted to the product that will require regular cleaning. If you find that the suction power is not as good as it should be and the vacuum cleaner is not picking up very well, cleaning the filters will improve the power of your vacuum cleaner. Open the top cover to remove the pre motor filter. Press down the catch and pull the filter out. The second filter is fitted on the side as shown, simply twist the cover and lift out the filter.
There are two filters fitted to the product that will require regular cleaning. If you find that the suction power is not as good as it should be and the vacuum cleaner is not picking up very well, cleaning the filters will improve the power of your vacuum cleaner. Open the top cover to remove the pre motor filter. Press down the catch and pull the filter out. The second filter is fitted on the side as shown, simply twist the cover and lift out the filter.
Dust the filters clean with a soft brush but for best results wash them in warm water. Make sure they are thoroughly dry before you pop them back in - this may take up to 24 hours.
For best cleaning results Hoover recommend that you replace the filters once per year, you can obtain replacements by visiting the spares section of this web site.
Clean the filters (2)
There are two filters in the cleaner, they need to be kept clean to give the best suction power and dirt pick up. One is located in the dust box, start by removing the dust container from the machine.
There are two filters in the cleaner, they need to be kept clean to give the best suction power and dirt pick up. One is located in the dust box, start by removing the dust container from the machine.

Open the dust box and remove the filter. For best results wash the filter in warm water to remove all the debris. Hoover suggest you replace the filter once per year and fresh filters can be purchased from the spares section of the website.
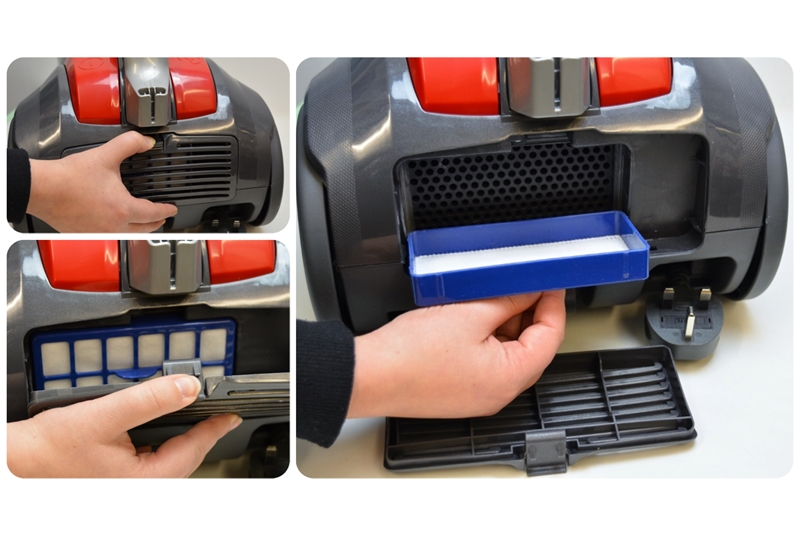
Before you refit the dust box lift out the exhaust filter found at the front of the product under where the dust box fits.
The exhaust filter (blue) can be lifted up to remove for cleaning. Wash in warm water for best results. All filters should be thoroughly dry before putting them back into the product - this can take up to 24 hours.
Clean the filters (3)
In order to get the very best suction from your cleaner keep the filters clean. Remove them from the product and clean by brushing or washing them in warm water. If they have been washed make sure they are thoroughly dry before popping them back in. Hoover recommend that you replace the filters once per year and these can be purchased from the spares section on our website.
In order to get the very best suction from your cleaner keep the filters clean. Remove them from the product and clean by brushing or washing them in warm water. If they have been washed make sure they are thoroughly dry before popping them back in. Hoover recommend that you replace the filters once per year and these can be purchased from the spares section on our website.
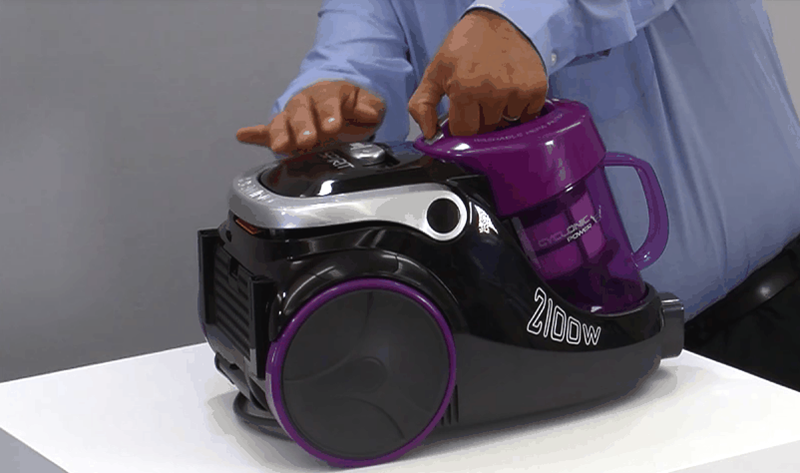
Press the button as shown to release the container from the cleaner. Start by emptying it into your dustbin.
Open the dust box by pressing the button
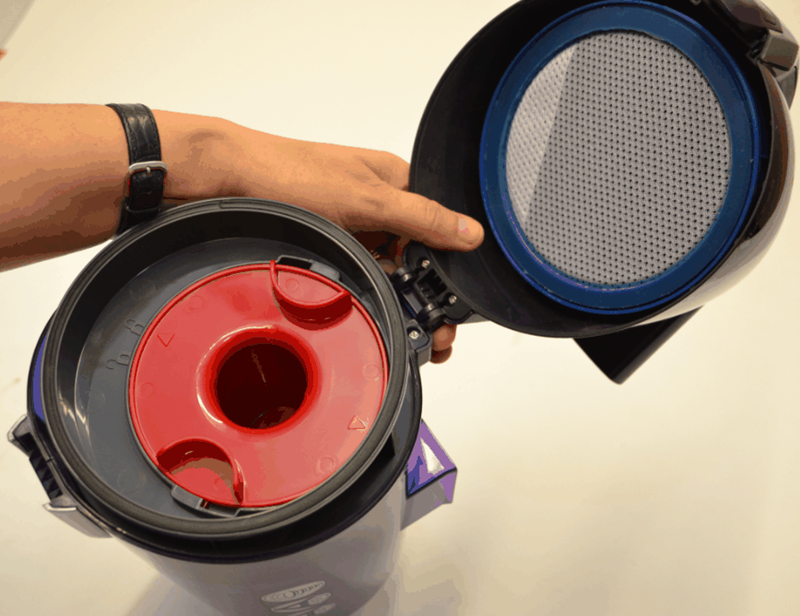
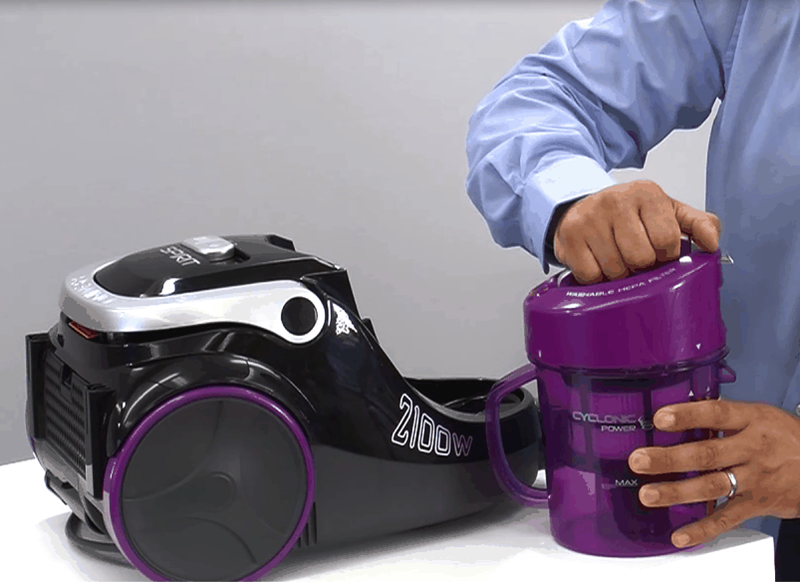
With the lid open the filter can be seen inside the lid and the red cone inside the dust box. This locks in place twist it so the arrow lines up with the open padlock symbol. Remove the cone and filter. The filter can be washed in warm water along with all of the other dust box parts.
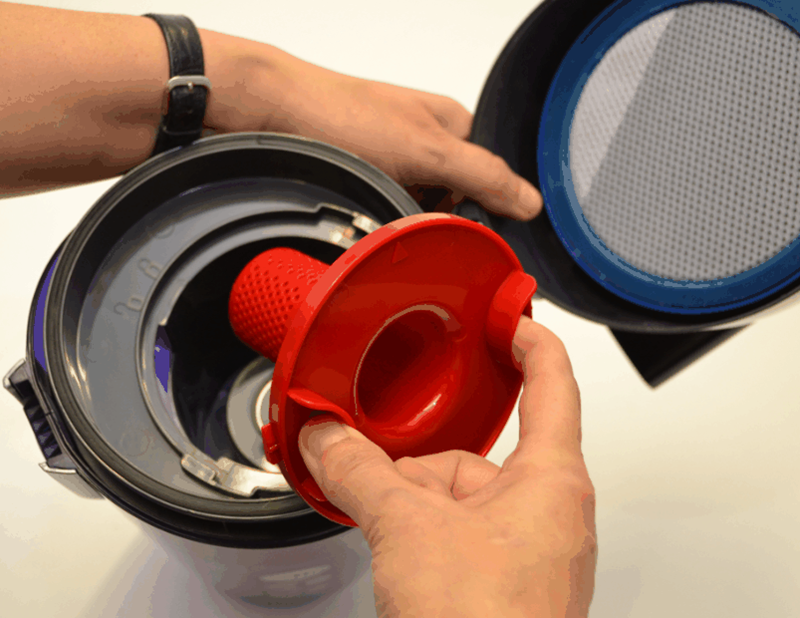

filter (left) cone in the centre and the dust box can all be cleaned in warm water
Once all the parts are dry, reassemble the dust box and fit it back onto the cleaner, its now ready for use.
This solution applies to the following models:
Vacuum Cleaners
- BF70VS01001 - 39001365
- BF70VS11001 - 39001366
- BF81VS02 - 39001469
- BF81VS12 - 39001471
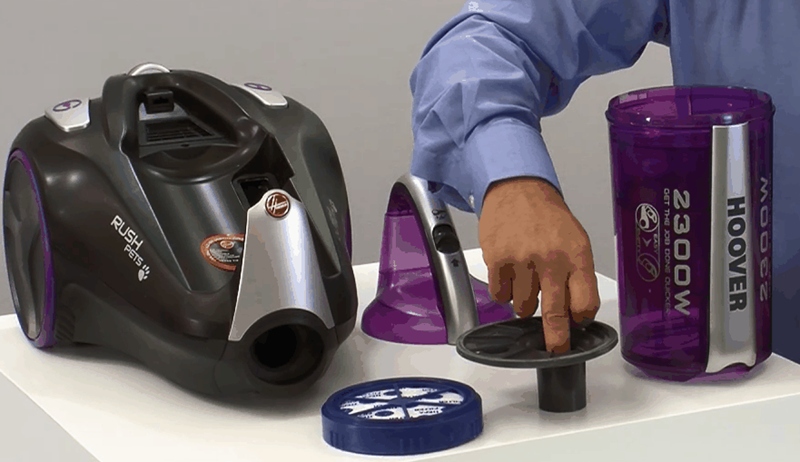
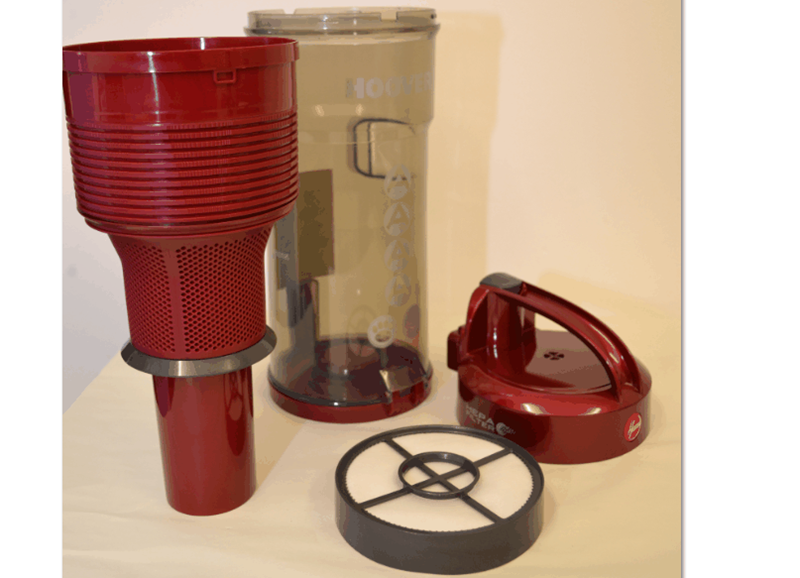
Clean the hepa filter and mesh screen
To get the very best suction from your cleaner please remove the dust box and empty it. Now twist the lid anti clock wise until the arrow on the lid lines up with the word ' open' and lift the lid off.
To get the very best suction from your cleaner please remove the dust box and empty it. Now twist the lid anti clock wise until the arrow on the lid lines up with the word ' open' and lift the lid off.
take the filter out to a waste bin and dust it clean. For best results wash in warm water but make sure it is completely dry before re fitting, this can take up to 24 hours. Its a good idea to replace the filters at least once per year and these can be purchased from the spares section of the website.
The plastic dust box and mesh screen may also be washed in warm water.
This solution applies to the following models:
Vacuum Cleaners
- AL71SZ01001 - 39100442
- AL71SZ02 - 39100443
- AL71SZ02001 - 39100417
- AL71SZ04 - 39100468
- JC2145 - 39100118
- JC3146 - 39100137
- JC3154 - 39100148
- JC3157T - 39100157
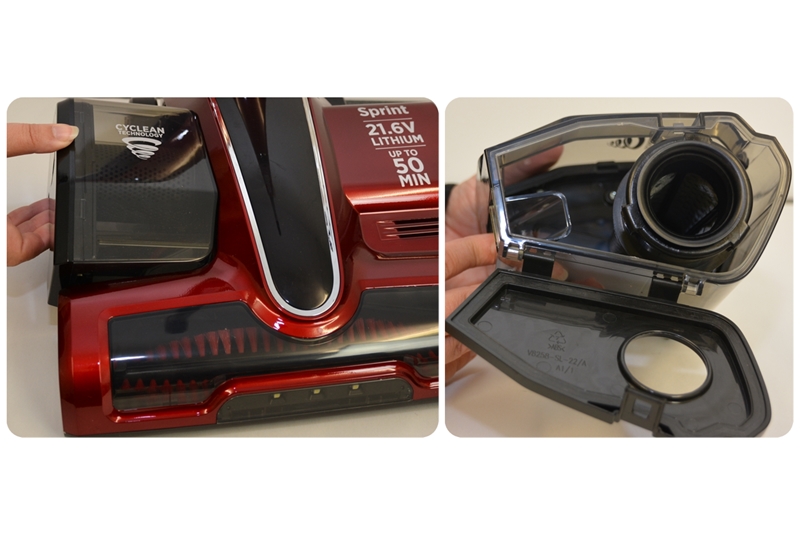
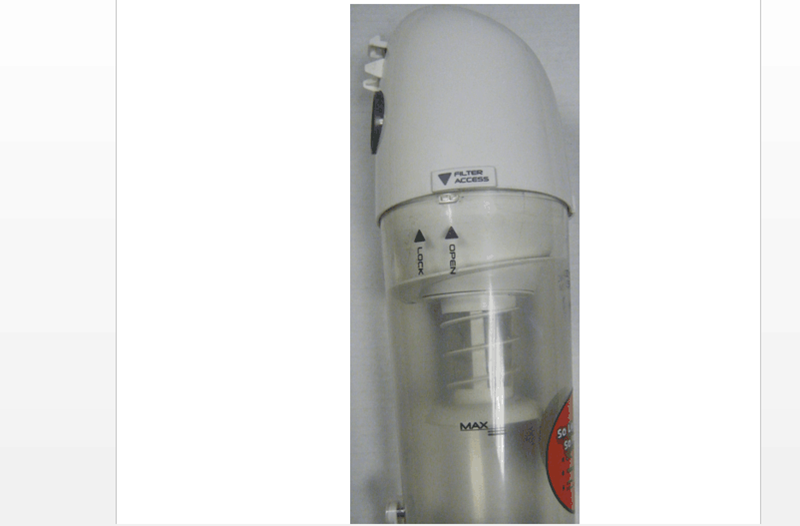
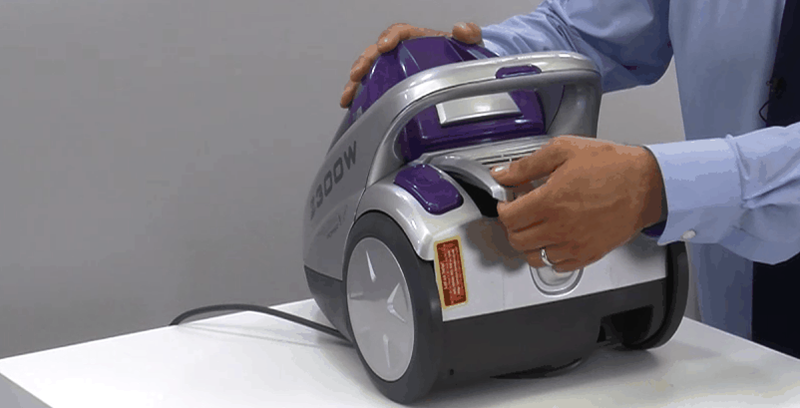
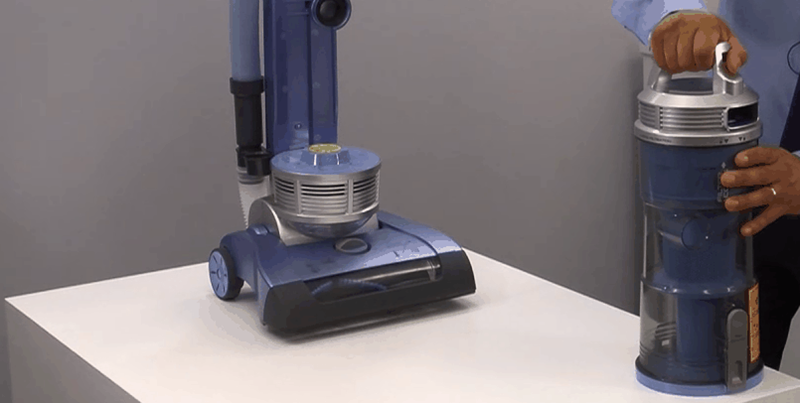
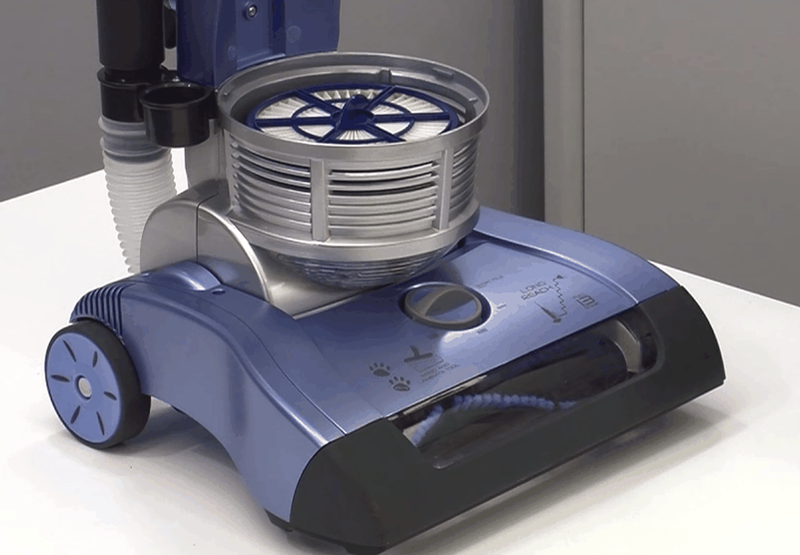
Empty the dirt container and clean the filters
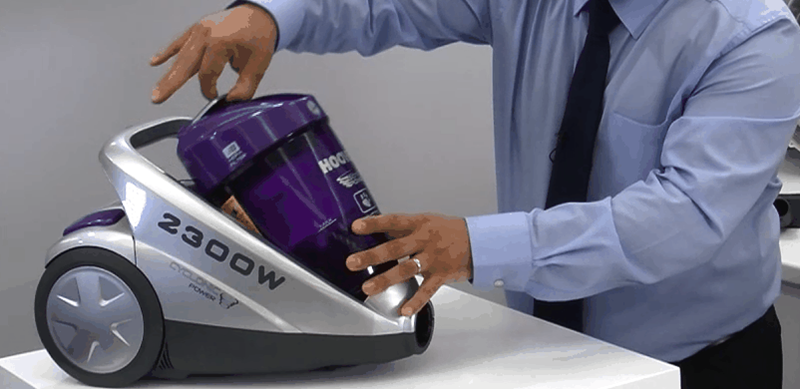
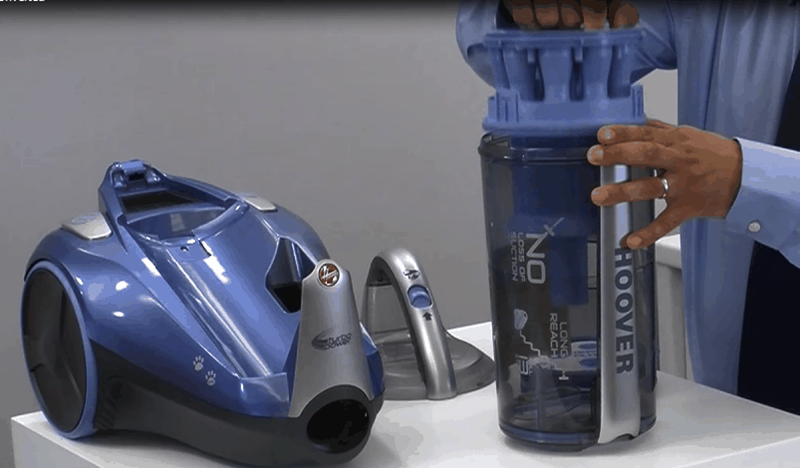
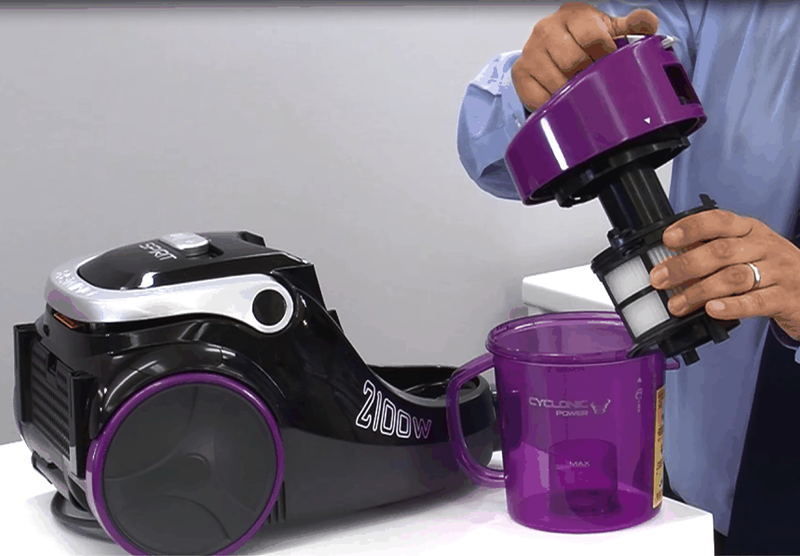
To keep your cleaner working efficiently with good suction power and also to stop it overheating and cutting out we advise you to keep the filters clean. Your product has 2 filters, the first is the hepa filter that you will find inside the dust container. Lift the clip as shown at the top of the dust container and lift it up.
To keep your cleaner working efficiently with good suction power and also to stop it overheating and cutting out we advise you to keep the filters clean. Your product has 2 filters, the first is the hepa filter that you will find inside the dust container. Lift the clip as shown at the top of the dust container and lift it up.
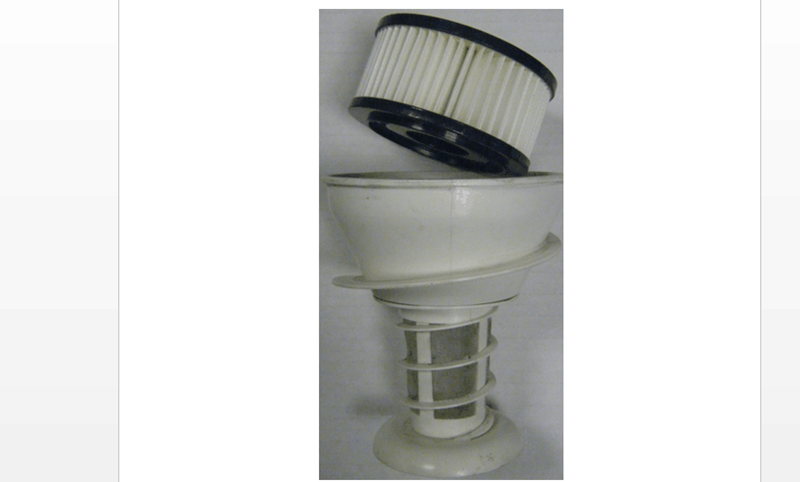
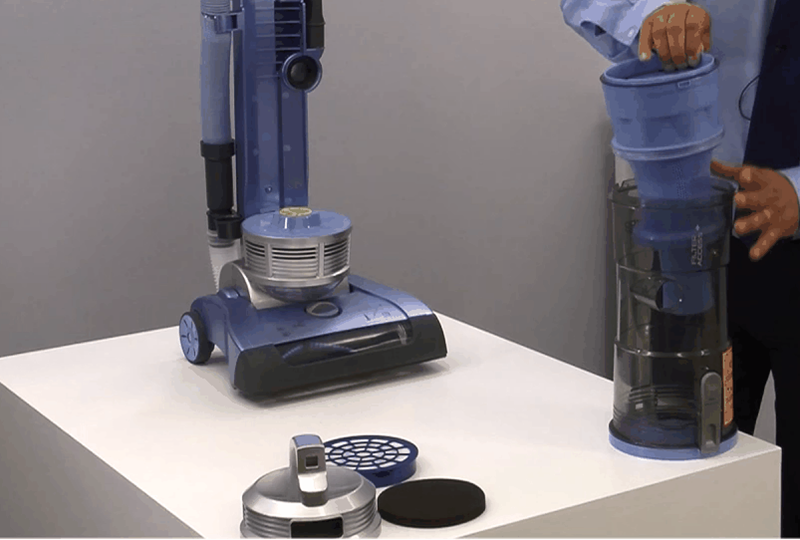
Twist the lid anti clockwise so that the arrow lines up with the open padlock. Lift the lid (with the filter attached) off. Now you can empty the contents of the dust box in your bin.
You will notice a mesh screen, twist this anti clockwise to remove it and rinse it off under a warm tap. Now twist the hepa filter anticlockwise to remove it from the lid. This filter can be dusted off with a brush and washed under warm water.
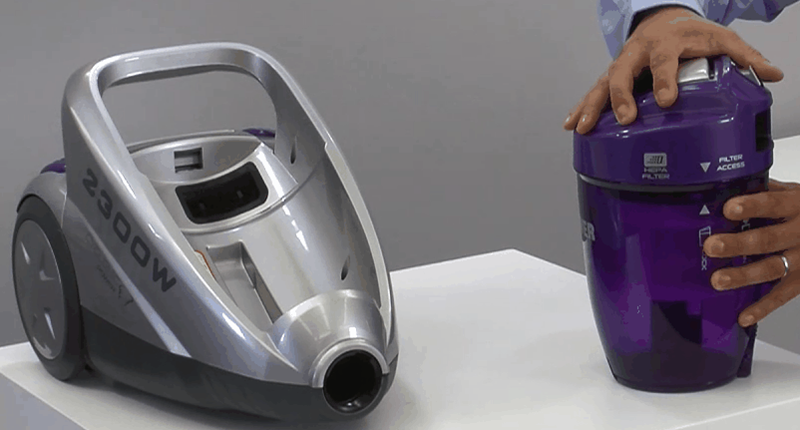
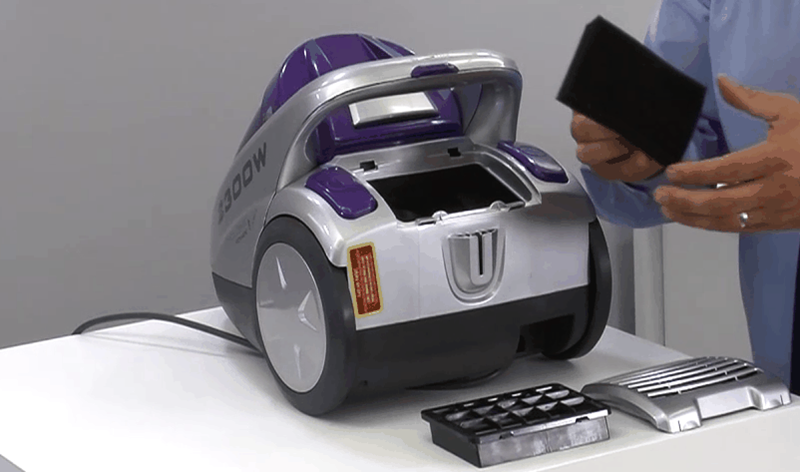
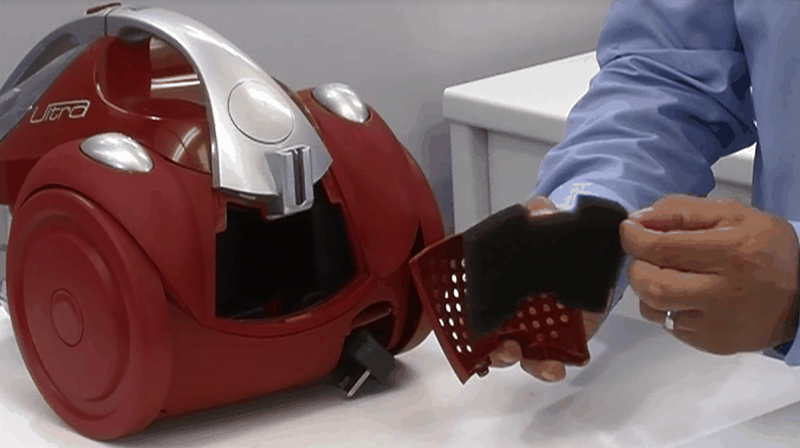
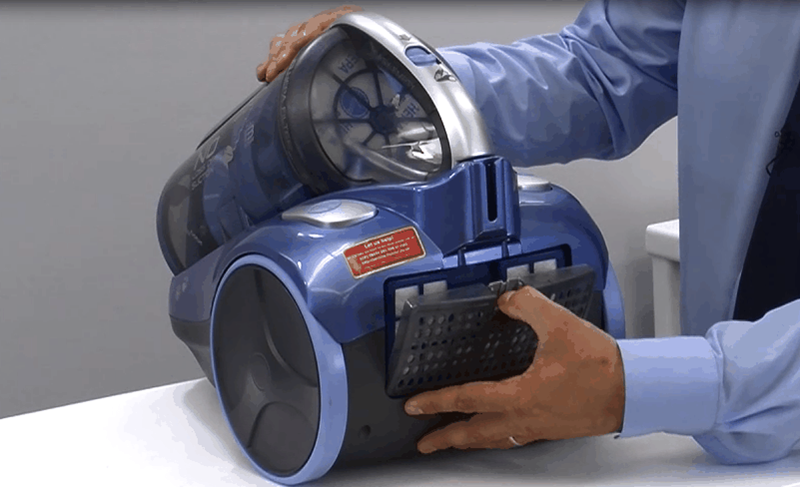
The second filter is located at the back of the cleaner between the 2 rear wheels. This is the exhaust filter simply release the cover and run under a warm tap.
Before you put everything back together make sure the filters are thoroughly dried out and this may take up to 24 hours. Filters will require regular replacement. Should you require replacement filters you can purchase them via the spares section of this website
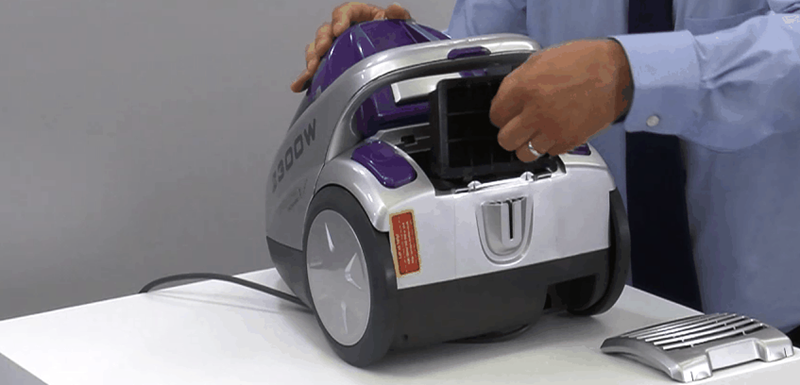
take the foam filter out of the cover and wash under warm water
This solution applies to the following models:
Vacuum Cleaners
- SX70HU01 - 39001180
- SX70HU03001 - 39001353
- SX70HU04 - 39001413
- SX70HU05 - 39001465
- SX70HU11 - 39001181
- SX70HU15001 - 39001267
- TC1192 - 39000386
- TC1201 - 39000581
- TC1202 - 39000613
- TC1203 - 39000612
- TC1206 - 39000381
- TC1208 - 39000472
- TC1209 - 39000484
- TC1210 - 39000623
- TC1211 - 39000653
- TC1212 - 39000652
- TSX2101 - 39000775
- TSX2201 - 39000804
- TSX2215 - 39000805
- TSXD2205 - 39000921
- TSXP2307 - 39001078
- TSXP2308 - 39001079
Empty the dirt container and clean the filters (1)
To get the best suction power and prevent your cleaner overheating and cutting out we recommend that you keep your filters and dust box clean. Remove the dust box from the cleaner by pressing the release catch next to the handle. Place it over your dust bin or a bin bag and open the dust release flap.
To get the best suction power and prevent your cleaner overheating and cutting out we recommend that you keep your filters and dust box clean. Remove the dust box from the cleaner by pressing the release catch next to the handle. Place it over your dust bin or a bin bag and open the dust release flap.
Inside the top of the dust box you will find a pre- motor hepa filter. Twist the lid anticlockwise to line the arrow up with the open padlock and lift the lid off
Lift the filter off and dust out or wash in warm water to get it really clean. The cyclone unit inside the dust box can be removed by pulling it out with the lifting hook and can be washed out under some warm water.
lift out the filter and foam pad - wash in warm water and allow to thoroughly dry
pull the cyclonic unit up and wash in a bucket of warm water make sure it's dry before you pop it back in
You will find the exhaust filter situated on the cleaner underneath where the dust box sits, twist the cover anti clockwise and lift the hepa filter out. Dust it off or wash under warm water. Any filters or parts of the dust box that are washed must be left for 24 hours to dry thoroughly. Filters will require regular replacement. Should you require replacement filters you can purchase them via the spares section of this website
the exhaust filter can be seen sitting inside the cleaner
lifting the exhaust filter out for cleaning
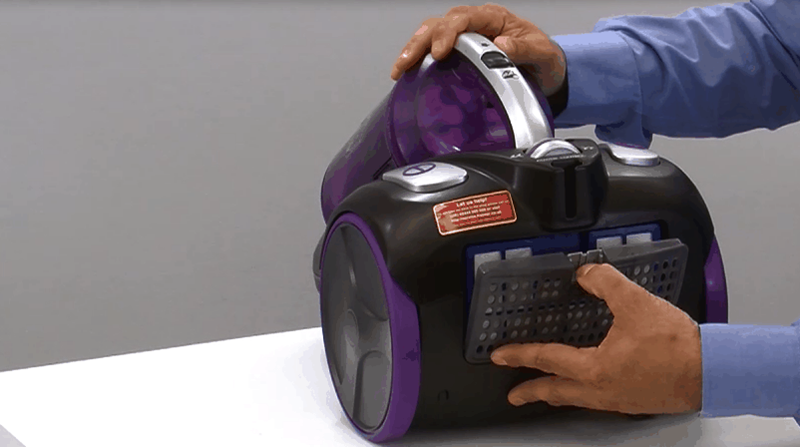
Empty the dirt container and clean the filters (2)
To keep your cleaner working efficiently with full suction power and to prevent it overheating and cutting out we recommend that the filters are regularly cleaned. There are 2 filters in your product: the hepa filter is found inside the dust box. Release the catch on the carry handle and lift the box out. Empty the contents out over your dust bin by pressing the flap release catch.
To keep your cleaner working efficiently with full suction power and to prevent it overheating and cutting out we recommend that the filters are regularly cleaned. There are 2 filters in your product: the hepa filter is found inside the dust box. Release the catch on the carry handle and lift the box out. Empty the contents out over your dust bin by pressing the flap release catch.

Now put your hand into the dust box and grasp the bottom of the filter, it’s a bit like changing a light bulb so twist anticlockwise and pull the filter down. Now you can remove the fine mesh cage by pulling it down. Wash this under a warm tap. Dust the hepa filter with a brush and run under a warm tap to remove the dust.
The second is the exhaust filter found at the back of the cleaner between the wheels. Unclip the cover take the filter out and simply wash under a warm tap. Filters will require regular replacement. Should you require replacement filters you can purchase them via the spares section of this website.
exhaust filter found at the rear of the cleaner
This solution applies to the following models:
Vacuum Cleaners
- DM6210 - 39100195
- SE71 VX04001 - 39001360
- SE71 VX05001 - 39001361
- SE71SP05 - 39001390
- SE71SZ04001 - 39001362
- SE71SZ08 - 39001414
- SE71WR01 - 39001400
- SE81RA05001 - 39001239
- SE81RA11001 - 39001240
- SE81SZ01001 - 39001170
- SE81SZ03 - 39001171
- SEA1RA02001 - 39001238
- TSB1906 - 39000742
- TSB2001 - 39000876
- TSB2005 - 39000667
- TSBE2100 - 39001090
- TSD2001 - 39001010
- TSU2001 - 39000877
- TSU2002 - 39000878
- TW1750 - 39000248
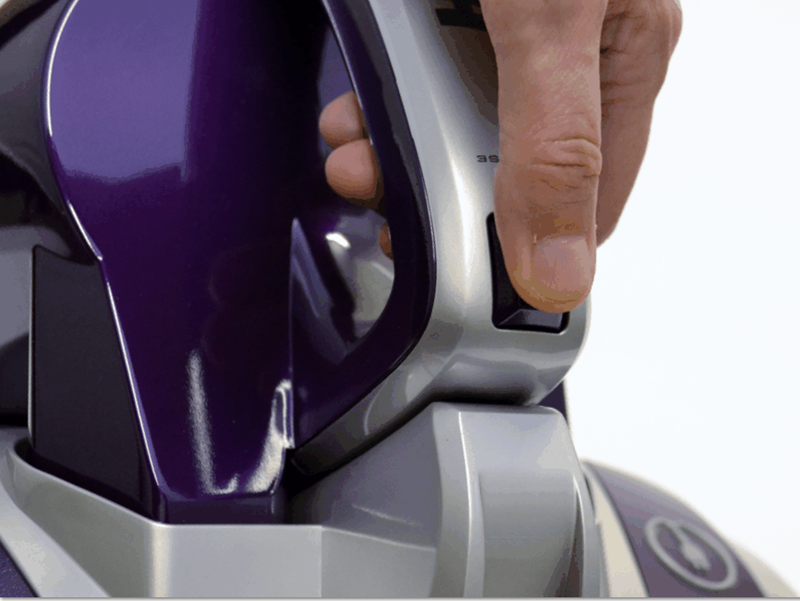
Empty the dust box
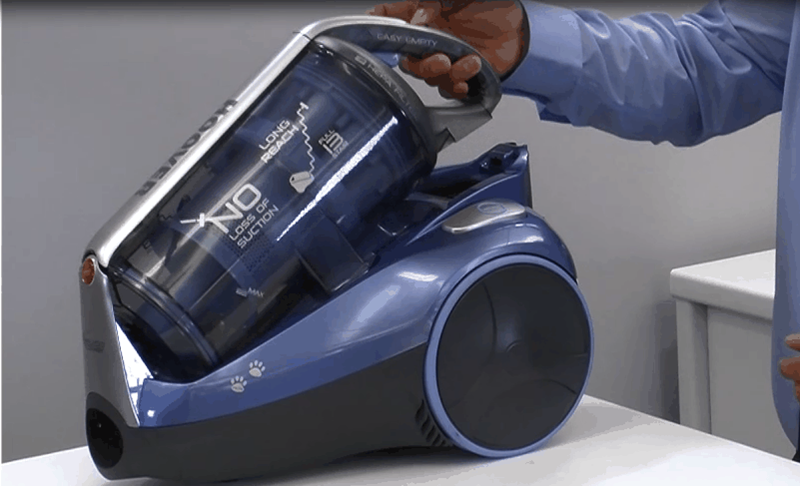
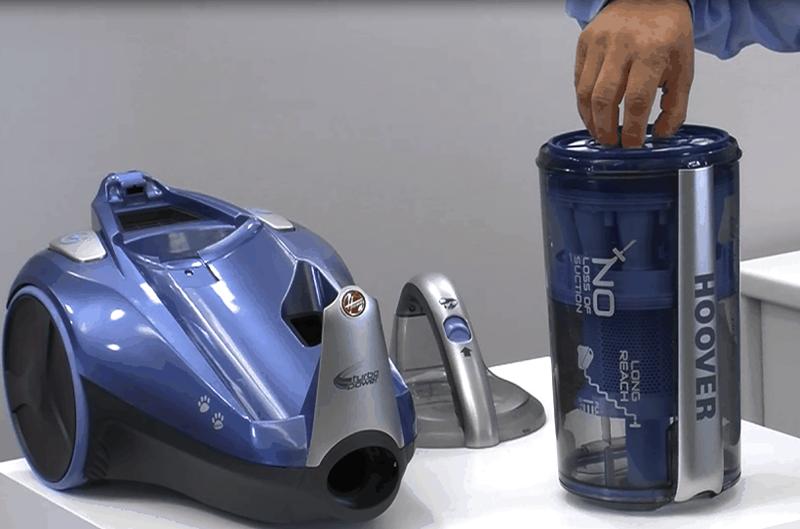
Once the dust box is 2/3 full it will need to be emptied to ensure that the cleaner works effectively. This is easily done by taking the dust box off the cleaner by lifting the carry handle.
Once the dust box is 2/3 full it will need to be emptied to ensure that the cleaner works effectively. This is easily done by taking the dust box off the cleaner by lifting the carry handle.

Place the dust box over your waste bin or a bin bag and press the release button as shown... The bin empty flap will then open - shake the bin to remove all of the dust and dirt.
This solution applies to the following models:
Vacuum Cleaners
- GL1103 - 39100292
- GL1106 - 39100293
- GL1108 - 39100360
- GL1109 - 39100294
- GL1110 - 39100349
- GL71GL01 - 39100384
- GL71GL02 - 39100385
- GL71GL02001 - 39100445
- GL71GL04001 - 39100426
- GLE900 - 39100379
Empty the dust box (2)
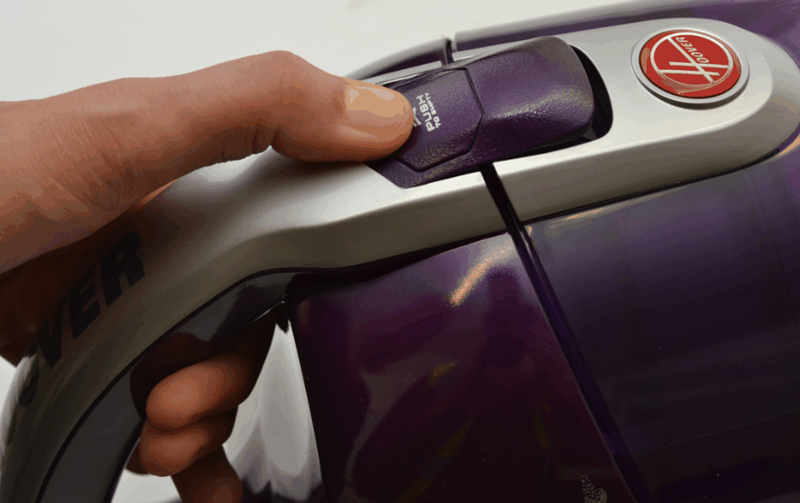
The dust box may be full. Take the cleaner to your dust bin and press the release catch as shown. The container flap will open and the collected dirt will fall into your dustbin.
The dust box may be full. Take the cleaner to your dust bin and press the release catch as shown. The container flap will open and the collected dirt will fall into your dustbin.
For best results empty the dust box when it reaches 2/3 full.
Empty the dust box (3)
Hoover recommend that the dust container is emptied when it is two thirds full. Press the bin release button found at the top of the dust container and pull the container away from the cleaner to remove it. Place it over your dustbin and open the flap at the bottom by pressing the catch as shown, allowing the dirt to empty out of the container.
Hoover recommend that the dust container is emptied when it is two thirds full. Press the bin release button found at the top of the dust container and pull the container away from the cleaner to remove it. Place it over your dustbin and open the flap at the bottom by pressing the catch as shown, allowing the dirt to empty out of the container.
Press the catch to open the container to empty out the dirt and dust.
This solution applies to the following models:
Vacuum Cleaners
- RV71RV01 - 39100471
Empty the dust box (4)
The dust box should be emptied on a regular basis, if it gets more than 2/3 full the cleaner will not pick up the dirt effectively. Start by unclipping the dust container from the cleaner by pressing down the release catch and lifting the bin off.
The dust box should be emptied on a regular basis, if it gets more than 2/3 full the cleaner will not pick up the dirt effectively. Start by unclipping the dust container from the cleaner by pressing down the release catch and lifting the bin off.
Take the dust container to your waste bin ready for emptying - Twist the lid anti clockwise to unlock and remove it, lift out the blue top filter and grey plastic screen. Now empty the contents out into your dustbin.
The filters and dust container can be washed in warm water make sure everything is dry before re assembling the dust box, this may take up to 24 hours.
This solution applies to the following models:
Vacuum Cleaners
- CH51S20 - 39001560
Empty the dust box (5)
Check that the dust container is not full, we recommend it is emptied when it is 2/3 full. Simply press the release catch found on the container handle and lift it off. Take it to your dustbin and twist the lid anti clockwise to open the container. You will then be able to lift out the filter and cyclonic unit. Empty the contents into your dustbin. The container, cyclonic unit and filters can be washed in warm water but please make sure they are thoroughly dry before you put everything back together. This may take 24 hours.
Check that the dust container is not full, we recommend it is emptied when it is 2/3 full. Simply press the release catch found on the container handle and lift it off. Take it to your dustbin and twist the lid anti clockwise to open the container. You will then be able to lift out the filter and cyclonic unit. Empty the contents into your dustbin. The container, cyclonic unit and filters can be washed in warm water but please make sure they are thoroughly dry before you put everything back together. This may take 24 hours.
This solution applies to the following models:
Vacuum Cleaners
- KS51_OP2 - 39001566
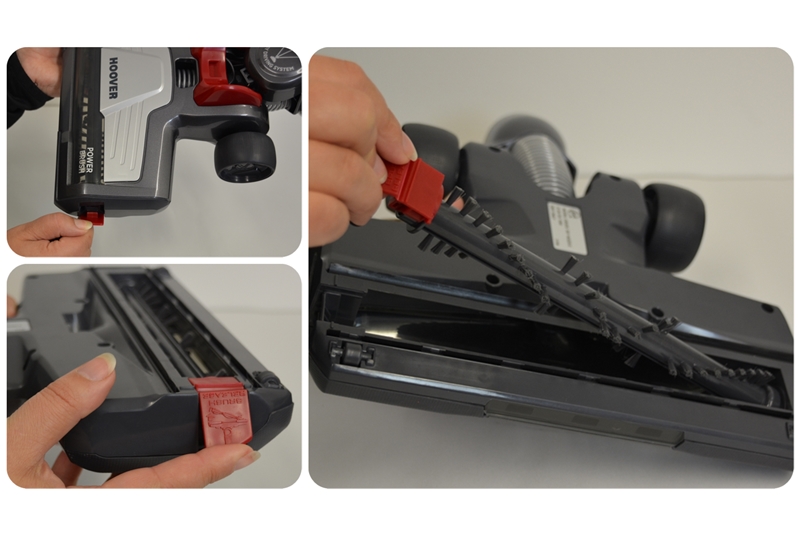
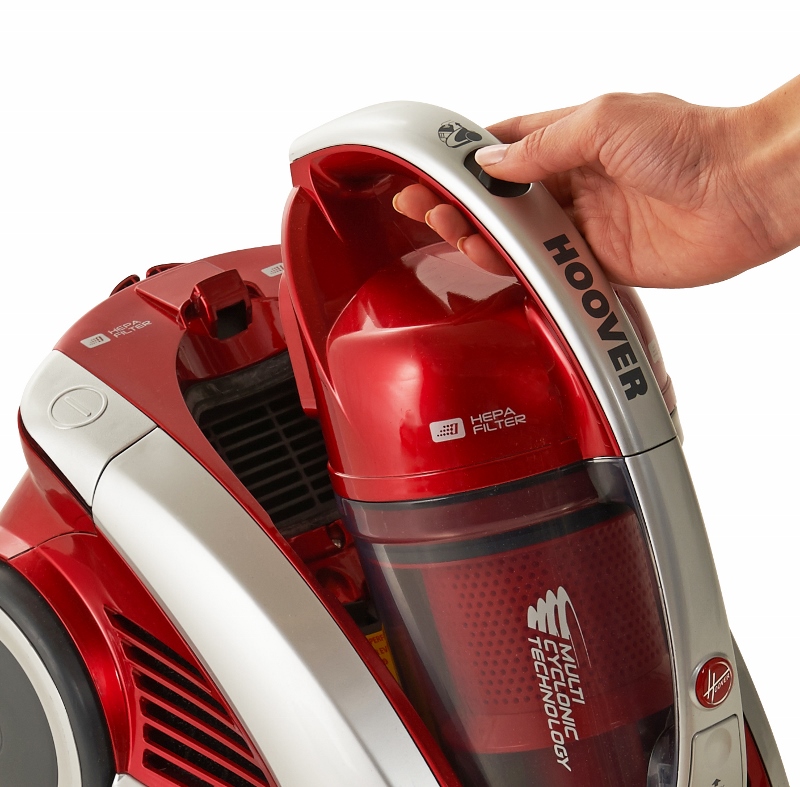
Empty the dust box and clean the filters
To maintain full suction power and your cleaner pick up effectively we recommend that you empty the dust container when it is 2/3 full. There are 2 filters on the cleaner and these should be regularly cleaned. Start by emptying the dust box, press the container release at the top of the handle as shown.
To maintain full suction power and your cleaner pick up effectively we recommend that you empty the dust container when it is 2/3 full. There are 2 filters on the cleaner and these should be regularly cleaned. Start by emptying the dust box, press the container release at the top of the handle as shown.
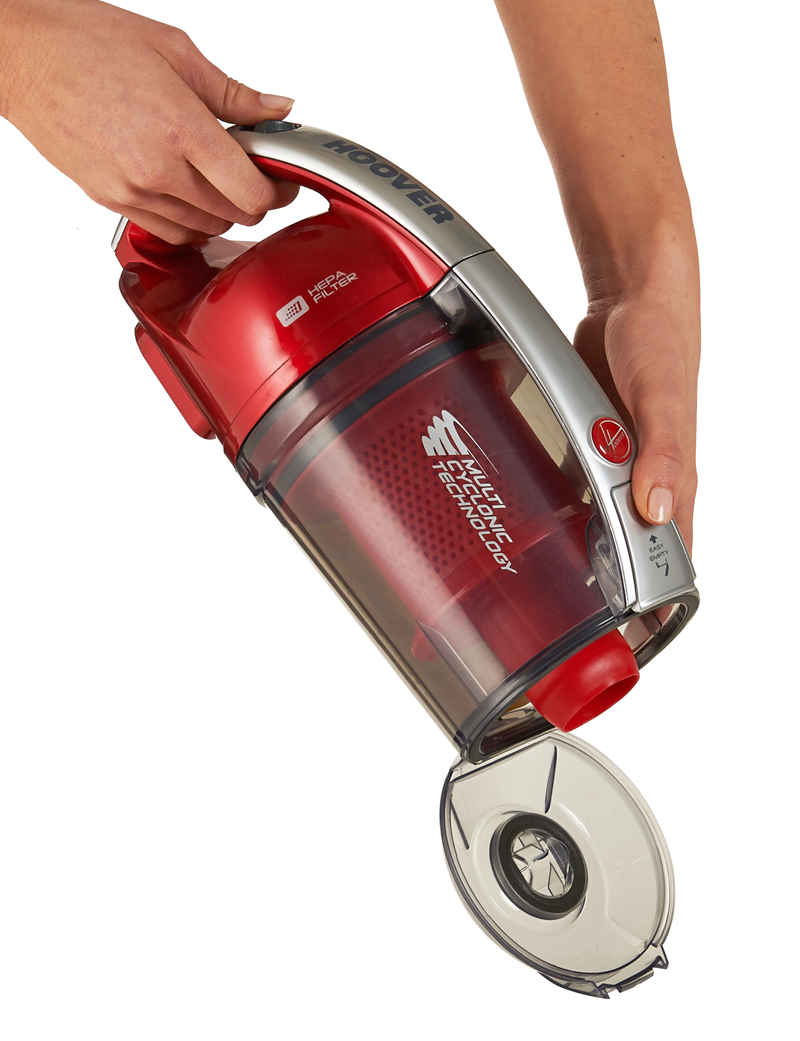
Take the container to your dustbin or a bin bag and press the release trigger to open the flap, shake the container to release all of the dirt.
Twist the top off the container to remove the hepa filter and foam pad. Dust the filters but for best results we recommend you wash them in warm water. Please make sure they are thoroughly dry before re fitting, this can take up to 24 hours. We also recommend that you replace the filters at least once per year and you can purchase new ones from the spares section of our website.
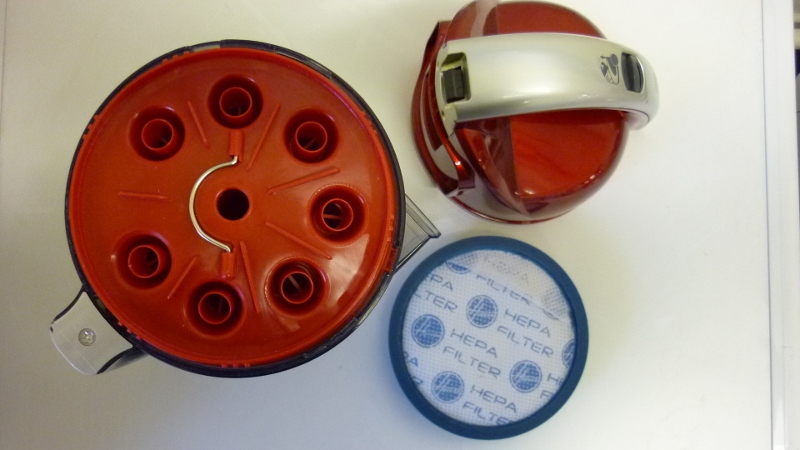
The cyclonic unit can be lifted out of the container as shown and cleaned by immersing in warm water along with the container. Make sure everything is dry before re assembling.
The second filter is found at the back of the cleaner as shown.
Peel the filter out of the cleaner and wash in warm water.
White exhaust filter removed ready for cleaning
This solution applies to the following models:
Vacuum Cleaners
- RE71TP03001 - 39001354
- RE71TP04001 - 39001355
- RE71TP20 - 39001184
- RE71TP25001 - 39001273
- RE71VE20 - 39001186
- RE71VE25001 - 39001274
- RU80TP11 - 39001194
- TJA1410 - 39000957
- TJA1440 - 39001042
- TJG1100 - 39001094
- TTG1100 - 39001095
- TTU1450 - 39001027
- TTU1460 - 39001076
- TTU1510 - 39000826
- TTU1520 - 39000827
Empty the dust container
We recommend you empty your duct container when it gets to 2/3 full. Simply press the release catch found at the top of the dust box and lift the container off.
We recommend you empty your duct container when it gets to 2/3 full. Simply press the release catch found at the top of the dust box and lift the container off.

Take the container to your dustbin or place over a bin bag and press the bin empty release to open the flap at the bottom of the container. Shake the container to loosen up the dirt so that it falls out.
press the release button on the top of the dust box to open the flap and let the dust out
Empty the dust container (1)
To get the best suction and pick up from your cleaner it is important to empty the dust box when it reaches 2/3 full. Simply remove from the cleaner by pressing the container release button as shown
To get the best suction and pick up from your cleaner it is important to empty the dust box when it reaches 2/3 full. Simply remove from the cleaner by pressing the container release button as shown
Take the dust container and place it over your dust bin or a bin bag and press the release button to open the flap and allow the dust to empty out. Shake the container to remove all of the collected dirt.

press the red release button to open the flap
This solution applies to the following models:
Vacuum Cleaners
- DM6210 - 39100195
- SE71SP05 - 39001390
- SE81RA05001 - 39001239
- SE81RA11001 - 39001240
- SE81SZ01001 - 39001170
- SE81SZ03 - 39001171
- SEA1RA02001 - 39001238
- TSB1906 - 39000742
- TSB2001 - 39000876
- TSB2005 - 39000667
- TSBE2100 - 39001090
- TSD2001 - 39001010
- TSU2001 - 39000877
- TSU2002 - 39000878
- TW1750 - 39000248
Empty the dust container (2)
Start by taking the dust container off the cleaner by lifting the release catch to remove the container.
Start by taking the dust container off the cleaner by lifting the release catch to remove the container.
Take the container to your dust bin.
Look closely at the lid of the container to find the padlock symbol. Twist the lid anti- clockwise until the 'open padlock' icon is in line with the arrow. The lid will now lift off.
Remove the filters and the cone found inside the container, this is best done with the dust container placed over your waste bin. Now tip the contents of the dust container into your waste bin. Give the filters a good clean, they can be brushed or washed in warm water. If they are washed please allow them to dry thoroughly before you pop them back in.
When you are refitting the inner cone back inside the dust container note that it has a locking plastic tab that sits in a slot in the bin above the word ' filter access'. Please ensure this is fitted into the slot other wise the container lid will not go back on.
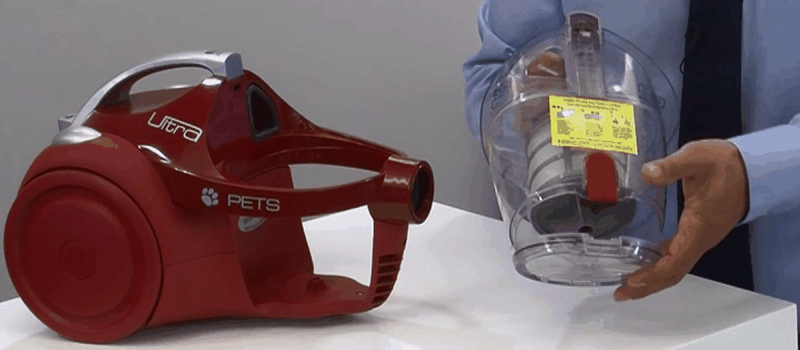
Empty the dust container (3)
Unclip the dust container and place it over your dust bin. Press the release to empty out the contents. The dust container and separator unit inside can be washed in warm water. Please ensure it has dried out thoroughly before re fitting. Doing this on a regular basis will keep the vacuum cleaner working well and with a good suction power.
Unclip the dust container and place it over your dust bin. Press the release to empty out the contents. The dust container and separator unit inside can be washed in warm water. Please ensure it has dried out thoroughly before re fitting. Doing this on a regular basis will keep the vacuum cleaner working well and with a good suction power.
Empty the dust container (4)
We recommend that you empty the dust container once it is 2/3 full. Disconnect the extension tube and position the body of the product over your dust bin. Simply press the catch to release the flap and all of the debris will fall out.
We recommend that you empty the dust container once it is 2/3 full. Disconnect the extension tube and position the body of the product over your dust bin. Simply press the catch to release the flap and all of the debris will fall out.
Press the catch as shown to empty the container
Empty the dust container (5)
We recommend that the dust container is emptied regularly or if it appears to be more than 2/3 full. Press the release catch at the rear of the cleaner and take the container to your dustbin and empty the contents.
We recommend that the dust container is emptied regularly or if it appears to be more than 2/3 full. Press the release catch at the rear of the cleaner and take the container to your dustbin and empty the contents.
The top may be detached and the central filter cone and dust box can be washed in warm water. Washing the filter cone regularly keeps your cleaner working efficiently but please make sure everything has dried thoroughly before you pop it all back together.
shown above (left) filter cone and the dust container
Empty the dust container and clean the filters
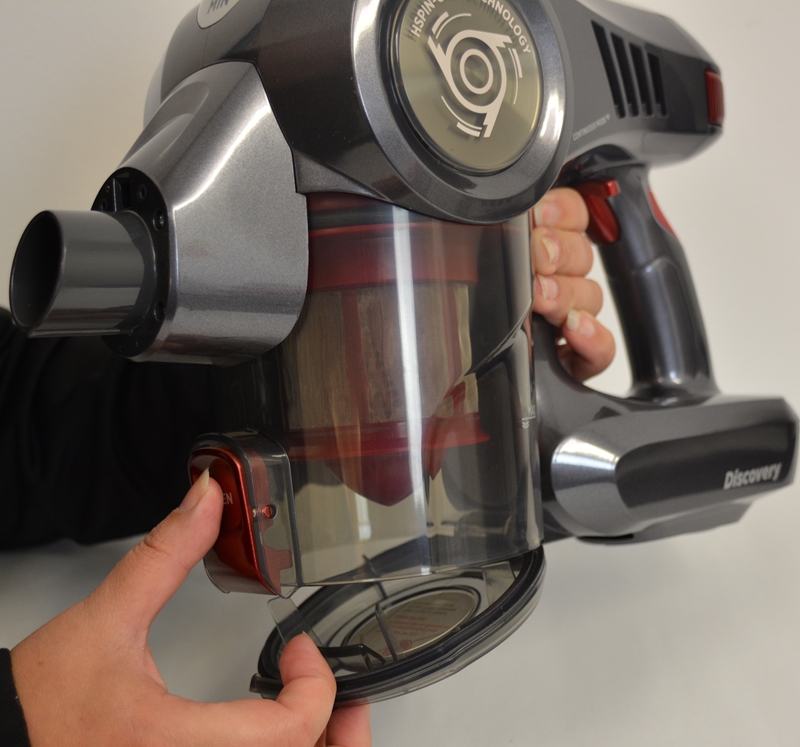
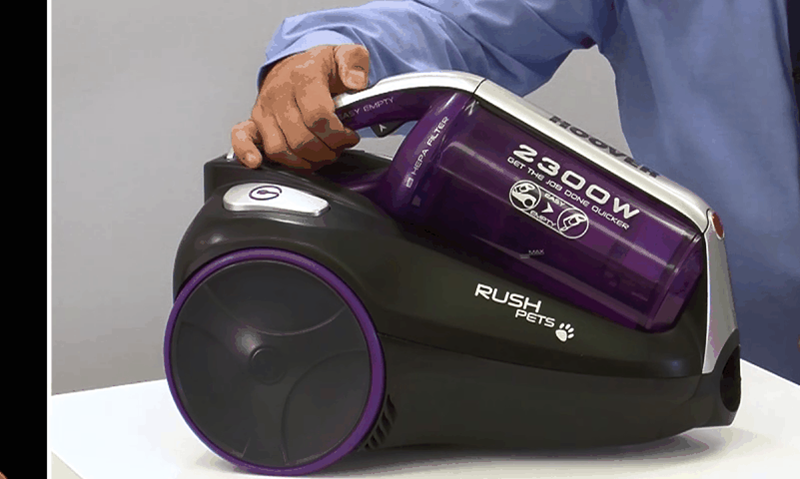
To keep your Curve vacuum in good working order and to prevent it from overheating and cutting out we recommend you regularly clean your filters and dust box. There are 2 filters on the product firstly take the dust container off by releasing the clip on the carry handle. Place the container over your dust bin and press the ‘easy empty’ button to release the flap to empty the contents of the dust box
To keep your Curve vacuum in good working order and to prevent it from overheating and cutting out we recommend you regularly clean your filters and dust box. There are 2 filters on the product firstly take the dust container off by releasing the clip on the carry handle. Place the container over your dust bin and press the ‘easy empty’ button to release the flap to empty the contents of the dust box
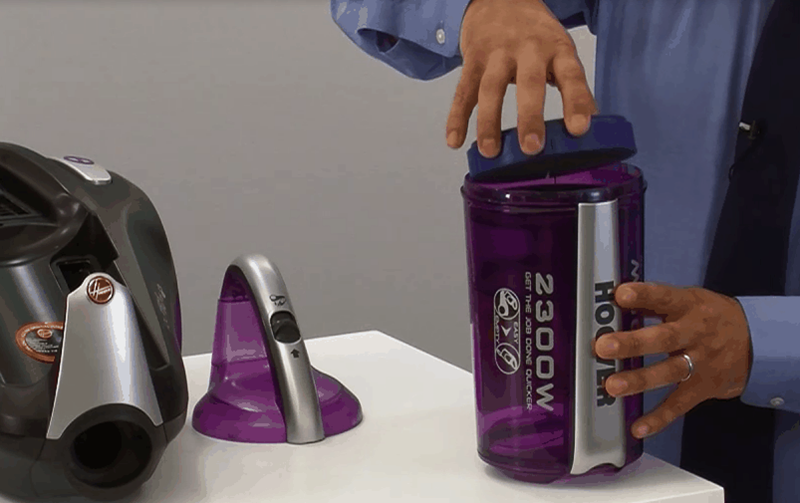
Now twist the lid of the dust box anti clockwise to line the arrow up with the open padlock icon (pic) Remove the hepa filter and wash in warm water. The inside unit may also be removed by pulling it up with the silver hook once removed wash in warm water (pic)
The second filter can be found under a cover situated under where the dust box fits:Lift the cover off and wash this filter in warm water.
Please don’t use any detergent to wash the filters and dry out thoroughly before putting them back together this usually takes 24 hours. Filters will require regular replacement. Should you require replacement filters you can purchase them via the spares section of this website.
This solution applies to the following models:
Vacuum Cleaners
- CU81CU11001 - 39001178
- CU81CU15001 - 39001271
- CU81CU20 - 39001179
- TCU1410 - 39000956
Empty the dust container and clean the filters (1)
To get the best suction power from your cleaner you should regularly empty the dust container and clean all of the filters on your product. Remove and dust the filters out then wash them in warm water for the best results, make sure they are thoroughly dry before refitting them into the cleaner. Filters will require regular replacement. Should you require replacement filters you can purchase them via the spares section of this website.
To get the best suction power from your cleaner you should regularly empty the dust container and clean all of the filters on your product. Remove and dust the filters out then wash them in warm water for the best results, make sure they are thoroughly dry before refitting them into the cleaner. Filters will require regular replacement. Should you require replacement filters you can purchase them via the spares section of this website.
empty the dust box and clean the heap filter as shown here
remove the blue pre motor filter and wash in warm water
the exhaust filter is found at the back remove and wash in warm water ... allow 24 hours for all filters to dry before you re fit them
This solution applies to the following models:
Vacuum Cleaners
- DM4468 - 39100131
- DM4476 - 39100140
- DM4484 - 39100134
- DM4485 - 39100132
- DM4494 - 39100133
- DM4496 - 39100102
- DM4499 - 39100130
- DM4523 - 39100080
- DM4525 - 39100119
- DM5226 - 39100313
- DM5226/1 - 39100350
- DM5524 - 39100127
- DM5530/1 - 39100124
- DM6163 - 39100159
- DM6173 - 39100160
- DM6185T - 39100161
- DM6197T/1 - 39100181
- DM6200 - 39100197
- DM6207T - 39100158
- DM6210 - 39100195
- DM6211 - 39100213
- DM6212 - 39100219
- DM6213 - 39100222
- DM6214 - 39100227
- DM6215 - 39100183
- DM6216 - 39100229
- DM6220 - 39100340
- DM6222 - 39100218
- DM6223 - 39100221
- DM6225 - 39100262
- DM6226 - 39100260
- DM6227 - 39100176
- DM6229 - 39100191
- DM6300 - 39100378
- DM71DM02 - 39100388
- DM71DM03001 - 39100432
- DML5224 - 39100268
- DML5227 - 39100261
- TC4210 - 39000385
- TC5213 - 39000418
- TC5223 - 39000329
- TC5232 - 39000347
- TC5235 - 39000708
- TC5238 - 39000358
Empty the dust container and clean the filters (2)
To keep your cleaner working effectively and producing the best possible suction it is important to regularly empty the dust container and keep the filters clean. To empty the container start by removing the dust container by pressing the release button on top of the product as shown.
To keep your cleaner working effectively and producing the best possible suction it is important to regularly empty the dust container and keep the filters clean. To empty the container start by removing the dust container by pressing the release button on top of the product as shown.
To open the box so that it can be emptied and to also clean the hepa filter twist the lid until the 2 arrows line up, then the lid will come off.
Tip the contents of the container into your dust bin or a bin bag. You can wash the bin with warm soapy water making sure it is thoroughly dry before re assembling onto the cleaner. Twist the filter to remove it from the lid. Pull off the mesh screen and dust the mesh and filter with a brush. Hepa filters trap microscopic dust particles and the best way to clean the filter is to wash it in warm water. Make sure it is dry before re assembly, we recommend that you replace the filters once per year and new ones can be purchased from the spares pages on our website. It is a good idea to have a spare one to use in the cleaner when you are waiting for things to dry!
The last thing to check is the exhaust filter, found at the back of the cleaner where the warm air escapes. Start by unclipping the cover as shown
Now peel the filter out and wash in warm water. Make sure it is thoroughly dry before you pop it back in!
Re assemble the product and try again. We do recommend that you replace the filters regularly so if washing them does not improve the cleaners performance it may be a good idea to purchase some new ones. Why not place an order from our spares site?
This solution applies to the following models:
Vacuum Cleaners
- LA71SM10 - 39001524
- LA71SM20 - 39001525
- SP71_BL06001 - 39001409
- SP71BL04001 - 39001358
- SP71BL05001 - 39001359
- SP81BL03 - 39001176
- SP81BL11 - 39001177
- SP81SM02 - 39001236
- SP81SM11 - 39001237
- SP81SP01001 - 39001246
- TC1182 - 39000342
- TC1183 - 39000473
- TC1184 - 39000424
- TC1185 - 39000527
- TC1188 - 39000756
- TC1191 - 39000463
- TC1192 - 39000386
- TC1201 - 39000581
- TC1202 - 39000613
- TC1203 - 39000612
- TC1206 - 39000381
- TC1208 - 39000472
- TC1209 - 39000484
- TC1210 - 39000623
- TC1211 - 39000653
- TC1212 - 39000652
- TCW1610 - 39000787
- TCW2006 - 39000786
- TSM1805 - 39000952
- TSM2005 - 39000951
- TSM2110 - 39000955
- TSP2000+SP48D/1 - 39000903
- TSP2002+S40D - 39000922
- TSP2004 - 39000818
- TSP2005 - 39000808
- TSP2006 - 39000823
- TSP2101 - 39000963
- TSP2210 - 39001083
Empty the dust container and clean the filters (3)
To keep your cleaner working effectively and giving the best possible suction we recommend that the duct container is emptied when it is 2/3 full and the filters are kept clean. To empty the dust box start by removing it from the cleaner by pressing the release trigger on top of the handle.
To keep your cleaner working effectively and giving the best possible suction we recommend that the duct container is emptied when it is 2/3 full and the filters are kept clean. To empty the dust box start by removing it from the cleaner by pressing the release trigger on top of the handle.
Take the container to your dust bin or a bin bag, pull the release trigger to open the flap at the bottom and shake to remove all of the collected dirt. There are 2 filters found in the dust box, twist the lid to open it and remove the hepa filter and foam pad found in the top. Dust both filters to remove dust and for best results wash in warm water. Please make sure they have thoroughly dried before popping them back in, this can take up to 24 hours. We recommend that you replace the hepa filter once per year and you can purchase new ones from the spares page on our web site.
Also inside the container you will find the black cyclonic unit make sure this is not clogged, it along with the whole dust container can be washed in warm water.
Left to right: Hepa filter, cyclonic unit and the dust container
The re is also a filter found at the rear of the cleaner where the warm air escapes. Unclip the filter cover as shown.
Dust the filter with a brush or for best results wash in warm water, making sure it is fully dry before popping back.
This solution applies to the following models:
Vacuum Cleaners
- RU70RU15001 - 39001352
- RU70RU16 - 39001402
- RU70RU17 - 39001466
- RU80TP15001 - 39001266
- RU80VE11 - 39001195
- RU80VE15001 - 39001265
- TCR4213 - 39000616
- TCR4224 - 39000772
- TCR4230 - 39000985
- TCR4233 - 39000556
- TCR4234 - 39000649
- TCR4237 - 39000771
- TCR4239 - 39000938
- TCR4240 - 39001080
Empty the dust container and clean the filters (4)
The dust container will need to be emptied regularly to keep your whirlwind cleaner working effectively. There is also a filter inside the container that should be cleaned regularly. Start by removing the dust container from the cleaner. Press the release button as shown and lift it off.
The dust container will need to be emptied regularly to keep your whirlwind cleaner working effectively. There is also a filter inside the container that should be cleaned regularly. Start by removing the dust container from the cleaner. Press the release button as shown and lift it off.
Now press the lid release to open up the dust container. Remove the blue hepa filter and foam pad. To clean simply dust with a brush, or wash in warm water if it is really dark coloured. Make sure that it is allowed to dry thoroughly before re fitting to the container. We recommend that you replace the filter once per year with a new one which can be purchased from the spares section of this website.
To empty the dust container remove the red cone and grey cyclonic unit and simply tip the contents in the bottom of the container out into your dust bin. All these parts may be washed in warm water to help clean them but please make sure everything is dry before putting it all back together.
with the cyclonic unit removed the container can be emptied out into a dustbin
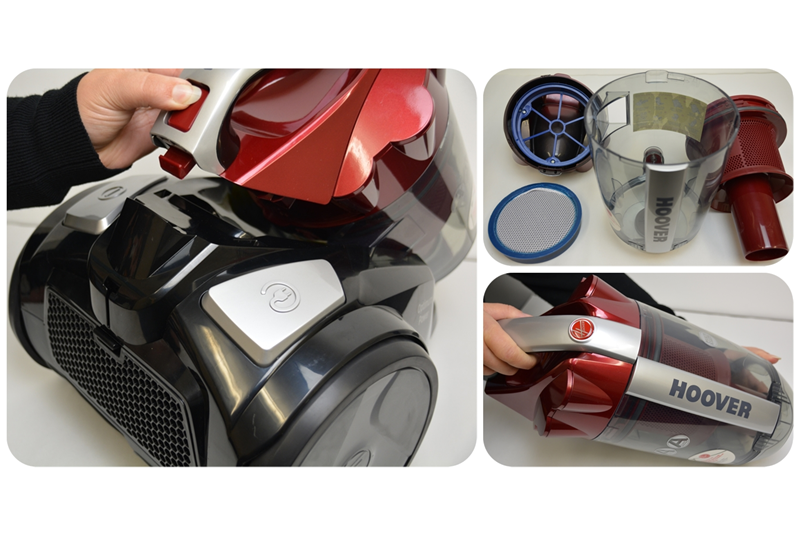
Empty the dustbox and clean the filter
Remove the hand held part of the cleaner and release the dust box by pressing the button on the handle. Empty the contents of the duct container in your dustbin. Brush the fibre filter to remove dust. For best results wash the filter and the dust container in warm water and allow to dry thoroughly before re fitting to the product..
Remove the hand held part of the cleaner and release the dust box by pressing the button on the handle. Empty the contents of the duct container in your dustbin. Brush the fibre filter to remove dust. For best results wash the filter and the dust container in warm water and allow to dry thoroughly before re fitting to the product..
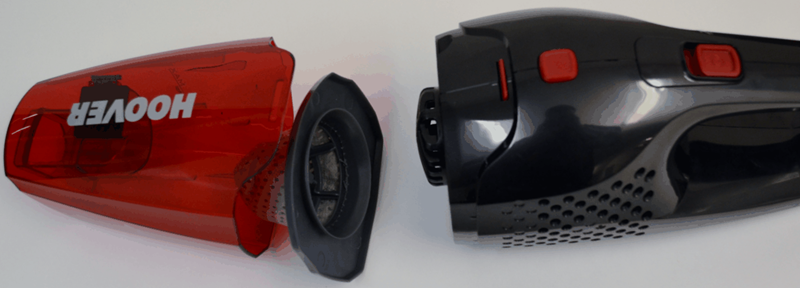
Grey cloth filter in the centre with dust box on the left
Empty the dustbox and clean the filters
If the suction power seems to be reduced and the product is not picking up it may be because the filters in the cleaner need to be cleaned. There are two filters in the product one at the top of the dust box and one that is fitted underneath the dust box. Start by pressing down the dust container release button found at the top next to the carry handle as shown:
If the suction power seems to be reduced and the product is not picking up it may be because the filters in the cleaner need to be cleaned. There are two filters in the product one at the top of the dust box and one that is fitted underneath the dust box. Start by pressing down the dust container release button found at the top next to the carry handle as shown:
Take the dust container to your dustbin, hold it over the bin and press the container empty button at the bottom and the flap will open shake to remove all the debris.
Twist the lid to release it, lift out the filter and the dust cone.
left to right dust cone, dust container, filter and lid
Wash all the components in warm water - please make sure that they are thoroughly dry before popping it all back together. Hoover recommend that you replace the filter once per year and these can be purchased from the spares section of our website.
With the dust container removed it is possible to get to the exhaust filter, twist the cover off.
Twist the blue filter frame out. This filter can be washed in warm water and left to dry thoroughly before its fitted back in. We recommend that the filters are replaced once per year - they can be purchased from the spares section of our website.
Fit a new bag and clean the filters
To keep your cleaner working effectively and with the best suction power the bag should be replaced when 2/3 full and the filters kept clean. To replace the bag first open the bag door by pressing the release catch as shown.
To keep your cleaner working effectively and with the best suction power the bag should be replaced when 2/3 full and the filters kept clean. To replace the bag first open the bag door by pressing the release catch as shown.

Lift out the bag and throw it away
There is also a filter to be found behind the bag. Take it off and dust it out. Hepa filters trap microscopic dust particles and for best results wash the filter in warm water. Be sure to let the filter dry thoroughly before re fitting back into the cleaner. We recommend that you replace the filters once per year and you can buy fresh filters and bags from the spares pages on our website.
Wash this filter in warm water
This solution applies to the following models:
Vacuum Cleaners
- AC73SE20001 - 39001364
- TGP1410 - 39000794
- TPP2310 - 39000531
- TPP2311 - 39000720
- TSE0100 - 39000614
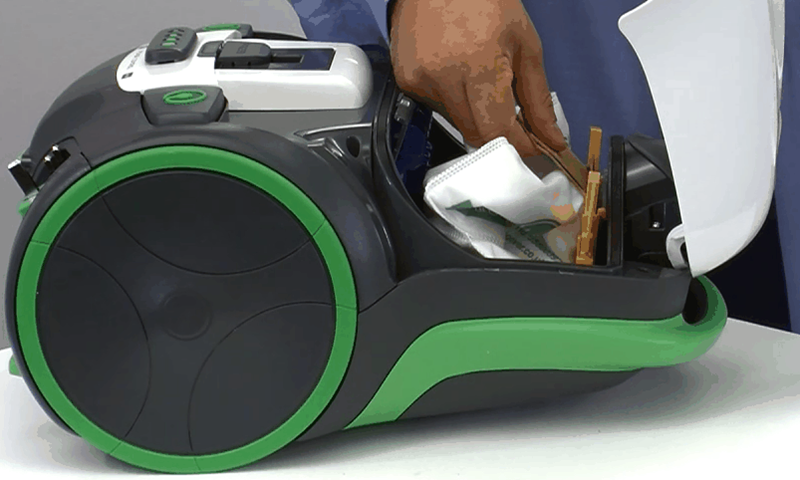
Fit a new paper bag and clean the filters
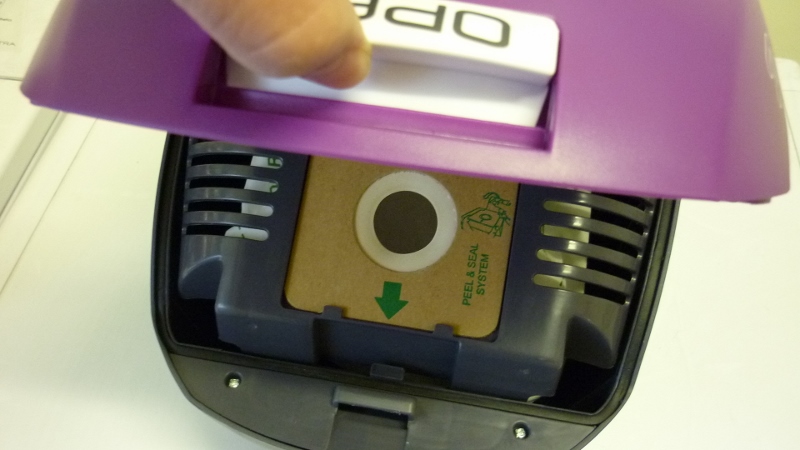
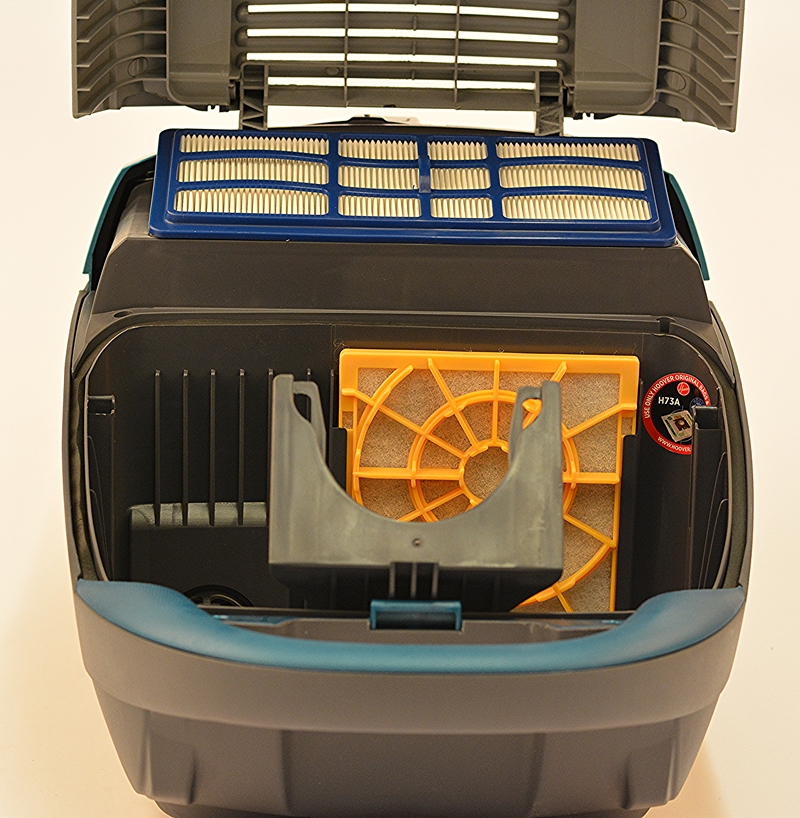
To keep your cleaner working efficiently and give maximum suction power we recommend you regularly clean the filters. This will also prevent it from overheating or cutting out. There are 2 filters on your product, the first one is found behind the bag. Open the dust box by pressing the catch at the centre of the bag cover and take out the bag. If your bag is more than 2/3 full it’s a good idea to throw it away and pop a new one in.
To keep your cleaner working efficiently and give maximum suction power we recommend you regularly clean the filters. This will also prevent it from overheating or cutting out. There are 2 filters on your product, the first one is found behind the bag. Open the dust box by pressing the catch at the centre of the bag cover and take out the bag. If your bag is more than 2/3 full it’s a good idea to throw it away and pop a new one in.
lift out the bag carrier and replace the bag. Please do not try to empty it
Behind the bag is the pre motor filter (yellow in colour) which can be slid upwards to remove it for cleaning. Dust it out with a brush but for best results wash in warm water to remove microscopic dust particles. Make sure it is thoroughly dry before re fitting. We recommend that you replace the filter once a year to get the very best suction and dirt pick up. Replacements can be purchased on our spares pages found on this website.

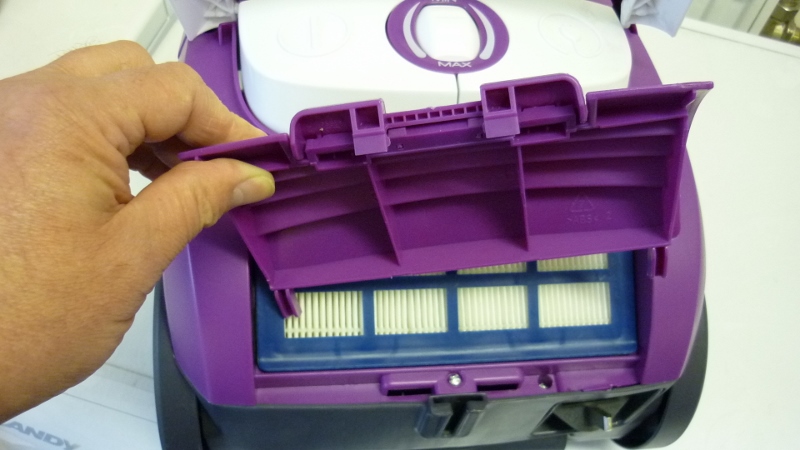
The second filter is found at the top of the cleaner next to the control switches. This is the exhaust filter - this is where the warm air escapes from the cleaner and should be removed and washed in warm water to keep the cleaner working efficiently. Please make sure it is dried thoroughly before popping it back in.
exhaust filter cover removed - lift the filter up for cleaning
Always use genuine Hoover bags ... please view our helpful video for more information.
This solution applies to the following models:
Vacuum Cleaners
- AT70ID40 - 39001187
- TE70_EN26001 - 39001416
- TE70EN20 - 39001190
- TE70EN21 - 39001463
- TE70EN21001 - 39001357
- TE70EN25001 - 39001268
- TE70ID30001 - 39001189
- TE70TE11 - 39001191
- TE70TE12 - 39001418
- TEN2400 - 39001082
- TP6206 - 39000373
- TP6220 - 39000538
- TTE2203 - 39000990
- TTE2304 - 39000969
Fit a new paper bag and clean the filters (1)
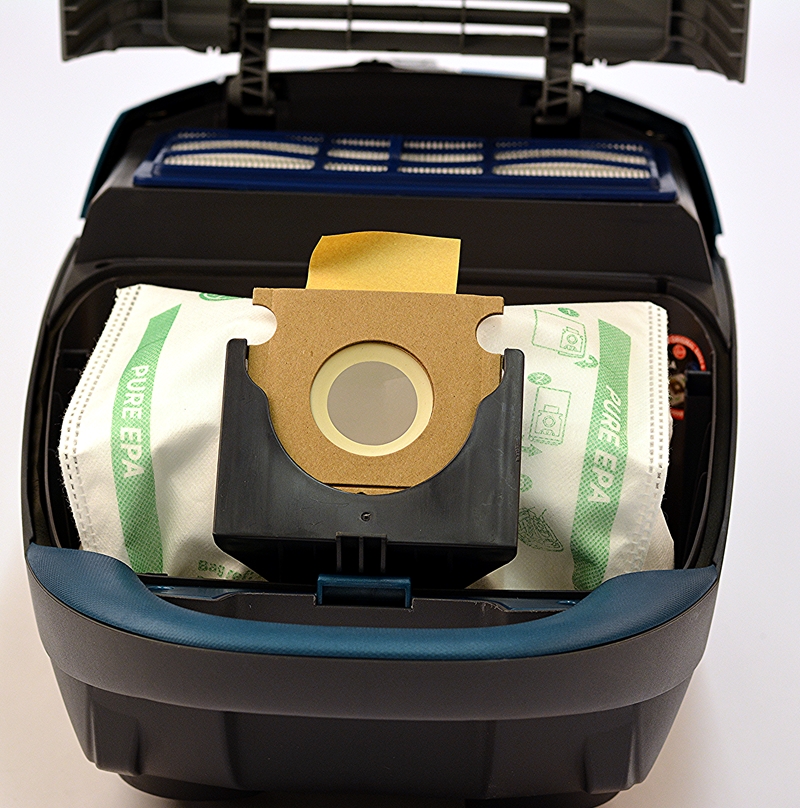
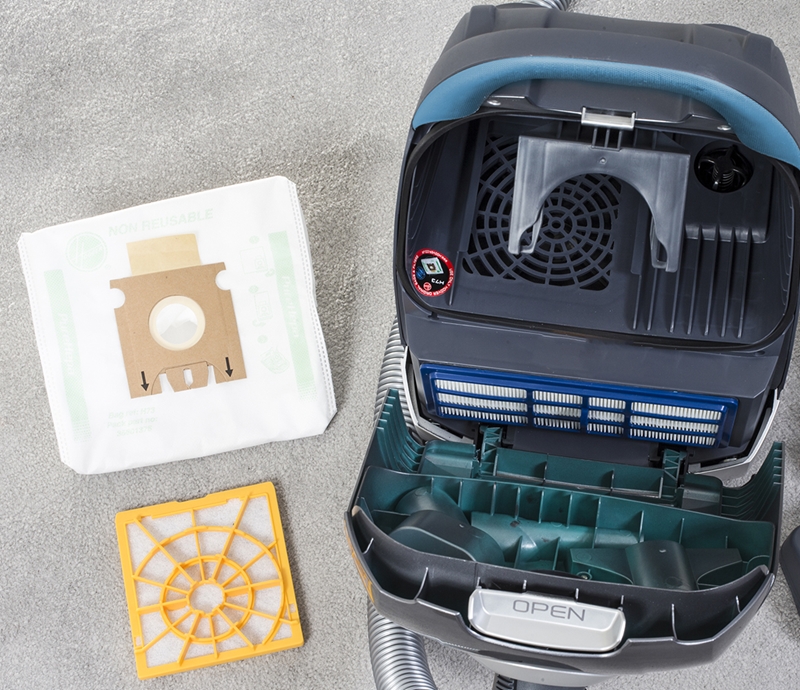
To keep your cleaner working efficiently and give maximum suction power we recommend you regularly clean the filter. Keeping things clean will also help to prevent it from overheating or cutting out. The pre motor is found behind the bag. Open the dust box by pressing the catch at the front of the bag lid and take out the paper bag. If your bag is more than 2/3 full it’s a good idea to throw it away and pop a new one in. Now pull the filter up to get it out of the rear of the bag compartment. You can clean this filter by using a brush to free it from dust and then wash it in warm water. Allow the filter to dry thoroughly before re fitting.
To keep your cleaner working efficiently and give maximum suction power we recommend you regularly clean the filter. Keeping things clean will also help to prevent it from overheating or cutting out. The pre motor is found behind the bag. Open the dust box by pressing the catch at the front of the bag lid and take out the paper bag. If your bag is more than 2/3 full it’s a good idea to throw it away and pop a new one in. Now pull the filter up to get it out of the rear of the bag compartment. You can clean this filter by using a brush to free it from dust and then wash it in warm water. Allow the filter to dry thoroughly before re fitting.
Please don’t use any detergent to clean your filters. Filters and paper bags will require regular replacement. Should you require replacement filters you can purchase them via the spares section of this website.
Fit a new paper bag and clean the filters (2)
To keep your cleaner working efficiently and give maximum suction power we recommend you regularly clean the filters. Keeping things clean can prevent the cleaner from overheating or cutting out. There are 2 filters on your product, the first one is found behind the paper bag. Open the dust box by pressing the catch at the front and take out the paper bag. If your bag is more than 2/3 full it’s a good idea to throw it away and pop a new one in. Now slide the yellow filter up to get it out of the rear of the bag compartment. You can clean this filter by using a brush to free it from dust and then wash it in warm water.
To keep your cleaner working efficiently and give maximum suction power we recommend you regularly clean the filters. Keeping things clean can prevent the cleaner from overheating or cutting out. There are 2 filters on your product, the first one is found behind the paper bag. Open the dust box by pressing the catch at the front and take out the paper bag. If your bag is more than 2/3 full it’s a good idea to throw it away and pop a new one in. Now slide the yellow filter up to get it out of the rear of the bag compartment. You can clean this filter by using a brush to free it from dust and then wash it in warm water.
The second filter is found at the back of the cleaner between the wheels, lift the cover up and take the filter out. Dust off any debris or wash in warm water.
Please don’t use any detergent to clean your filters.Filters and paper bags will require regular replacement. Should you require replacement filters you can purchase them via the spares section of this website.
Exhaust filter
Replace the bag and clean both filters
We recommend that when the bag is 2/3 full then it should be replaced. Also check that the filters are clean.Both the blue hepa and yellow filter can be cleaned by dusting them with a soft brush. For best results wash the filters in warm water but please make sure they have dried thoroughly before re fitting them. The bag is not re useable and new bags can be purchase from the spares section of this website.
We recommend that when the bag is 2/3 full then it should be replaced. Also check that the filters are clean.Both the blue hepa and yellow filter can be cleaned by dusting them with a soft brush. For best results wash the filters in warm water but please make sure they have dried thoroughly before re fitting them. The bag is not re useable and new bags can be purchase from the spares section of this website.
Hoover recommend that the filters are replaced once per year - doing so will increase the pick up power of the vacuum cleaner.
replace the bag (shown above) and clean both the yellow pre motor filter and blue exhaust filter shown below
This solution applies to the following models:
Vacuum Cleaners
- ATC18LI - 39001570
Replace the bag and clean the filter
If the suction power is not good then replace the paper bag and clean the filter. Start by opening the bag door.
If the suction power is not good then replace the paper bag and clean the filter. Start by opening the bag door.
pull the catch back and lift off the lid
Push the bag locking catch down

then lift the bag out
push down on the filter clip, remove the filter for cleaning. For best results fit a new bag and wash the filter under warm water. Be sure to allow the filter to dry thoroughly before you pop it back in.
Replacement bags and filters can be purchased from the spares section of our website.

Replace the bag and clean the filters
We recommend that when the bag is 2/3 full then it should be replaced. Also check that the filters are clean.Both the blue hepa and yellow filter can be cleaned by dusting them with a soft brush. For best results wash the filters in warm water but please make sure they have dried thoroughly before re fitting them. The bag is not re useable and new bags can be purchase from the spares section of this website.
We recommend that when the bag is 2/3 full then it should be replaced. Also check that the filters are clean.Both the blue hepa and yellow filter can be cleaned by dusting them with a soft brush. For best results wash the filters in warm water but please make sure they have dried thoroughly before re fitting them. The bag is not re useable and new bags can be purchase from the spares section of this website.
Hoover recommend that the filters are replaced once per year - doing so will increase the pick up power of the vacuum cleaner.
This solution applies to the following models:
Vacuum Cleaners
- AT70EG10001 - 39001270
- ATC18LI - 39001570
Replace the paper bag
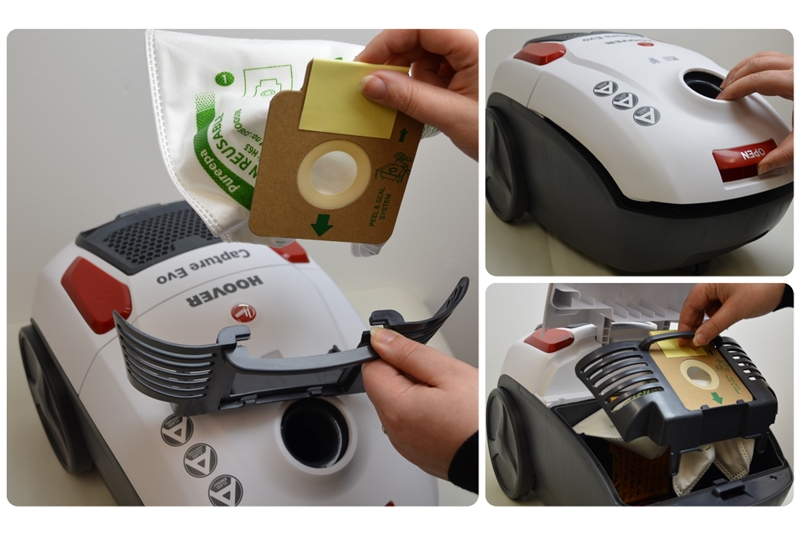
Hoover recommend that you replace the bag when it is two thirds full. New bags can be purchased from the spares section of the website.
Hoover recommend that you replace the bag when it is two thirds full. New bags can be purchased from the spares section of the website.
Open the bag door, lift out the bag carrier with the bag attached. Remove the bag and place it in your dustbin. Finally fit the new bag to the carrier, pop it back in and your ready to go.
Watch our helpful video guide
Watch our helpful video guide (1)
This solution applies to the following models:
Vacuum Cleaners
- HF122RPT 001 - 39400918
- HF18CPT 001 - 39400354
- HF18RH 001 - 39400353
- HF222RH 001 - 39400912
- HF222UXL 001 - 39400919
- HF222XLRG 001 - 39400389
- HF522BH 001 - 39400915
- HF522PTE 001 - 39400921
- HF522STH 001 - 39400982
- HF522STP 001 - 39400983
- HF522UPT 001 - 39400914
- HF722G 001 - 39400368
- HF722PG 001 - 39400369
- HF822OF 001 - 39400397
- HFC216R 001 - 39400360
- HFC324U 001 - 39400361
Watch our troubleshooting video
This solution applies to the following models:
Vacuum Cleaners
- WR71 VX04001 - 39100466
- WR71 VX05001 - 39100482
- WR71 WR03 - 39100480
- WR71WR01 - 39100460
- WR71WR02 - 39100459
- WRE01 001 - 39100514
- WRE02P 001 - 39100515
Watch our video guide
This solution applies to the following models:
Vacuum Cleaners
- TF5192 - 39000451
- TFC3185 - 39000413
- TFC6203 - 39000402
- TFC6207 - 39000414
- TFS5206 - 39000474
- TFS5209 - 39000511
- TFS7100 - 39000529
- TFS7185 - 39000651
- TFS7195 - 39000475
- TFS7197 - 39000524
- TFS7198 - 39000523
- TFS7202 - 39000540
- TFS7208 - 39000596
- TFS7209 - 39000453
- TFS7210 - 39000541
- TFS7220 - 39000542
- TFV2015 - 39000722
- TMI2015 - 39000828
- TMI2019 - 39000939
Watch our video guide (1)
This solution applies to the following models:
Vacuum Cleaners
- DM4468 - 39100131
- DM4476 - 39100140
- DM4484 - 39100134
- DM4485 - 39100132
- DM4494 - 39100133
- DM4496 - 39100102
- DM4499 - 39100130
- DM4523 - 39100080
- DM4525 - 39100119
- DM5226 - 39100313
- DM5226/1 - 39100350
- DM5524 - 39100127
- DM5530/1 - 39100124
- DM6163 - 39100159
- DM6173 - 39100160
- DM6185T - 39100161
- DM6197T/1 - 39100181
- DM6200 - 39100197
- DM6207T - 39100158
- DM6210 - 39100195
- DM6211 - 39100213
- DM6212 - 39100219
- DM6213 - 39100222
- DM6214 - 39100227
- DM6215 - 39100183
- DM6216 - 39100229
- DM6220 - 39100340
- DM6222 - 39100218
- DM6223 - 39100221
- DM6225 - 39100262
- DM6226 - 39100260
- DM6227 - 39100176
- DM6229 - 39100191
- DM6300 - 39100378
- DM71DM02 - 39100388
- DM71DM03001 - 39100432
- DML5224 - 39100268
- DML5227 - 39100261
Watch our video guide (10)
This solution applies to the following models:
Vacuum Cleaners
- HL2102 - 39100265
- HL2107 - 39100298
- HL2208 - 39100315
- HP22+SP48D - 39100302
- HP2300 - 39100300
- HP2305 - 39100343
- HS22+SP48D - 39100309
- HU4177T - 39100155
- HU4185 - 39100196
- HU4187T - 39100164
- HU4197 - 39100180
- HU4200 - 39100226
- HU4201 - 39100223
- HU4202 - 39100198
- HU4203 - 39100215
- HU4204 - 39100225
- HU4205 - 39100188
- HU4206 - 39100224
- HU4207 - 39100177
- HU4207/1 - 39100212
- HU4208 - 39100211
- HU4217/1 - 39100303
- HU4220 - 39100319
- HU71HU02 - 39100397
- HU71HU04001 - 39100431
- HU71HU05001 - 39100453
- TH31HO01 - 39100496
- VR81HL01 - 39100472
- VR81HU01 - 39100462
- VR81HU02 - 39100473
- VR81HU03 - 39100481
Watch our video guide (11)
This solution applies to the following models:
Vacuum Cleaners
- JA1600 - 39100283
- JA1603 - 39100347
- KIT JAZZ CY - 39100318
- KIT JAZZ CY2 - 39000975
- KIT JAZZ GR - 39100317
- KIT JAZZ GR2 - 39000976
- TP71 JA01001 - 39100393
- TP71 OP01 - 39100485
- TP71TP01 - 39100392
- TP71TP02 - 39100391
- TP71TP02001 - 39100427
- TP71TP04001 - 39100428
- TP71TP06001 - 39100450
- TP71TP07001 - 39100451
- TP71TP08 - 39100476
- TP71TP09 - 39100477
- UTE1100 - 39100380
- UTP1605 - 39100285
- UTP1610 - 39100284
- UTP1611 - 39100346
- UTP1612 - 39100362
Watch our video guide (12)
This solution applies to the following models:
Vacuum Cleaners
- BR2201 - 39100321
- BR2202 - 39100320
- BR2306 - 39100364
- DI2200 - 39100314
- SM1800 - 39100232
- SM1901 - 39100239
- SP2101 - 39100323
- SP2102 - 39100322
- SP71_BL06001 - 39001409
- TH31 VO01 - 39100486
- TH31 VO02 - 39100487
- TH31BO01 - 39100488
- TH31BO02 - 39100489
- TH31SM01 - 39100492
- TH31SM02 - 39100493
- TH71 VX01001 - 39100437
- TH71 VX02001 - 39100438
- TH71BL01 - 39100404
- TH71BL01001 - 39100440
- TH71BL02 - 39100410
- TH71BL02001 - 39100441
- TH71BR01 - 39100474
- TH71BR02 - 39100475
- TH71SM01 - 39100399
- TH71SM01001 - 39100434
- TH71SM02 - 39100400
- TH71SM02001 - 39100435
- TH71SM03 - 39100401
- TH71SM03001 - 39100436
- TH71SP04 - 39100446
- VR81HL01 - 39100472
- VR81HU01 - 39100462
- VR81HU02 - 39100473
- VR81HU03 - 39100481
- VR81VR01001 - 39100430
- VR81VR02001 - 39100429
Watch our video guide (13)
This solution applies to the following models:
Vacuum Cleaners
- PU1240 - 39100276
- PU2012 - 39100339
- PU2110 - 39100202
- PU2111 - 39100245
- PU2115/1 - 39100345
- PU2118 - 39100344
- PU2120 - 39100201
- PU2121 - 39100246
- PU2122 - 39100330
- PU2130 - 39100200
- PU2300 - 39100366
- PU31EN10 - 39100507
- PU71EN01 - 39100390
- PU71EN01001 - 39100452
- PU71EN02001 - 39100423
- PU71PU01 - 39100409
- PU71PU01001 - 39100444
- U3495 - 39100113
- U3524 - 39100178
- U3525 - 39100114
- U3530 - 39100012
Watch our video guide (2)
Watch our video guide (3)
This solution applies to the following models:
Vacuum Cleaners
- RU70RU15001 - 39001352
- RU70RU16 - 39001402
- RU70RU17 - 39001466
- RU80TP15001 - 39001266
- RU80VE15001 - 39001265
- TCR4213 - 39000616
- TCR4224 - 39000772
- TCR4230 - 39000985
- TCR4233 - 39000556
- TCR4234 - 39000649
- TCR4237 - 39000771
- TCR4239 - 39000938
- TCR4240 - 39001080
Watch our video guide (4)
This solution applies to the following models:
Watch our video guide (5)
This solution applies to the following models:
Vacuum Cleaners
- SE71 VX04001 - 39001360
- SE71 VX05001 - 39001361
- SE71SP05 - 39001390
- SE71SZ04001 - 39001362
- SE71SZ08 - 39001414
- SE71WR01 - 39001400
- SE71WR02 - 39001401
- SE81RA05001 - 39001239
- SE81RA11001 - 39001240
- SE81SZ01001 - 39001170
- SE81SZ03 - 39001171
- SEA1RA02001 - 39001238
- TSB1906 - 39000742
- TSB2001 - 39000876
- TSB2005 - 39000667
- TSBE2100 - 39001090
- TSD2001 - 39001010
- TSU2001 - 39000877
- TSU2002 - 39000878
- TW1750 - 39000248
Watch our video guide (6)
This solution applies to the following models:
Vacuum Cleaners
- LA71SM10 - 39001524
- LA71SM20 - 39001525
- SP71_BL06001 - 39001409
- SP71BL04001 - 39001358
- SP71BL05001 - 39001359
- SP81BL03 - 39001176
- SP81BL11 - 39001177
- SP81SM02 - 39001236
- SP81SM11 - 39001237
- SP81SP01001 - 39001246
- TC1182 - 39000342
- TC1183 - 39000473
- TC1184 - 39000424
- TC1185 - 39000527
- TC1188 - 39000756
- TC1191 - 39000463
- TC1192 - 39000386
- TC1201 - 39000581
- TC1202 - 39000613
- TC1203 - 39000612
- TC1206 - 39000381
- TC1208 - 39000472
- TC1209 - 39000484
- TC1210 - 39000623
- TC1211 - 39000653
- TC1212 - 39000652
- TCW1610 - 39000787
- TCW2006 - 39000786
- TSM1805 - 39000952
- TSM2005 - 39000951
- TSM2110 - 39000955
- TSP2000+SP48D/1 - 39000903
- TSP2002+S40D - 39000922
- TSP2004 - 39000818
- TSP2005 - 39000808
- TSP2006 - 39000823
- TSP2101 - 39000963
- TSP2210 - 39001083
Watch our video guide (7)
This solution applies to the following models:
Vacuum Cleaners
- AT70ID40 - 39001187
- TE70_EN26001 - 39001416
- TE70EN20 - 39001190
- TE70EN21 - 39001463
- TE70EN21001 - 39001357
- TE70EN25001 - 39001268
- TE70ID30001 - 39001189
- TE70TE11 - 39001191
- TE70TE12 - 39001418
- TEN2400 - 39001082
- TP6206 - 39000373
- TP6220 - 39000538
- TTE2203 - 39000990
- TTE2304 - 39000969
Watch our video guide (8)
This solution applies to the following models:
Vacuum Cleaners
- RE71TP03001 - 39001354
- RE71TP04001 - 39001355
- RE71TP20 - 39001184
- RE71TP25001 - 39001273
- RE71VE20 - 39001186
- RE71VE25001 - 39001274
- RU80TP11 - 39001194
- RU80VE11 - 39001195
- TJA1410 - 39000957
- TJA1440 - 39001042
- TJG1100 - 39001094
- TTG1100 - 39001095
- TTU1450 - 39001027
- TTU1460 - 39001076
- TTU1510 - 39000826
- TTU1520 - 39000827
Watch our video guide (9)
This solution applies to the following models:
Vacuum Cleaners
- GL1103 - 39100292
- GL1106 - 39100293
- GL1108 - 39100360
- GL1109 - 39100294
- GL1110 - 39100349
- GL71GL01 - 39100384
- GL71GL02 - 39100385
- GL71GL02001 - 39100445
- GL71GL04001 - 39100426
- GLE900 - 39100379
Watch our video guides
Watch our Vision ONEfi troubleshooting video
This solution applies to the following models:
Vacuum Cleaners
- VR81OF01 - 39100490
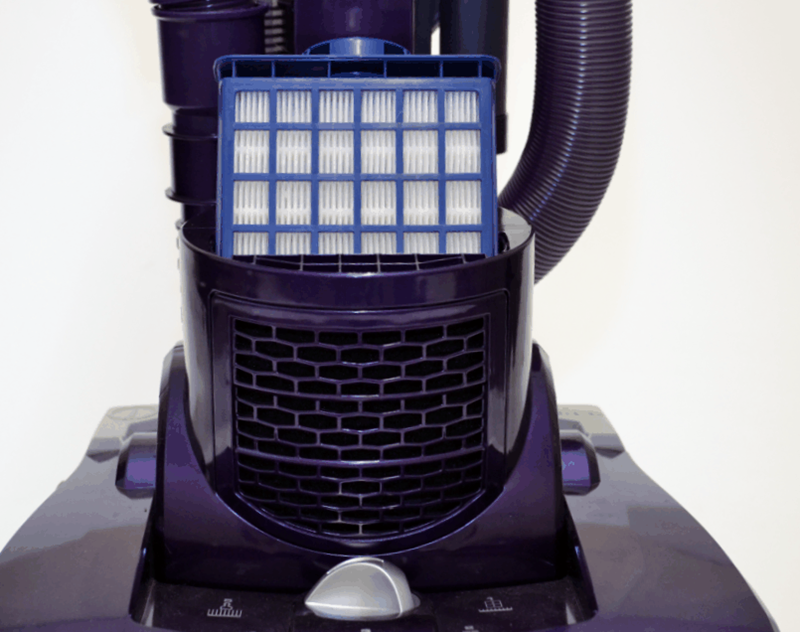
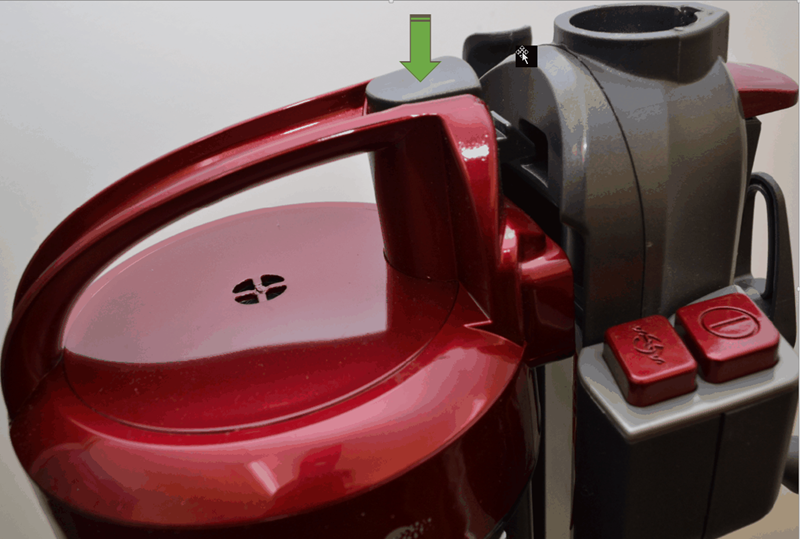
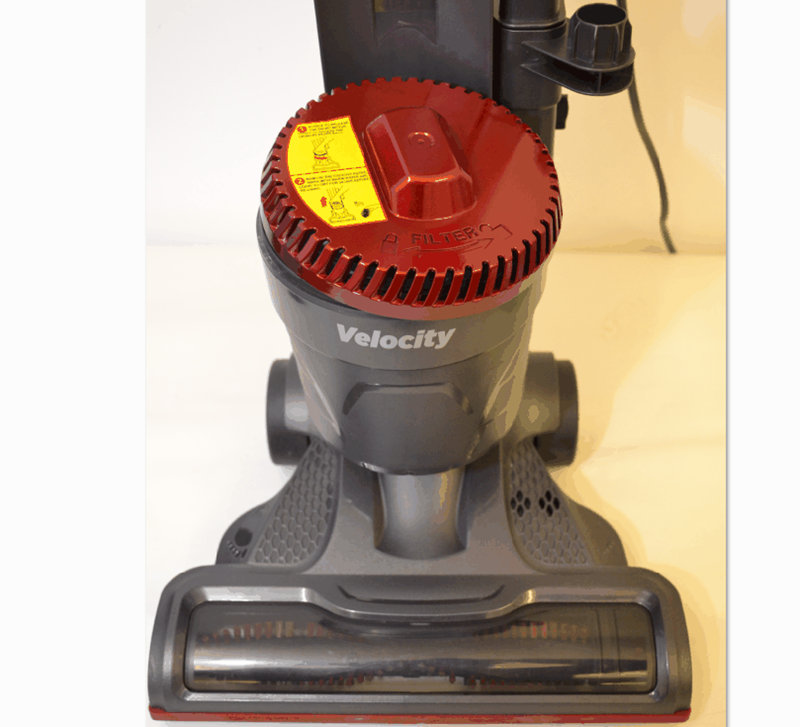
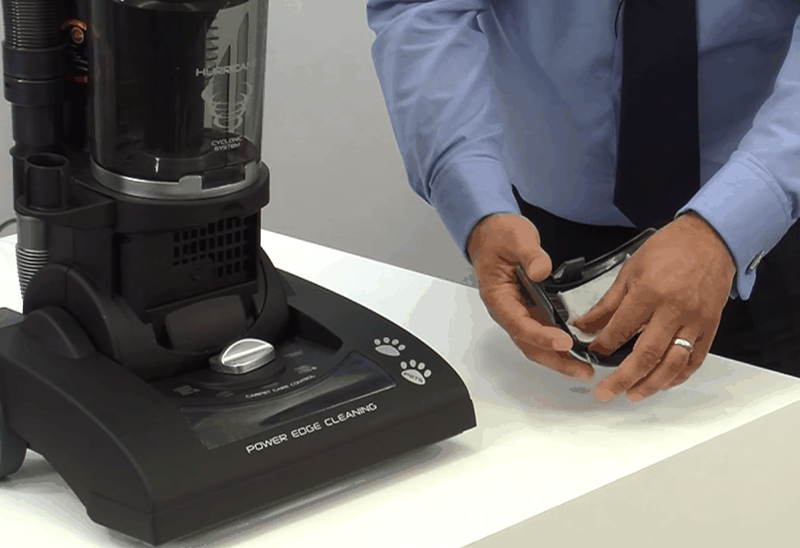
Check the brushes are spinning round
Switch the cleaner on and press the brush control switch to 'on' - Push the button indicated in the picture with the green arrow. (the brushes will only spin if switched on)
Switch the cleaner on and press the brush control switch to 'on' - Push the button indicated in the picture with the green arrow. (the brushes will only spin if switched on)
Look through the clear window to see if the brushes are rotating. If they are not turning round, the cleaner will not pick dirt and debris up and this may be due to the belt breaking or a build up of debris around the brushes.
Before doing any further checks please UNPLUG the cleaner from the electricity supply.
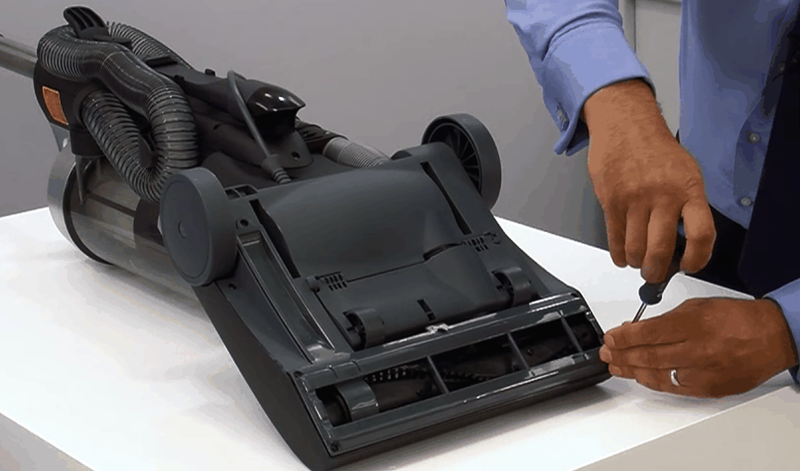
To get to the belt turn the cleaner over and prize out the 2 little roller wheels as shown. The screws for the brush cover are found underneath the wheels. Flick them out with a flat screwdriver.
use a screwdriver to push out the wheels there are 2 - one on each side, keep these somewhere safe.
Using a standard Phillips head screwdriver loosen the 2 screws found in the wheel recess.
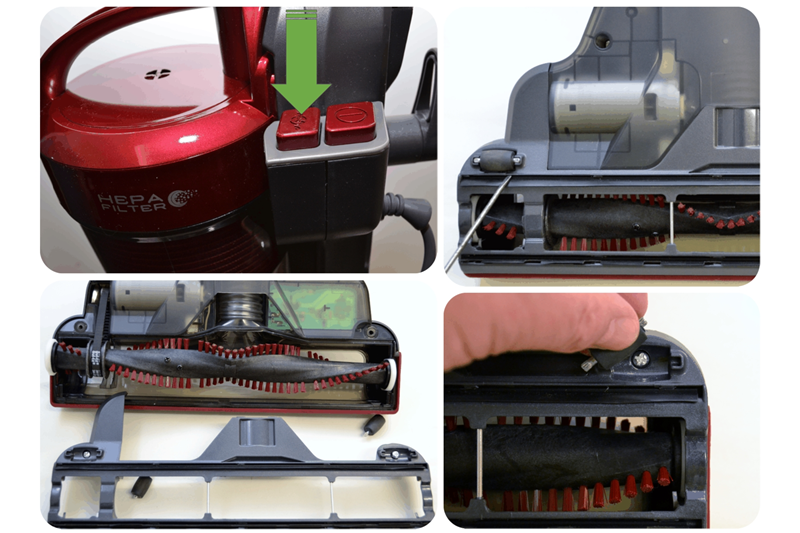
Once the two screws have been removed pull the brush cover off. Check the belt has not broken (shown on the left in the above picture) If its broken replace with a new belt which can be purchased from the spares section on our website or ringing our dedicated spares team. Clean any build up of hair or threads around the brushes which will stop your Velocity cleaner from picking up effectively so remove anything tangled up in there.
Check the brushes are spinning round (1)
If the cleaner is being used in the upright mode , the brush roll found in the foot of the product needs to be spinning round for the best pick up performance. Check the on / off switch slider has been pushed down to the bottom setting. The mid way setting will switch the cleaner on but only give suction, push it down to the bottom setting to switch on the brushes. A build up of hair and debris tangled up around the brush roll will stop the cleaner picking up or may completely jam the brush and prevent it from turning.
If the cleaner is being used in the upright mode , the brush roll found in the foot of the product needs to be spinning round for the best pick up performance. Check the on / off switch slider has been pushed down to the bottom setting. The mid way setting will switch the cleaner on but only give suction, push it down to the bottom setting to switch on the brushes. A build up of hair and debris tangled up around the brush roll will stop the cleaner picking up or may completely jam the brush and prevent it from turning.
Turn the product over to remove the brush roll for cleaning:
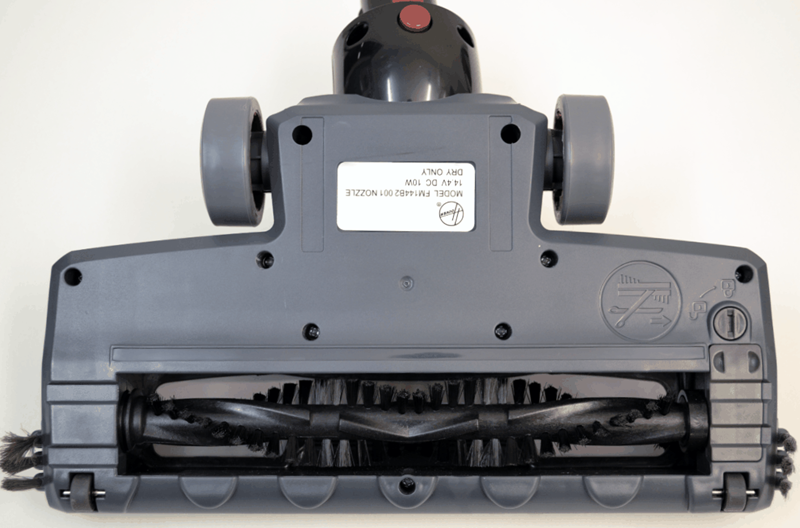
Twist the catch to the 'unlock' padlock symbol and remove the locking bar. The brush roll will lift out for cleaning.
- NOTE - There is not a belt in this product.
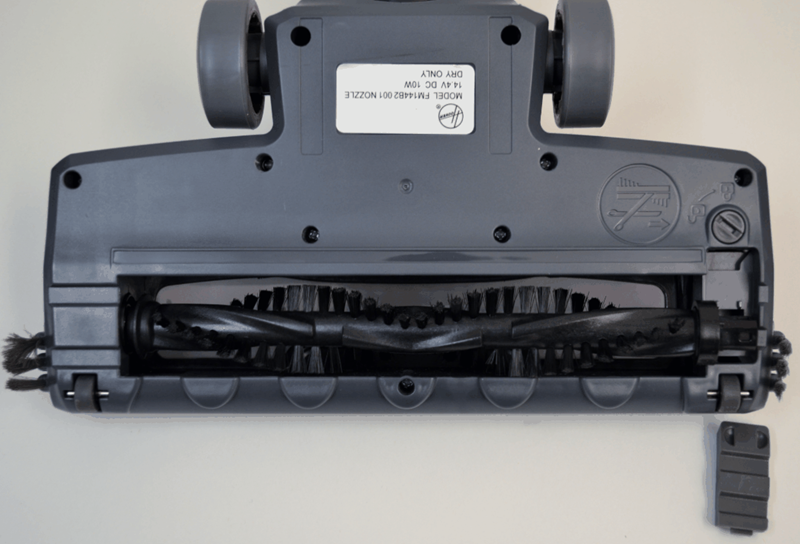
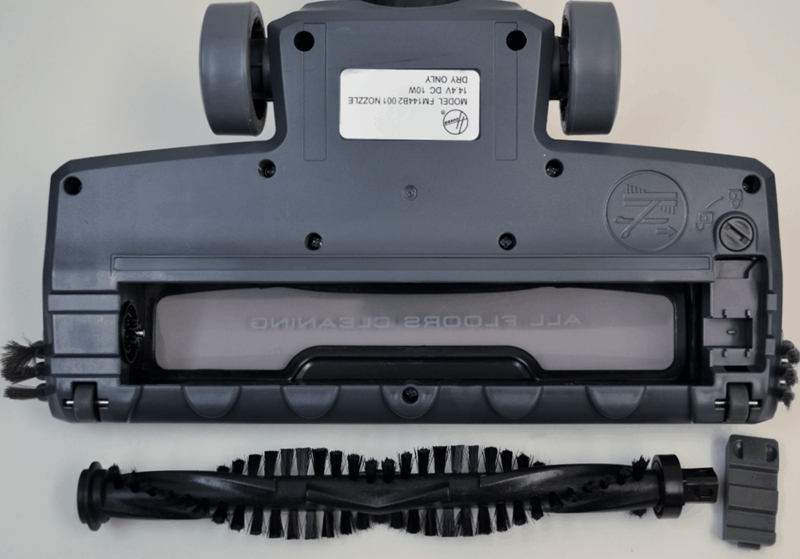
brush roll removed for cleaning for best results replace the brush once per year. A new one can be purchased from our spares section of the website
Check the floor brush is not blocked
If the cleaner is not picking up with the floor nozzle then the reason for this is it may have become blocked. Take the floor brush off the extension tube and examine it for any debris that may have got stuck in it. Look in the tubing and the hole in the bottom of the nozzle to see if it is blocked up. If it is then clear out any debris and try again. If the brushes on it are worn or the litter picker strip is worn away then the pick up with the brush may be poor. To purchase a new one please look on the spares pages of our website.
If the cleaner is not picking up with the floor nozzle then the reason for this is it may have become blocked. Take the floor brush off the extension tube and examine it for any debris that may have got stuck in it. Look in the tubing and the hole in the bottom of the nozzle to see if it is blocked up. If it is then clear out any debris and try again. If the brushes on it are worn or the litter picker strip is worn away then the pick up with the brush may be poor. To purchase a new one please look on the spares pages of our website.

typical floor nozzle or brush - inspect for restrictions or blockages
This solution applies to the following models:
Vacuum Cleaners
- AC73SE20001 - 39001364
- AT70EG10001 - 39001270
- AT70ID40 - 39001187
- ATC18LI - 39001570
- BF70VS01001 - 39001365
- BF70VS11001 - 39001366
- BF81VS02 - 39001469
- BF81VS12 - 39001471
- BR71BR01 - 39001453
- BR71BR02 - 39001452
- BV71CP10 - 39001522
- BV71CP20 - 39001523
- CP70CP11 - 39001182
- CP71CP01 - 39001183
- CP71CP01 - 39001417
- CU81CU11001 - 39001178
- CU81CU15001 - 39001271
- CU81CU20 - 39001179
- DV70ID02 - 39400170
- KS51_OP2 - 39001566
- LA71SM10 - 39001524
- LA71SM20 - 39001525
- LA71WR01 - 39001526
- LA71WR20 - 39001527
- PR60_SL40 - 39001568
- RE71TP03001 - 39001354
- RE71TP04001 - 39001355
- RE71TP20 - 39001184
- RE71TP25001 - 39001273
- RE71VE20 - 39001186
- RE71VE25001 - 39001274
- RU70RU15001 - 39001352
- RU70RU16 - 39001402
- RU70RU17 - 39001466
- RU80TP11 - 39001194
- RU80TP15001 - 39001266
- RU80VE11 - 39001195
- RU80VE15001 - 39001265
- SE71SP05 - 39001390
- SE71WR01 - 39001400
- SE71WR02 - 39001401
- SE81RA05001 - 39001239
- SE81RA11001 - 39001240
- SE81SZ01001 - 39001170
- SE81SZ03 - 39001171
- SEA1RA02001 - 39001238
- SP71_BL06001 - 39001409
- SP71BL04001 - 39001358
- SP71BL05001 - 39001359
- SP81BL03 - 39001176
- SP81BL11 - 39001177
- SP81SM02 - 39001236
- SP81SM11 - 39001237
- SP81SP01001 - 39001246
- ST70ST01001 - 39001356
- ST71ST02 - 39001470
- STC18LI - 39001574
- SX70HU01 - 39001180
- SX70HU03001 - 39001353
- SX70HU04 - 39001413
- SX70HU05 - 39001465
- SX70HU11 - 39001181
- SX70HU15001 - 39001267
- SX9750 - 39500042
- SX9760 - 39500041
- SY71NM02 - 39400171
- TAV1610 - 39000488
- TAV1615 - 39000545
- TAV1620 - 39000490
- TC1182 - 39000342
- TC1183 - 39000473
- TC1184 - 39000424
- TC1185 - 39000527
- TC1188 - 39000756
- TC1191 - 39000463
- TC1192 - 39000386
- TC1201 - 39000581
- TC1202 - 39000613
- TC1203 - 39000612
- TC1206 - 39000381
- TC1208 - 39000472
- TC1209 - 39000484
- TC1210 - 39000623
- TC1211 - 39000653
- TC1212 - 39000652
- TC4210 - 39000385
- TC5213 - 39000418
- TC5223 - 39000329
- TC5232 - 39000347
- TC5235 - 39000708
- TC5238 - 39000358
- TCP2011 - 39000822
- TCR4213 - 39000616
- TCR4224 - 39000772
- TCR4230 - 39000985
- TCR4233 - 39000556
- TCR4234 - 39000649
- TCR4237 - 39000771
- TCR4239 - 39000938
- TCR4240 - 39001080
- TCU1410 - 39000956
- TCW1610 - 39000787
- TCW2006 - 39000786
- TE70_EN26001 - 39001416
- TE70EN20 - 39001190
- TE70EN21 - 39001463
- TE70EN21001 - 39001357
- TE70EN25001 - 39001268
- TE70ID30001 - 39001189
- TE70TE11 - 39001191
- TE70TE12 - 39001418
- TEN2400 - 39001082
- TF2005 - 39000588
- TF2006 - 39000587
- TF4195 - 39000412
- TF5192 - 39000451
- TFB2010 - 39000442
- TFB2282 - 39000441
- TFC3185 - 39000413
- TFC6203 - 39000402
- TFC6207 - 39000414
- TFC6283 - 39000401
- TFS5206 - 39000474
- TFS5209 - 39000511
- TFS7100 - 39000529
- TFS7185 - 39000651
- TFS7195 - 39000475
- TFS7197 - 39000524
- TFS7198 - 39000523
- TFS7202 - 39000540
- TFS7208 - 39000596
- TFS7209 - 39000453
- TFS7210 - 39000541
- TFS7220 - 39000542
- TFV2015 - 39000722
- TGP1410 - 39000794
- TJA1410 - 39000957
- TJA1440 - 39001042
- TJG1100 - 39001094
- TMI2015 - 39000828
- TMI2019 - 39000939
- TP6206 - 39000373
- TP6220 - 39000538
- TPP2310 - 39000531
- TPP2311 - 39000720
- TS2061 - 39000334
- TS2213 - 39000419
- TS2308 - 39000382
- TS2359 - 39000783
- TS2360 - 39000628
- TSB1906 - 39000742
- TSB2001 - 39000876
- TSB2005 - 39000667
- TSBE2100 - 39001090
- TSD2001 - 39001010
- TSE0100 - 39000614
- TSM1805 - 39000952
- TSM2005 - 39000951
- TSM2110 - 39000955
- TSP2000+SP48D/1 - 39000903
- TSP2002+S40D - 39000922
- TSP2004 - 39000818
- TSP2005 - 39000808
- TSP2006 - 39000823
- TSP2101 - 39000963
- TSP2210 - 39001083
- TSU2001 - 39000877
- TSU2002 - 39000878
- TSX2101 - 39000775
- TSX2201 - 39000804
- TSX2215 - 39000805
- TSXD2205 - 39000921
- TSXP2307 - 39001078
- TSXP2308 - 39001079
- TTE2203 - 39000990
- TTE2304 - 39000969
- TTG1100 - 39001095
- TTU1450 - 39001027
- TTU1460 - 39001076
- TTU1510 - 39000826
- TTU1520 - 39000827
- TW1750 - 39000248
- TWDH1400 - 39500057
- TXP1215 - 39000784
- XP71EG25001 - 39001269
- XP71ID20 - 39001192
- XP81OP25 - 39001468
Check the lower hose section for blockages
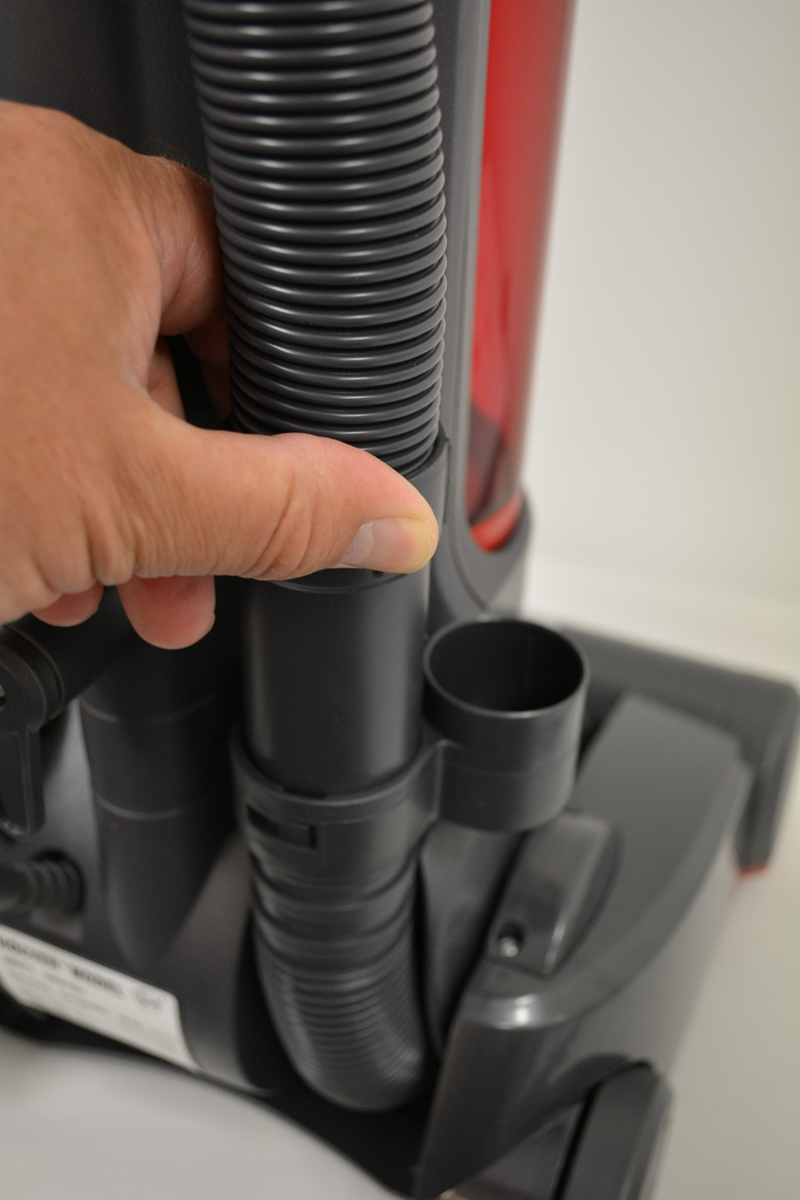
There may be a blockage in the lower hose that leads into the main cleaning hose. Dirt travels up from the floor area through this hose and is sucked into the dust box, it's possible that something may be stuck in there. To check the lower hose start by separating the cleaning tools hose. Remove the hose from the lower section by twisting it anti - clockwise and pulling it up.
There may be a blockage in the lower hose that leads into the main cleaning hose. Dirt travels up from the floor area through this hose and is sucked into the dust box, it's possible that something may be stuck in there. To check the lower hose start by separating the cleaning tools hose. Remove the hose from the lower section by twisting it anti - clockwise and pulling it up.
Now look down and inspect the lower end of the hose - the belt cover plate can also be removed and a coin dropped through this small hose section. If it does not appear at the other end near to the brush roll there is something stuck in the hose. Carefully pull any trapped debris clear.
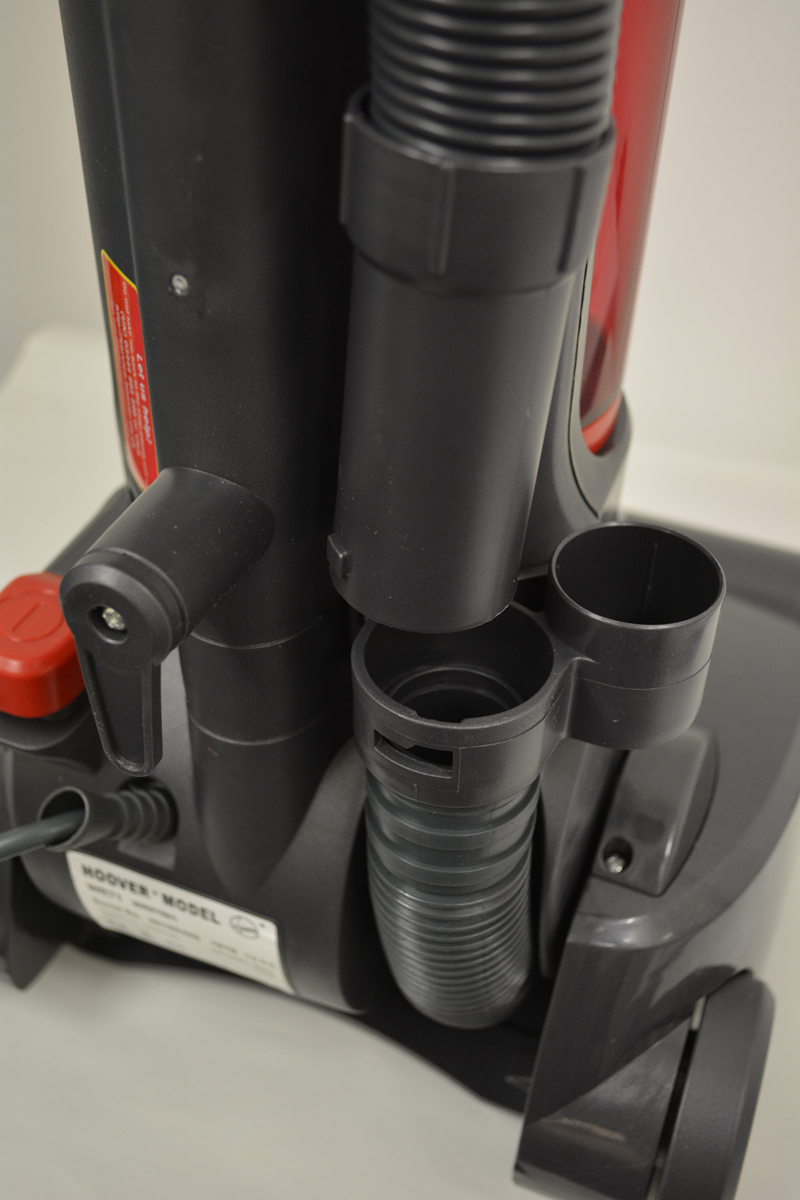
unscrew and remove the belt cover from the base to check the other end of the hose.
This solution applies to the following models:
Vacuum Cleaners
- WR71 VX04001 - 39100466
- WR71 VX05001 - 39100482
- WR71 WR03 - 39100480
- WR71WR01 - 39100460
- WR71WR02 - 39100459
- WRE01 001 - 39100514
- WRE02P 001 - 39100515
Clean all of the filters
To get the very best suction it is important to keep the 2 filters clean. The exhaust filter is found at the front of the product behind a cover. Unclip the cover, peel the micro filter out and dust it out. For best results we recommend you wash this in warm water making sure it is thoroughly dry before re fitting.
To get the very best suction it is important to keep the 2 filters clean. The exhaust filter is found at the front of the product behind a cover. Unclip the cover, peel the micro filter out and dust it out. For best results we recommend you wash this in warm water making sure it is thoroughly dry before re fitting.
peel out the filter
There is also a hepa filter in the dust box. It is a hepa filter which means it will trap microscopic dust particles and it will need to be regularly cleaned and replaced once a year to keep the suction strength of the cleaner good. Filters can be purchased from the spares web site. Remove the dust box by pressing the release button found at the top of the dust box.

Empty the dust container out into your waste bin or a bin bag. Next twist the lid of the container until the 'open' symbol lines up with the arrow as shown. Now lift off the lid and twist the filter anti clockwise to detach it from the container lid.

Twist the filter anti clockwise to remove it from the lid. Pull the mesh screen off and dust every thing out with a brush. For best results wash the filter and mesh in some warm water but make sure every thing is dry before you put it all together again.

clean the filter shown here in the technicians hand by removing the mesh and washing in warm water
Put every thing back together and check the suction power. Should it not be as good as usual then it may be an indication that the filters need to be replaced altogether. Click onto the spares site to purchase some! Consider buying a spare set to have ready to pop in when you have washed the originals and are waiting for them to dry?
This solution applies to the following models:
Vacuum Cleaners
- HL2102 - 39100265
- HL2107 - 39100298
- HL2208 - 39100315
- HP22+SP48D - 39100302
- HP2300 - 39100300
- HP2305 - 39100343
- HS22+SP48D - 39100309
- HU4177T - 39100155
- HU4185 - 39100196
- HU4187T - 39100164
- HU4197 - 39100180
- HU4200 - 39100226
- HU4201 - 39100223
- HU4202 - 39100198
- HU4203 - 39100215
- HU4204 - 39100225
- HU4205 - 39100188
- HU4206 - 39100224
- HU4207 - 39100177
- HU4207/1 - 39100212
- HU4208 - 39100211
- HU4217/1 - 39100303
- HU4220 - 39100319
- HU71HU02 - 39100397
- HU71HU04001 - 39100431
- HU71HU05001 - 39100453
- TH31HO01 - 39100496
- VR81HL01 - 39100472
- VR81HU01 - 39100462
- VR81HU02 - 39100473
- VR81HU03 - 39100481
Clean the exhaust filter
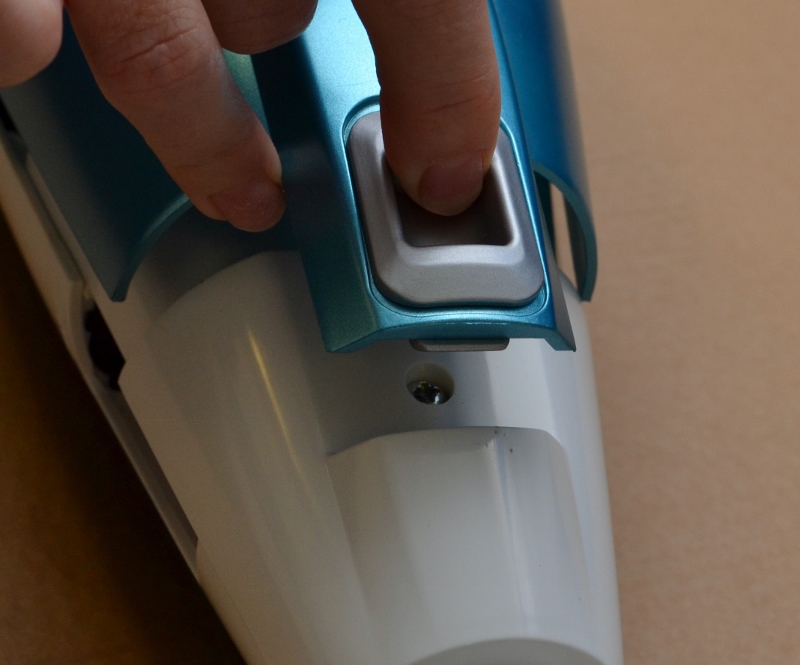
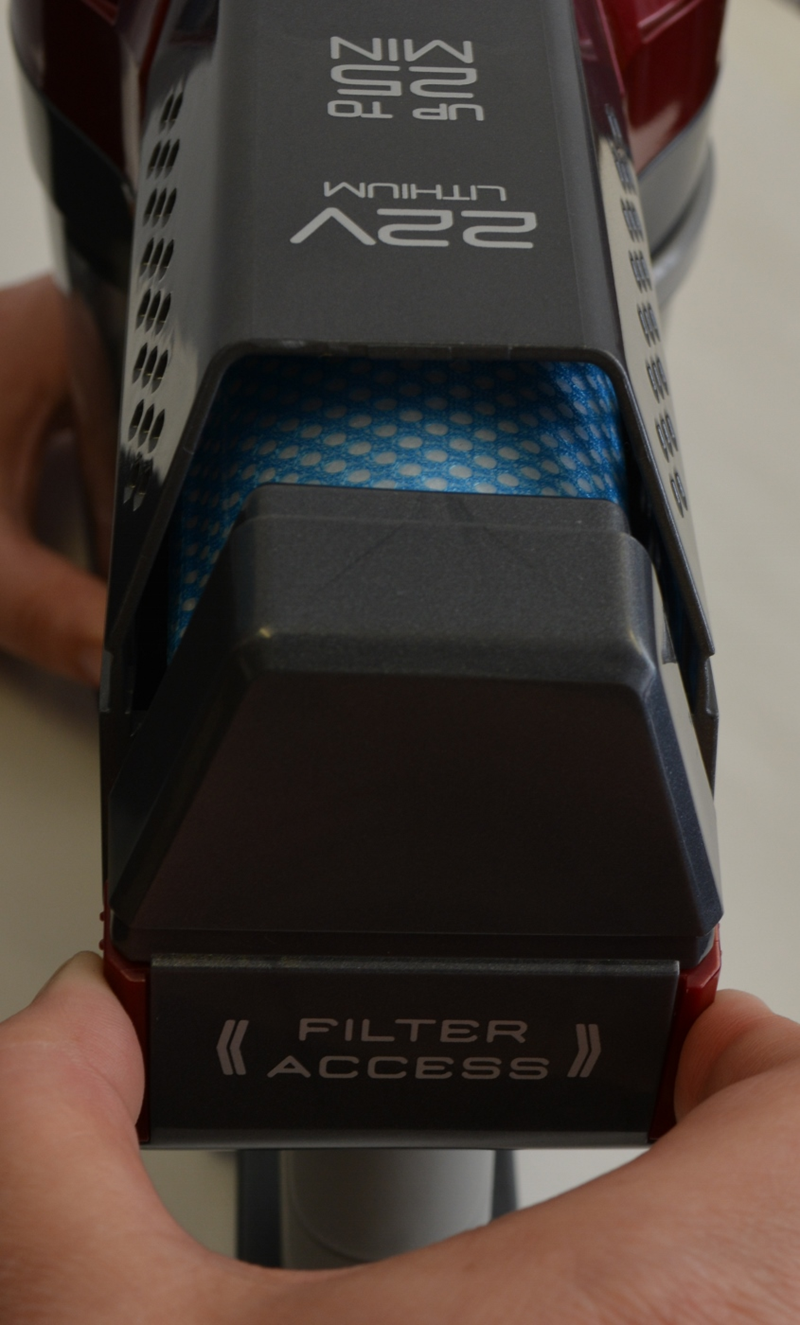
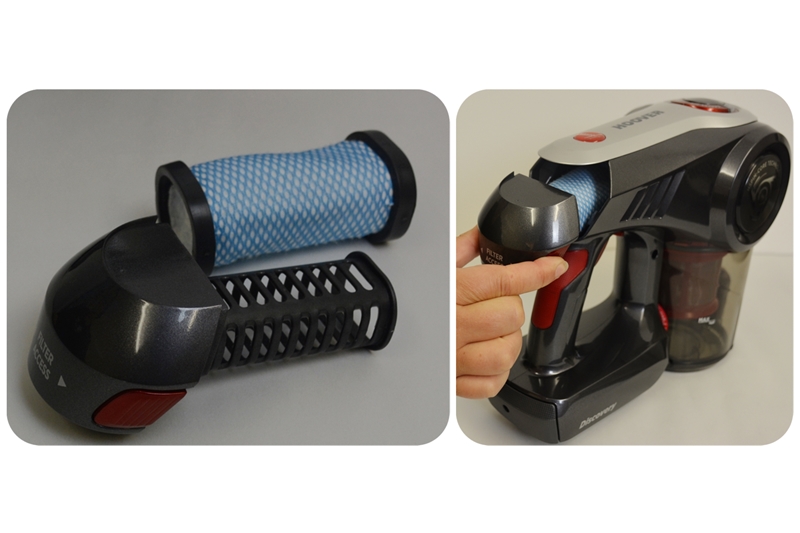
The exhaust filter is located in the top part of the handle. Squeeze the catch together and pull out the filter cartridge as shown
The exhaust filter is located in the top part of the handle. Squeeze the catch together and pull out the filter cartridge as shown
Remove the foam outer filter and clean both parts by dusting with a brush or wash in warm water. Please make sure that both parts are thoroughly dry before re fitting. For best results Hoover recommend that you replace the filters once per year and new filters can be purchased from the spares section of our website.
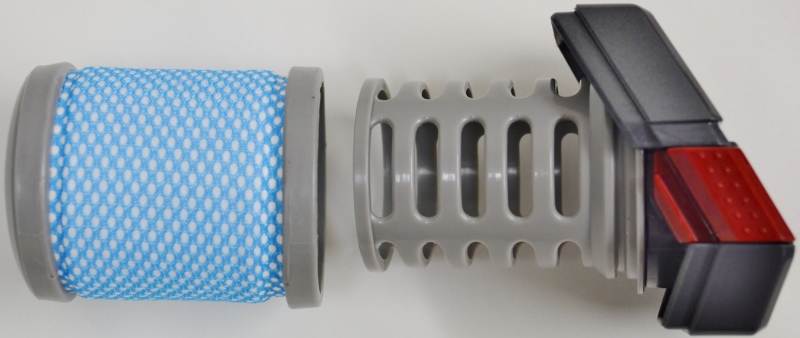
Foam filter ( on the left) removed from the cartridge for cleaning
Clean the exhaust filter (1)
There is an air exhaust filter fitted at the rear of the cleaner and should be cleaned regularly. If it becomes clogged the suction power will be reduced, it is really easy to clean start by unclipping the filter cover.
There is an air exhaust filter fitted at the rear of the cleaner and should be cleaned regularly. If it becomes clogged the suction power will be reduced, it is really easy to clean start by unclipping the filter cover.
remove the blue filter for cleaning
Clean the exhaust filter (2)
There is a filter located in the rear part of the handle as shown - this is known as the exhaust filter. Squeeze the sides of the filter cover together and pull it out. The blue tube like filter can be removed from the cover and washed in warm water but ensure it is thoroughly dry before re fitting. This may take up to 24 hours to dry.
There is a filter located in the rear part of the handle as shown - this is known as the exhaust filter. Squeeze the sides of the filter cover together and pull it out. The blue tube like filter can be removed from the cover and washed in warm water but ensure it is thoroughly dry before re fitting. This may take up to 24 hours to dry.
We recommend for best results that you renew the filter at least once per year. New filters can be purchased from the spares section of this website.
The filter (left) is located in the handle as shown
Clean the filters (1)
To keep the cleaner working efficiently and effectively the filters will need to be cleaned regularly. There are 2 filters on the cleaner the first of which is inside the dust box. Start by removing the dust container from the product by pressing the release button on the top of the container, place over your dust bin or bin bag and press the catch on the bottom of the container that will open the flap and allow the dust to escape. Give the container a shake to help release all of the dust and dirt.
To keep the cleaner working efficiently and effectively the filters will need to be cleaned regularly. There are 2 filters on the cleaner the first of which is inside the dust box. Start by removing the dust container from the product by pressing the release button on the top of the container, place over your dust bin or bin bag and press the catch on the bottom of the container that will open the flap and allow the dust to escape. Give the container a shake to help release all of the dust and dirt.

Once the container is empty put your hand up inside the container, grasp the bottom of the filter and twist anti clockwise to release the filter and remove from the bottom of the dust container.
Once removed from the dust container, slide the mesh screen off the hepa filter and give them both a good dusting with a brush. The hepa filter is designed to capture microscopic dust particles and allergens, for best results wash it in warm water and allow 24 hours for it to dry thoroughly before re fitting. We recommend you replace this filter once per year and you can easily purchase new filters from the spares section on our web site. Why not have a spare ready to pop in the cleaner when the original is drying out after washing? That way you can continue your house work straight away!
The second filter is the exhaust filter which can be found at the rear of the cleaner where the warm air escapes. Unclip the cover, peel the foam filter out and rinse under warm water. Ensure that it is dry before popping it back in to the cleaner. Keeping both filters clean and regular replacements will make your cleaner pick up effectively and deliver a good suction power.
flick the catch up to remove the exhaust filter cover, peel the filter out ready for cleaning

Clean the filters (11)
There are two filters fitted to the cleaner and keeping them clean will ensure that it has great suction and picks up efficiently. The first one is fitted under the dust container, simply unclip the container and the filter cover to get to the pre motor filter. The second one can be found by turning the cleaner over and unclipping the exhaust filter from its housing as shown.
There are two filters fitted to the cleaner and keeping them clean will ensure that it has great suction and picks up efficiently. The first one is fitted under the dust container, simply unclip the container and the filter cover to get to the pre motor filter. The second one can be found by turning the cleaner over and unclipping the exhaust filter from its housing as shown.
Dust the filters clean with a soft brush or for best results wash them in warm water but please allow them to dry thoroughly before putting them back. This may take up to 24 hours. Hoover recommend that new filters are fitted if no improvement is noticed after cleaning them and at least one per year. new ones can be obtained from the spares section of this web site.
Clean the filters (12)
There are two filters that can be found inside the dust container. These collect fine dust particles and regular cleaning will improve the performance of the cleaner. Start by lifting the dust container up at a slight angle to remove it from the cleaner. Take it to your waste bin, flip the lid catch to open the container and shake out the contents. Now twist the round filter anti clockwise to remove it.The inner filter can be removed by again twisting anti clockwise and extracting it from the filter housing. Slide the foam pad off the filter and dust both with a soft brush to clean away the dirt and debris. For best results you can wash the filters and the dust container in warm water but please make sure they are fully dry before you put it all back together.
There are two filters that can be found inside the dust container. These collect fine dust particles and regular cleaning will improve the performance of the cleaner. Start by lifting the dust container up at a slight angle to remove it from the cleaner. Take it to your waste bin, flip the lid catch to open the container and shake out the contents. Now twist the round filter anti clockwise to remove it.The inner filter can be removed by again twisting anti clockwise and extracting it from the filter housing. Slide the foam pad off the filter and dust both with a soft brush to clean away the dirt and debris. For best results you can wash the filters and the dust container in warm water but please make sure they are fully dry before you put it all back together.
Hoover recommend that once a year you replace the filters, this will keep the cleaner working efficiently and new ones can be purchased from the spares section of this website.
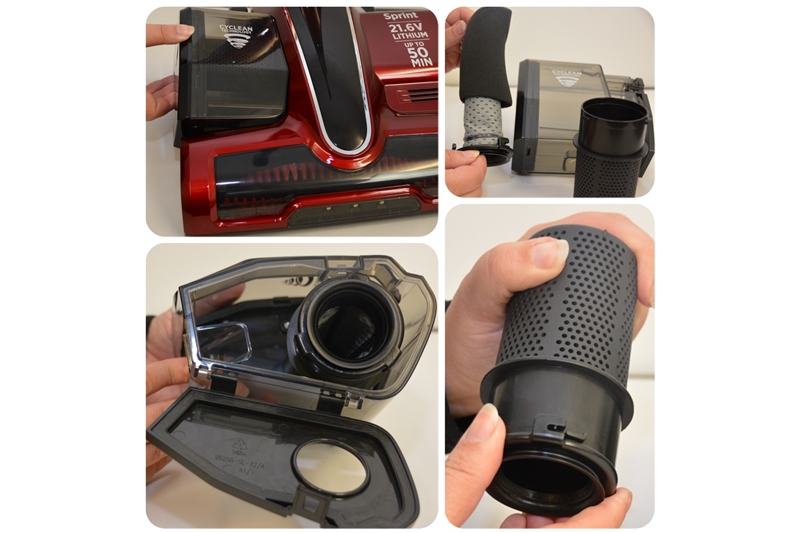
This solution applies to the following models:
Vacuum Cleaners
- HFC216R 001 - 39400360
- HFC324U 001 - 39400361
- SI216RB - 39400305
Clean the filters (4)
There are two filters on your Freedom vacuum and these need to be cleaned on a regular basis to keep the product working efficiently. If the cleaner loses suction power it may be that the filters are clogged and require cleaning. The exhaust filter is situated on top of the hood as shown:
There are two filters on your Freedom vacuum and these need to be cleaned on a regular basis to keep the product working efficiently. If the cleaner loses suction power it may be that the filters are clogged and require cleaning. The exhaust filter is situated on top of the hood as shown:
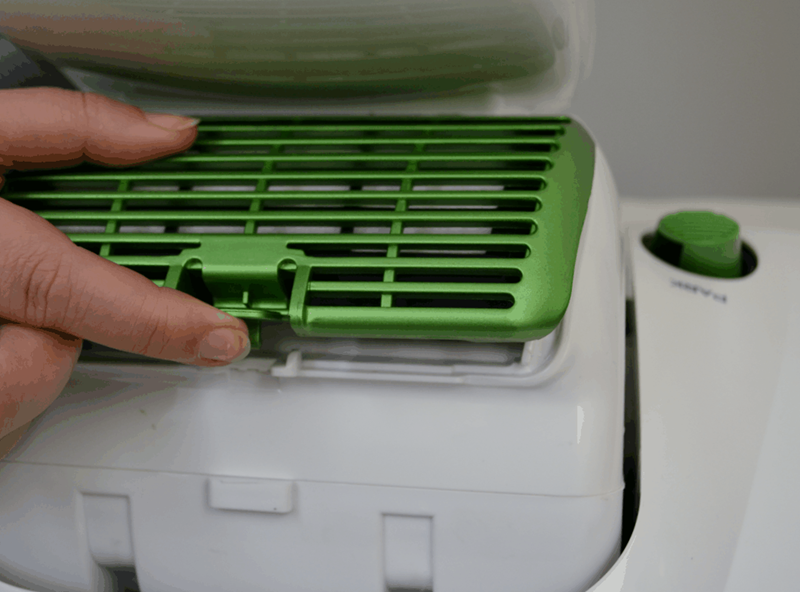
Wash the filter in warm water and allow to dry thoroughly before re fitting.
The second filter is located in the top of the dust box, take the box off the cleaner and empty the dirt out into your dustbin. Unclip the top of the dust box:
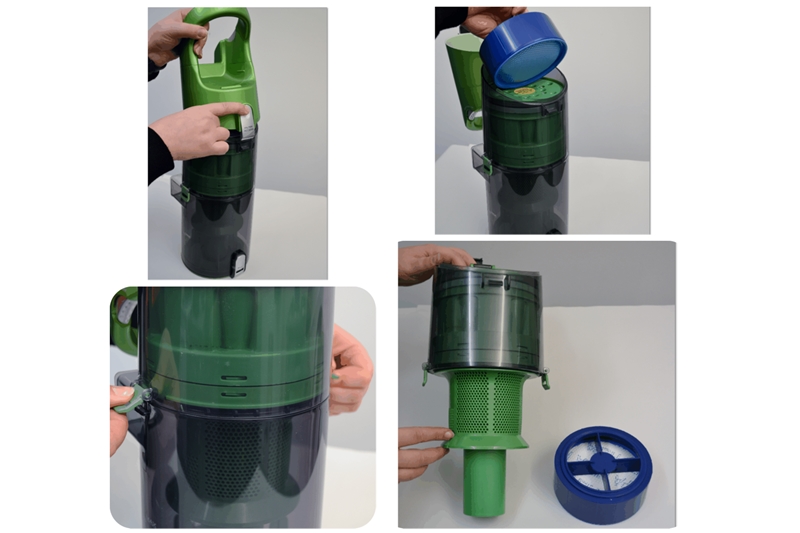
This solution applies to the following models:
Vacuum Cleaners
- DME7133 - 39100271
- FR7183 - 39100174
- FR7185 - 39100192
- FR7187 - 39100173
- FR71EG01001 - 39100424
- FR71FR01001 - 39100433
- FR71FR02001 - 39100425
Clean the filters (6)
If the suction power is not good or your Reactive vacuum is not picking up dirt, the problem may be due to a blockage in the filters. There are two filters fitted along with the separation system that we recommend you clean on a regular basis. To do this start by removing the dust container from the body of the cleaner, press down the catch at the top and pull away from the body. Take the dust container to your dust bin and empty the contents out by releasing the flap at the bottom of the container as shown. Simply press the release button.
If the suction power is not good or your Reactive vacuum is not picking up dirt, the problem may be due to a blockage in the filters. There are two filters fitted along with the separation system that we recommend you clean on a regular basis. To do this start by removing the dust container from the body of the cleaner, press down the catch at the top and pull away from the body. Take the dust container to your dust bin and empty the contents out by releasing the flap at the bottom of the container as shown. Simply press the release button.
Now twist the lid at the top of the container anticlockwise and remove it. There is a filter in the top of the lid which can be brushed clean or washed in warm water. The dust separator can be pulled out through the top of the container and dusted down with a damp cloth or washed in warm water. If you do wash the filter or the separator please make sure it is thoroughly dry before it is put back.
Your Reactive vacuum also has an exhaust filter fitted at the front of the base, to remove it slide the catch to the unlocked padlock icon and lift the filter off. This can be dusted with a brush or washed in warm water but please ensure its dry before you place it back into the product.
At Hoover we recommend you replace both filters each year to keep your cleaner working efficiently, these can be purchased from the spares section of our website.
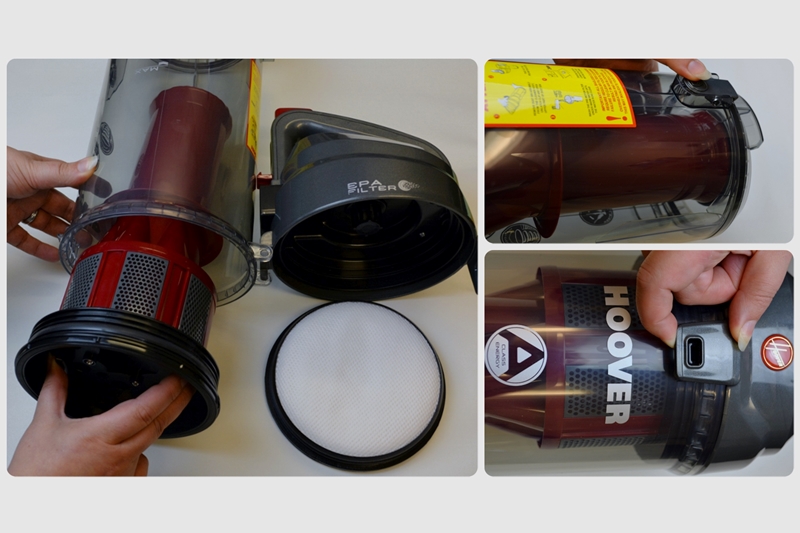
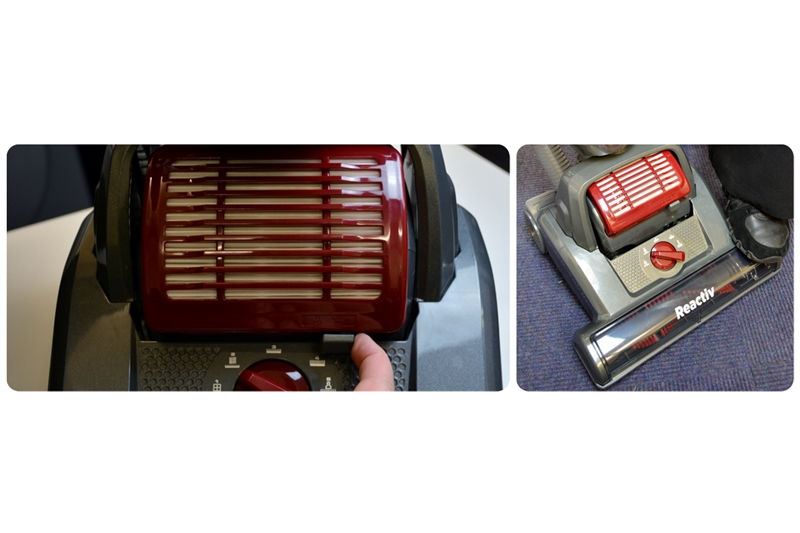
This solution applies to the following models:
Vacuum Cleaners
- RV71RV01 - 39100471
Clean the filters (7)
The Capture vacuum cleaner has two filters which may require cleaning. If your cleaner has lost suction power or is not picking up the reason for this may be that the filters now need to be cleaned. We also recommend that for the best performance that you replace these filters once per year. Replacements can be purchased from the spares section of our web site, cleaning the filters is a quick and easy job. Start by opening the bag cover by pressing the release catch at the front as shown.
The Capture vacuum cleaner has two filters which may require cleaning. If your cleaner has lost suction power or is not picking up the reason for this may be that the filters now need to be cleaned. We also recommend that for the best performance that you replace these filters once per year. Replacements can be purchased from the spares section of our web site, cleaning the filters is a quick and easy job. Start by opening the bag cover by pressing the release catch at the front as shown.
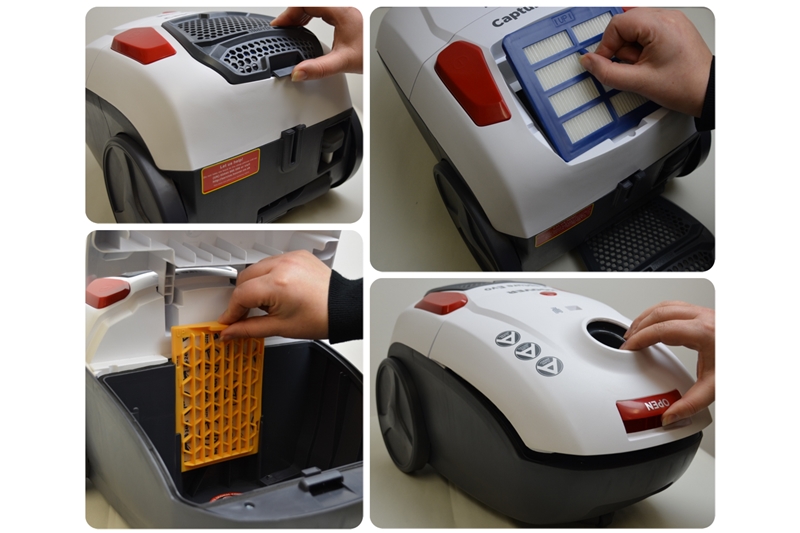
Clean the filters (8)
Your cleaner uses filters to trap dirt particles and will require regular cleaning. If you find the suction power seems to have dropped and it is not picking up very well then it may be time to clean these filters. The exhaust filter is found at the rear of the product, unclip the cover and lift out the blue filter for cleaning. Remove the dust box and twist off the lid, inside the dust box you will find the blue hepa filter and grey mesh screen. Use a soft brush to dust away the dirt or for best results wash all the filters in warm water. Please make sure they are thoroughly dry before you pop it all back together.
Your cleaner uses filters to trap dirt particles and will require regular cleaning. If you find the suction power seems to have dropped and it is not picking up very well then it may be time to clean these filters. The exhaust filter is found at the rear of the product, unclip the cover and lift out the blue filter for cleaning. Remove the dust box and twist off the lid, inside the dust box you will find the blue hepa filter and grey mesh screen. Use a soft brush to dust away the dirt or for best results wash all the filters in warm water. Please make sure they are thoroughly dry before you pop it all back together.
Hoover recommend that you replace the filters once per year and you can purchase new filters from the spares section of this website.
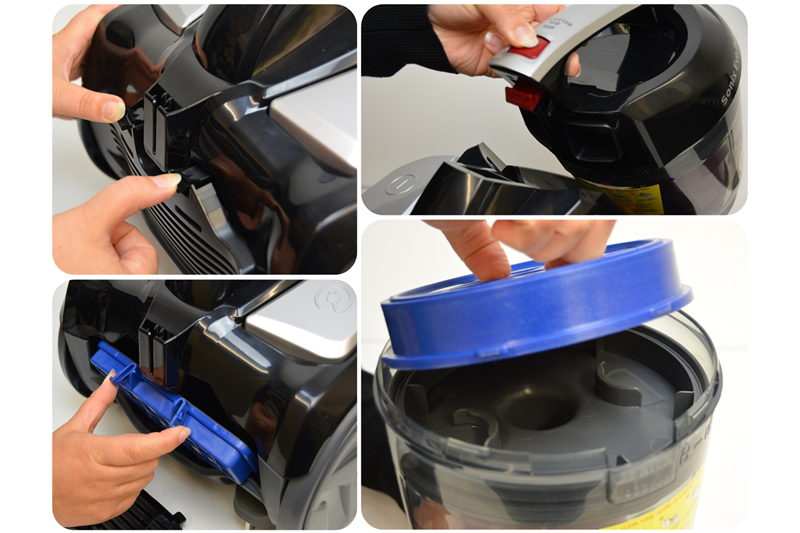
This solution applies to the following models:
Vacuum Cleaners
- CH51S20 - 39001560
Clean the filters (9)
If the cleaner has lost suction and not picking up check that the filters are clean. Regular cleaning keeps the vacuum cleaner working efficiently and there are two filters fitted to your product. One is fitted at the back, simply unclip the cover and remove the exhaust filter for cleaning.
If the cleaner has lost suction and not picking up check that the filters are clean. Regular cleaning keeps the vacuum cleaner working efficiently and there are two filters fitted to your product. One is fitted at the back, simply unclip the cover and remove the exhaust filter for cleaning.
The second filter is fitted inside the lid of the dust container, simply release from the body of the cleaner and twist the lid anti clockwise to open it. The blue filter can be pulled out of the lid. Using a soft brush dust both filters to remove debris and particles. For best results the filters can be washed in warm water but check they are thoroughly dry before putting them back into place, this may take up to 24 hours.
Hoover recommend that you fit new filters once per year to keep your vacuum cleaner in tip top working order. Replacements can be purchased from the spares section of this website. Fitting new filters will greatly improve the performance of the product.
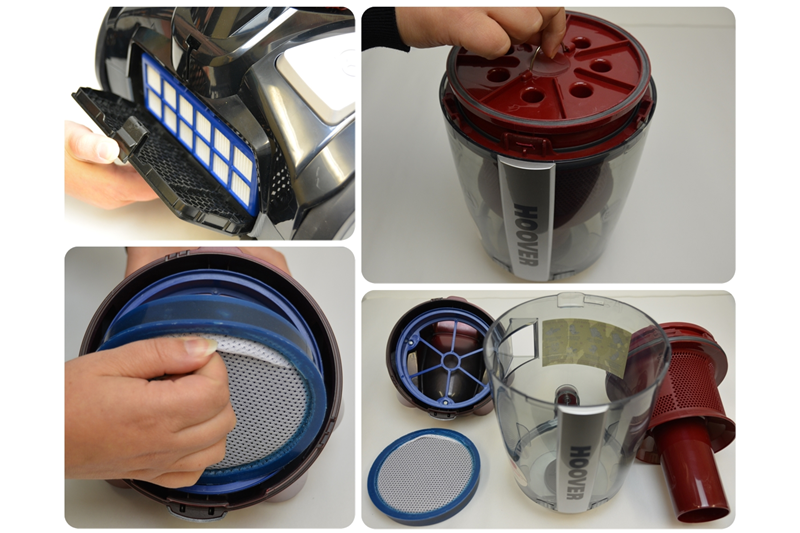
This solution applies to the following models:
Vacuum Cleaners
- KS51_OP2 - 39001566
Clean the filters (Synthesis lite models)
There are two filters fitted to the cleaner that will from time to time require cleaning especially if you notice that the suction power is not good.
There are two filters fitted to the cleaner that will from time to time require cleaning especially if you notice that the suction power is not good.
Remove the dust container and the top filter cover by pressing the release catch shown in the picture and simply lift the blue filter for cleaning.
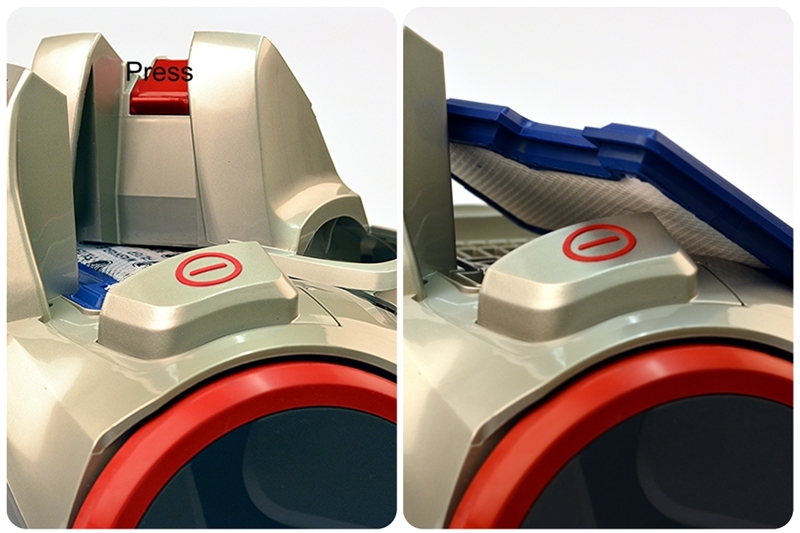
Turn the cleaner over to get to the filter located in the bottom of the product, grasp the cover and pull it open and simply slide the blue filter out.
For best results wash the filters in warm water but please ensure they are thoroughly dry before refitting and this can take up to 24 hours. We recommend that you replace the filters and new ones can be purchased from the spares section of the website.

Keep the cyclonic unit clean
First remove the dust box and empty it out over your dustbin or into a bin bag. Lift the handle to take it off the cleaner
First remove the dust box and empty it out over your dustbin or into a bin bag. Lift the handle to take it off the cleaner
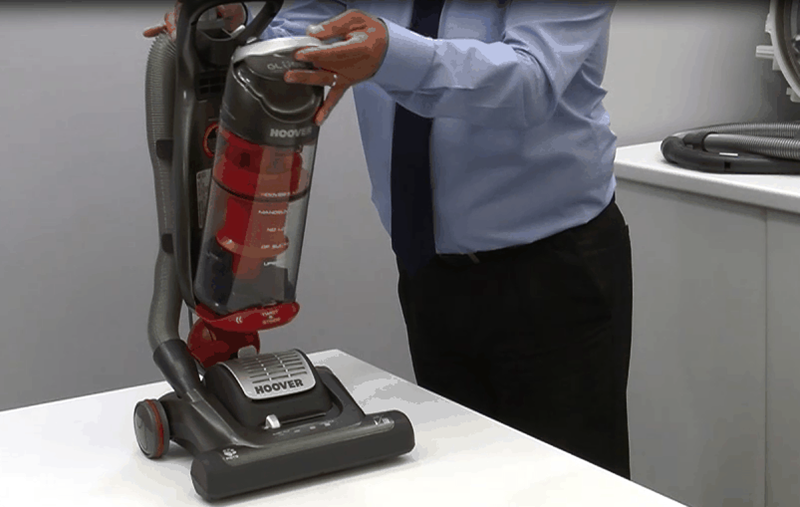
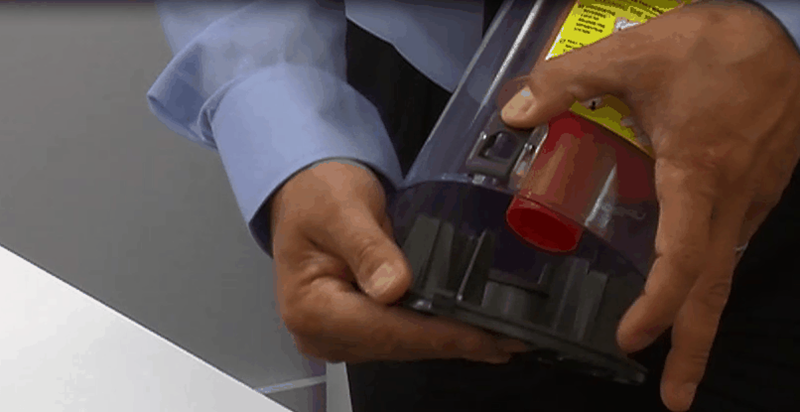
press the release catch to open container

Now open the top of the dust box to get to the filter. Take out the filter and turn the blue star shaped nut anti clockwise. Why not take this opportunity to wash the filter in warm water to get the very best results from the Globe cleaner? Be sure to make sure it is thoroughly dry before you put it all back together.
Now pull the cyclonic unit out from the bottom of the container as shown. Wash it out in a bucket of water and leave to dry thoroughly before re assembly.
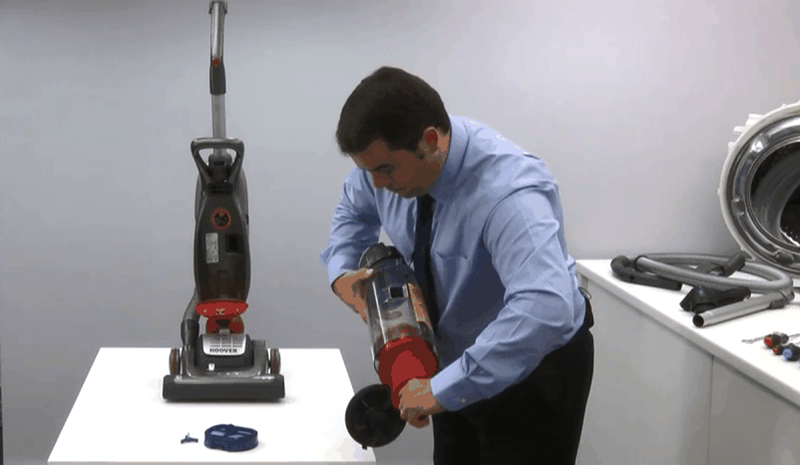
removing the red cyclonic unit for cleaning
This solution applies to the following models:
Vacuum Cleaners
- GL1103 - 39100292
- GL1106 - 39100293
- GL1108 - 39100360
- GL1109 - 39100294
- GL1110 - 39100349
- GL71GL01 - 39100384
- GL71GL02 - 39100385
- GL71GL02001 - 39100445
- GL71GL04001 - 39100426
- GLE900 - 39100379
The filters may be dirty
Keeping the filters clean will improve the suction power of your Breeze vacuum. There are two filters in the cleaner and it's really easy to find them and clean them.
Keeping the filters clean will improve the suction power of your Breeze vacuum. There are two filters in the cleaner and it's really easy to find them and clean them.
The exhaust filter is found at the back of the cleaner as shown. Start by pulling on the release clip to remove the filet cover.

Remove the filter for cleaning. This can be done with a brush or the filter unit can be washed in warm water. Please make sure that it thoroughly dry before re fitting it to the cleaner.
The second filter is found in the lid of the duct container. First remove the container from the product by lifting the release catch on top as shown here.
Now look for the pad lock symbol and twist the lid off anti clockwise until the open pad lock icon lines up with the arrow on the container body. The lid will now lift off and the filters can be taken out for cleaning.
Both these filters can be dusted clean or washed in warm water, if you do wash them please make sure that they are dried thoroughly before re fitting them. Clean the blue fibre filter and the spongy bit.
To keep your Breeze in tip top condition Hoover recommend that your replace the filters once per year or if they are very dirty and won't clean up. Replacements can be purchased from the spares section of this website.
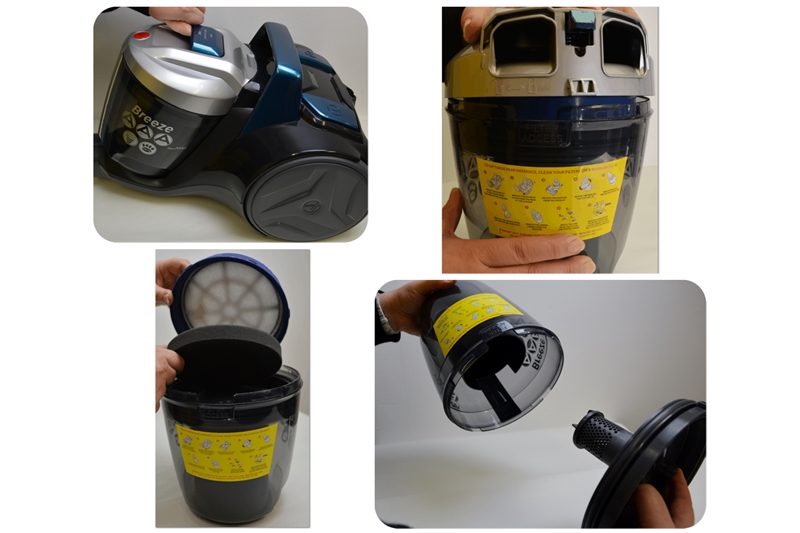
Check for a blockage in the hose
To check the hose for a blockage simply remove it from the cleaner, hold it upright and drop a coin down through the hose from the top. If the hose is blocked the coin will not drop out of the hose.
To check the hose for a blockage simply remove it from the cleaner, hold it upright and drop a coin down through the hose from the top. If the hose is blocked the coin will not drop out of the hose.
If the coin appears at the other end then its unlikely the hose is blocked.
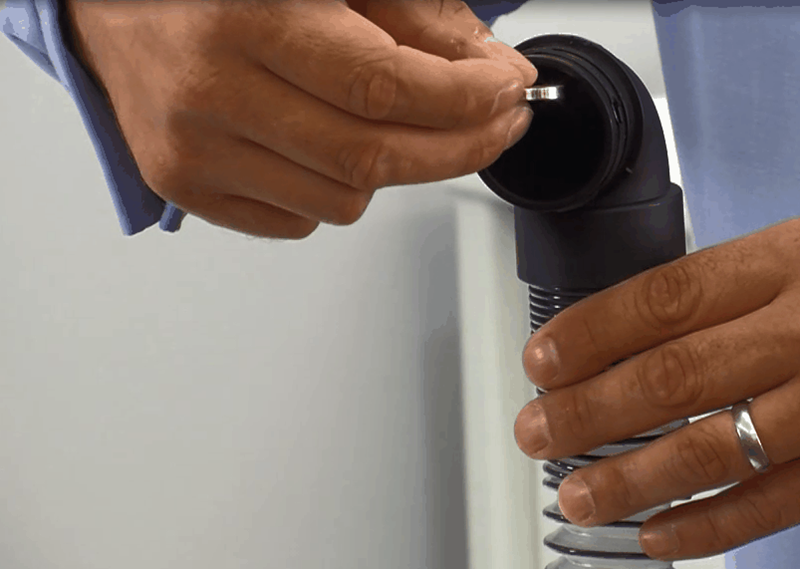
If the coin remains inside the hose then there is something stuck inside the hose. This will reduce the suction power and the cleaner will not pick up. Push a broom handle down the hose to carefully push out the obstruction or blockage.
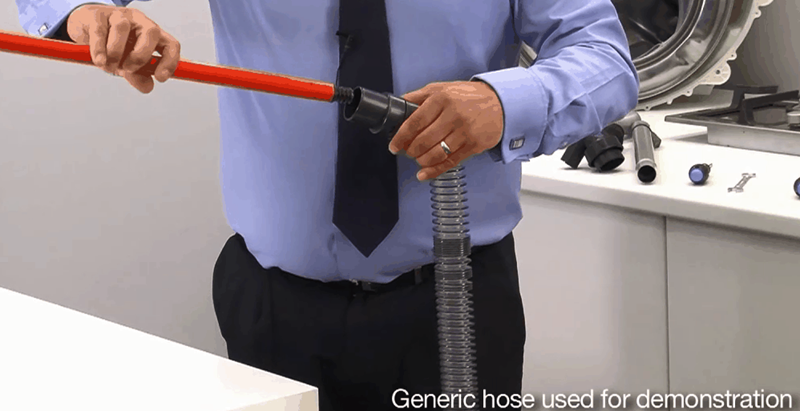
This solution applies to the following models:
Vacuum Cleaners
- AC73SE20001 - 39001364
- AL71SZ01001 - 39100442
- AL71SZ02 - 39100443
- AL71SZ02001 - 39100417
- AL71SZ04 - 39100468
- AT70EG10001 - 39001270
- AT70ID40 - 39001187
- ATC18LI - 39001570
- BF70VS01001 - 39001365
- BF70VS11001 - 39001366
- BF81VS02 - 39001469
- BF81VS12 - 39001471
- BR2201 - 39100321
- BR2202 - 39100320
- BR2306 - 39100364
- BR71BR01 - 39001453
- BR71BR02 - 39001452
- BV71CP10 - 39001522
- BV71CP20 - 39001523
- CA144BU2 - 39400240
- CA144TF2 - 39400190
- CA18TG2 - 39400189
- CA192TP2 - 39400166
- CH51S20 - 39001560
- CP70CP11 - 39001182
- CP71CP01 - 39001183
- CP71CP01 - 39001417
- CU81CU11001 - 39001178
- CU81CU15001 - 39001271
- CU81CU20 - 39001179
- DI2200 - 39100314
- DM4468 - 39100131
- DM4476 - 39100140
- DM4484 - 39100134
- DM4485 - 39100132
- DM4494 - 39100133
- DM4496 - 39100102
- DM4499 - 39100130
- DM4523 - 39100080
- DM4525 - 39100119
- DM5226 - 39100313
- DM5226/1 - 39100350
- DM5524 - 39100127
- DM5530/1 - 39100124
- DM6163 - 39100159
- DM6173 - 39100160
- DM6185T - 39100161
- DM6197T/1 - 39100181
- DM6200 - 39100197
- DM6207T - 39100158
- DM6210 - 39100195
- DM6211 - 39100213
- DM6212 - 39100219
- DM6213 - 39100222
- DM6214 - 39100227
- DM6215 - 39100183
- DM6216 - 39100229
- DM6220 - 39100340
- DM6222 - 39100218
- DM6223 - 39100221
- DM6225 - 39100262
- DM6226 - 39100260
- DM6227 - 39100176
- DM6229 - 39100191
- DM6300 - 39100378
- DM71DM02 - 39100388
- DM71DM03001 - 39100432
- DME7133 - 39100271
- DML5224 - 39100268
- DML5227 - 39100261
- DV70ID02 - 39400170
- FR7183 - 39100174
- FR7185 - 39100192
- FR7187 - 39100173
- FR71EG01001 - 39100424
- FR71FR01001 - 39100433
- FR71FR02001 - 39100425
- GL1103 - 39100292
- GL1106 - 39100293
- GL1108 - 39100360
- GL1109 - 39100294
- GL1110 - 39100349
- GL71GL01 - 39100384
- GL71GL02 - 39100385
- GL71GL02001 - 39100445
- GL71GL04001 - 39100426
- GLE900 - 39100379
- HL2102 - 39100265
- HL2107 - 39100298
- HL2208 - 39100315
- HL500HM 001 - 39101039
- HL700P 001 - 39100519
- HL700PXL 001 - 39100520
- HP22+SP48D - 39100302
- HP2300 - 39100300
- HP2305 - 39100343
- HS22+SP48D - 39100309
- HU4177T - 39100155
- HU4185 - 39100196
- HU4187T - 39100164
- HU4197 - 39100180
- HU4200 - 39100226
- HU4201 - 39100223
- HU4202 - 39100198
- HU4203 - 39100215
- HU4204 - 39100225
- HU4205 - 39100188
- HU4206 - 39100224
- HU4207 - 39100177
- HU4207/1 - 39100212
- HU4208 - 39100211
- HU4217/1 - 39100303
- HU4220 - 39100319
- HU71HU02 - 39100397
- HU71HU04001 - 39100431
- HU71HU05001 - 39100453
- JA1600 - 39100283
- JA1603 - 39100347
- JC2145 - 39100118
- JC3146 - 39100137
- JC3154 - 39100148
- JC3157T - 39100157
- KIT JAZZ CY - 39100318
- KIT JAZZ CY2 - 39000975
- KIT JAZZ GR - 39100317
- KIT JAZZ GR2 - 39000976
- KS51_OP2 - 39001566
- LA71SM10 - 39001524
- LA71SM20 - 39001525
- LA71WR01 - 39001526
- LA71WR20 - 39001527
- PR60_SL40 - 39001568
- PU1240 - 39100276
- PU2012 - 39100339
- PU2110 - 39100202
- PU2111 - 39100245
- PU2115/1 - 39100345
- PU2118 - 39100344
- PU2120 - 39100201
- PU2121 - 39100246
- PU2122 - 39100330
- PU2130 - 39100200
- PU2300 - 39100366
- PU31EN10 - 39100507
- PU71EN01 - 39100390
- PU71EN01001 - 39100452
- PU71EN02001 - 39100423
- PU71PU01 - 39100409
- PU71PU01001 - 39100444
- RE71TP03001 - 39001354
- RE71TP04001 - 39001355
- RE71TP20 - 39001184
- RE71TP25001 - 39001273
- RE71VE20 - 39001186
- RE71VE25001 - 39001274
- RU70RU15001 - 39001352
- RU70RU16 - 39001402
- RU70RU17 - 39001466
- RU80TP11 - 39001194
- RU80TP15001 - 39001266
- RU80VE11 - 39001195
- RU80VE15001 - 39001265
- RV71RV01 - 39100471
- SE71 VX04001 - 39001360
- SE71 VX05001 - 39001361
- SE71SP05 - 39001390
- SE71SZ04001 - 39001362
- SE71SZ08 - 39001414
- SE71WR01 - 39001400
- SE71WR02 - 39001401
- SE81RA05001 - 39001239
- SE81RA11001 - 39001240
- SE81SZ01001 - 39001170
- SE81SZ03 - 39001171
- SEA1RA02001 - 39001238
- SL8123 - 39100171
- SL8123 - 39100248
- SL8127 - 39100172
- SM1800 - 39100232
- SM1901 - 39100239
- SP2101 - 39100323
- SP2102 - 39100322
- SP71_BL06001 - 39001409
- SP71BL04001 - 39001358
- SP71BL05001 - 39001359
- SP81BL03 - 39001176
- SP81BL11 - 39001177
- SP81SM02 - 39001236
- SP81SM11 - 39001237
- SP81SP01001 - 39001246
- ST70ST01001 - 39001356
- ST71ST02 - 39001470
- STC18LI - 39001574
- SX70HU01 - 39001180
- SX70HU03001 - 39001353
- SX70HU04 - 39001413
- SX70HU05 - 39001465
- SX70HU11 - 39001181
- SX70HU15001 - 39001267
- SX9750 - 39500042
- SX9760 - 39500041
- SY71NM02 - 39400171
- TAV1610 - 39000488
- TAV1615 - 39000545
- TAV1620 - 39000490
- TC1182 - 39000342
- TC1183 - 39000473
- TC1184 - 39000424
- TC1185 - 39000527
- TC1188 - 39000756
- TC1191 - 39000463
- TC1192 - 39000386
- TC1201 - 39000581
- TC1202 - 39000613
- TC1203 - 39000612
- TC1206 - 39000381
- TC1208 - 39000472
- TC1209 - 39000484
- TC1210 - 39000623
- TC1211 - 39000653
- TC1212 - 39000652
- TC4210 - 39000385
- TC5213 - 39000418
- TC5223 - 39000329
- TC5232 - 39000347
- TC5235 - 39000708
- TC5238 - 39000358
- TCP2011 - 39000822
- TCR4213 - 39000616
- TCR4224 - 39000772
- TCR4230 - 39000985
- TCR4233 - 39000556
- TCR4234 - 39000649
- TCR4237 - 39000771
- TCR4239 - 39000938
- TCR4240 - 39001080
- TCU1410 - 39000956
- TCW1610 - 39000787
- TCW2006 - 39000786
- TE70_EN26001 - 39001416
- TE70EN20 - 39001190
- TE70EN21 - 39001463
- TE70EN21001 - 39001357
- TE70EN25001 - 39001268
- TE70ID30001 - 39001189
- TE70TE11 - 39001191
- TE70TE12 - 39001418
- TEN2400 - 39001082
- TF2005 - 39000588
- TF2006 - 39000587
- TF4195 - 39000412
- TF5192 - 39000451
- TFB2010 - 39000442
- TFB2282 - 39000441
- TFC3185 - 39000413
- TFC6203 - 39000402
- TFC6207 - 39000414
- TFC6283 - 39000401
- TFS5206 - 39000474
- TFS5209 - 39000511
- TFS7100 - 39000529
- TFS7185 - 39000651
- TFS7195 - 39000475
- TFS7197 - 39000524
- TFS7198 - 39000523
- TFS7202 - 39000540
- TFS7208 - 39000596
- TFS7209 - 39000453
- TFS7210 - 39000541
- TFS7220 - 39000542
- TFV2015 - 39000722
- TGP1410 - 39000794
- TH31 VO01 - 39100486
- TH31 VO02 - 39100487
- TH31BO01 - 39100488
- TH31BO02 - 39100489
- TH31HO01 - 39100496
- TH31SM01 - 39100492
- TH31SM02 - 39100493
- TH71 VX01001 - 39100437
- TH71 VX02001 - 39100438
- TH71BL01 - 39100404
- TH71BL01001 - 39100440
- TH71BL02 - 39100410
- TH71BL02001 - 39100441
- TH71BR01 - 39100474
- TH71BR02 - 39100475
- TH71SM01 - 39100399
- TH71SM01001 - 39100434
- TH71SM02 - 39100400
- TH71SM02001 - 39100435
- TH71SM03 - 39100401
- TH71SM03001 - 39100436
- TH71SP04 - 39100446
- TJA1410 - 39000957
- TJA1440 - 39001042
- TJG1100 - 39001094
- TMI2015 - 39000828
- TMI2019 - 39000939
- TP6206 - 39000373
- TP6220 - 39000538
- TP71 JA01001 - 39100393
- TP71 OP01 - 39100485
- TP71TP01 - 39100392
- TP71TP02 - 39100391
- TP71TP02001 - 39100427
- TP71TP04001 - 39100428
- TP71TP06001 - 39100450
- TP71TP07001 - 39100451
- TP71TP08 - 39100476
- TP71TP09 - 39100477
- TPP2310 - 39000531
- TPP2311 - 39000720
- TS2061 - 39000334
- TS2213 - 39000419
- TS2308 - 39000382
- TS2359 - 39000783
- TS2360 - 39000628
- TSB1906 - 39000742
- TSB2001 - 39000876
- TSB2005 - 39000667
- TSBE2100 - 39001090
- TSD2001 - 39001010
- TSE0100 - 39000614
- TSM1805 - 39000952
- TSM2005 - 39000951
- TSM2110 - 39000955
- TSP2000+SP48D/1 - 39000903
- TSP2002+S40D - 39000922
- TSP2004 - 39000818
- TSP2005 - 39000808
- TSP2006 - 39000823
- TSP2101 - 39000963
- TSP2210 - 39001083
- TSU2001 - 39000877
- TSU2002 - 39000878
- TSX2101 - 39000775
- TSX2201 - 39000804
- TSX2215 - 39000805
- TSXD2205 - 39000921
- TSXP2307 - 39001078
- TSXP2308 - 39001079
- TTE2203 - 39000990
- TTE2304 - 39000969
- TTG1100 - 39001095
- TTU1450 - 39001027
- TTU1460 - 39001076
- TTU1510 - 39000826
- TTU1520 - 39000827
- TW1750 - 39000248
- TWDH1400 - 39500057
- TXP1215 - 39000784
- U3495 - 39100113
- U3524 - 39100178
- U3525 - 39100114
- U3530 - 39100012
- UTE1100 - 39100380
- UTP1605 - 39100285
- UTP1610 - 39100284
- UTP1611 - 39100346
- UTP1612 - 39100362
- VE01 - 39100499
- VE02 - 39100501
- VE03OF01 - 39100506
- VE18LIG - 39100491
- VL81VL01 - 39100461
- VL81VL02 - 39100465
- VL81VL51 - 39100479
- VR81HL01 - 39100472
- VR81HU01 - 39100462
- VR81HU02 - 39100473
- VR81HU03 - 39100481
- VR81OF01 - 39100490
- VR81VR01001 - 39100430
- VR81VR02001 - 39100429
- WR71 VX04001 - 39100466
- WR71 VX05001 - 39100482
- WR71 WR03 - 39100480
- WR71WR01 - 39100460
- WR71WR02 - 39100459
- WRE01 001 - 39100514
- WRE02P 001 - 39100515
- XP71EG25001 - 39001269
- XP71ID20 - 39001192
- XP81OP25 - 39001468
Check the brush roll is spinning around
To check the brush roll is spinning around, simply switch the product on and tilt it over to see if the brushes are rotating . If they are not, the drive belt may have snapped and need to be replaced. If they are turning the brush may simply need a clean, switch off the product and unplug it then remove any hair or debris that may be tangled around the brush roll. We recommend that you change the belt even if it is not broken at least once per year and the brushes when the bristles have worn down. Doing this keeps your cleaner working efficiently. To do these checks turn the cleaner over and using a standard Phillips screwdriver remove the 7 screws that hold the brush cover in place.
To check the brush roll is spinning around, simply switch the product on and tilt it over to see if the brushes are rotating . If they are not, the drive belt may have snapped and need to be replaced. If they are turning the brush may simply need a clean, switch off the product and unplug it then remove any hair or debris that may be tangled around the brush roll. We recommend that you change the belt even if it is not broken at least once per year and the brushes when the bristles have worn down. Doing this keeps your cleaner working efficiently. To do these checks turn the cleaner over and using a standard Phillips screwdriver remove the 7 screws that hold the brush cover in place.
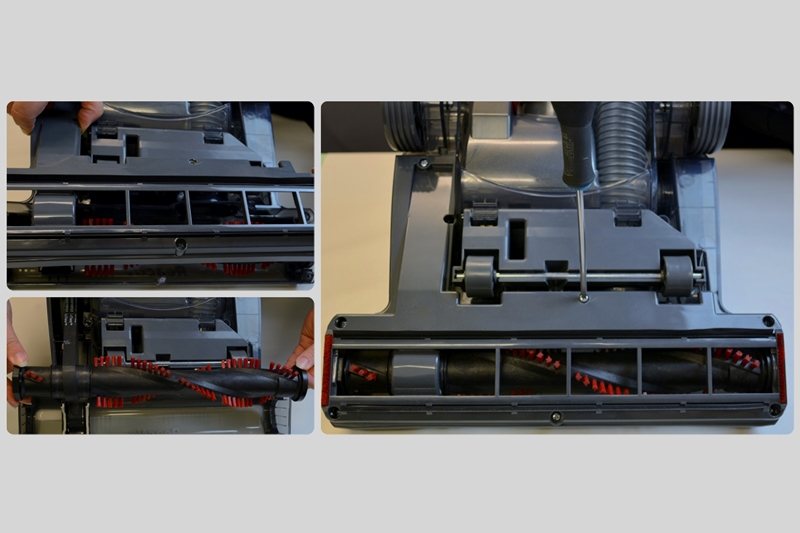
This solution applies to the following models:
Vacuum Cleaners
- RV71RV01 - 39100471
Clean the brush bar
There is a rotating brush bar fitted underneath the cleaner that sweeps up dirt from the floor. If the bristles become clogged with debris the cleaner will not pick up efficiently. To remove the brush and clean it simply use a flat blade screw driver to turn the lock to the 'open padlock' setting and lift the red catch out. Now pull the brush out and carefully remove any debris tangled around the bristles. Re fit and place the securing catch back in place and lock it by turning the catch to the 'locked padlock' setting.
There is a rotating brush bar fitted underneath the cleaner that sweeps up dirt from the floor. If the bristles become clogged with debris the cleaner will not pick up efficiently. To remove the brush and clean it simply use a flat blade screw driver to turn the lock to the 'open padlock' setting and lift the red catch out. Now pull the brush out and carefully remove any debris tangled around the bristles. Re fit and place the securing catch back in place and lock it by turning the catch to the 'locked padlock' setting.
For best results we advise that you replace the brush bar once per year or if the brushes look worn or the bristles have fallen out. New brushes can be purchased from the spares section of our website.
Please note there is not a belt fitted to this product
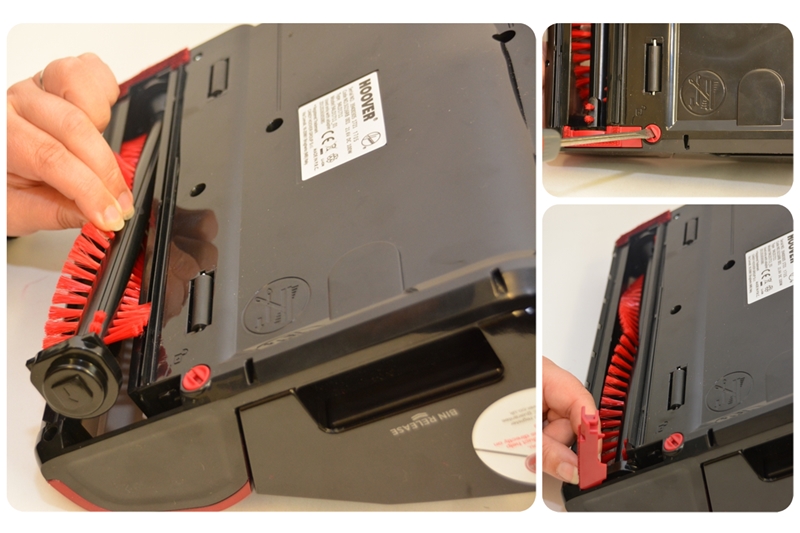
This solution applies to the following models:
Vacuum Cleaners
- HFC216R 001 - 39400360
- HFC324U 001 - 39400361
- SI216RB - 39400305
Clean the dust box filter
Firstly empty the contents of the dust box, to do this place the cleaner over your dustbin and press the release catch as shown to open the dust box flap. The dirt will empty out into your dustbin.
Firstly empty the contents of the dust box, to do this place the cleaner over your dustbin and press the release catch as shown to open the dust box flap. The dirt will empty out into your dustbin.
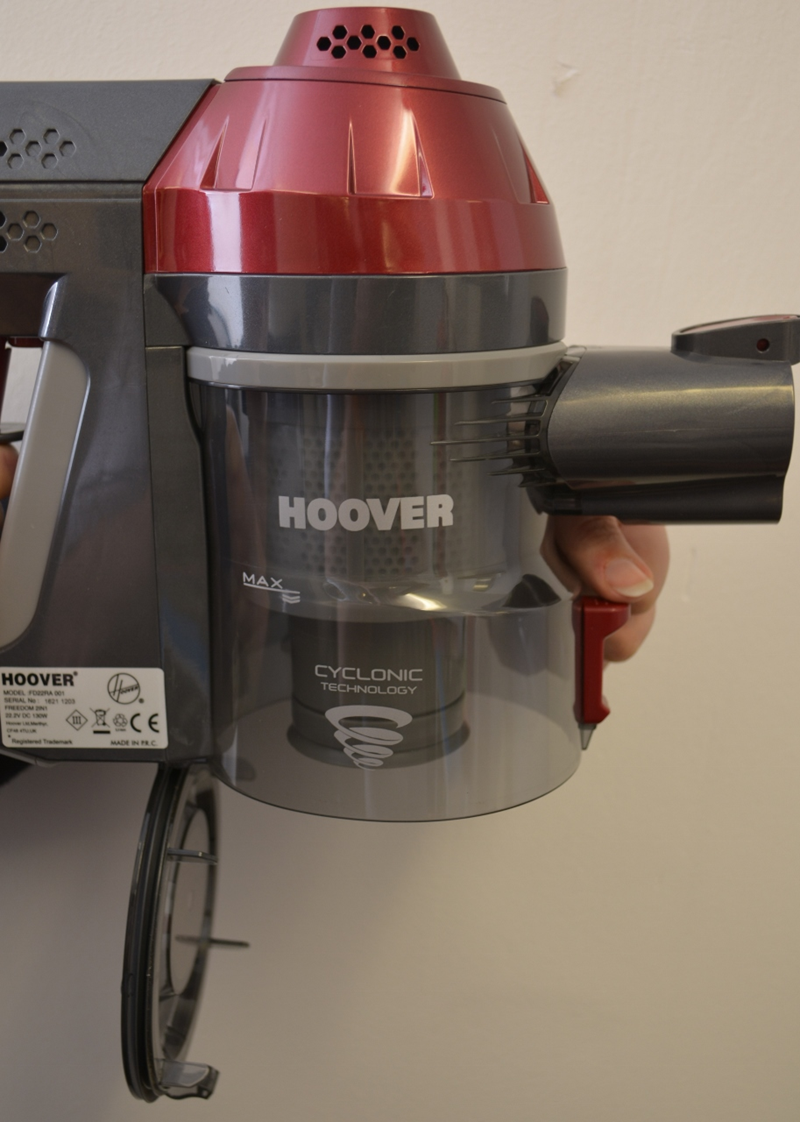
Now close the flap and remove the dust container by pressing down the release catch and pulling the container sideways. Turn the cleaner upside down to locate the catch.
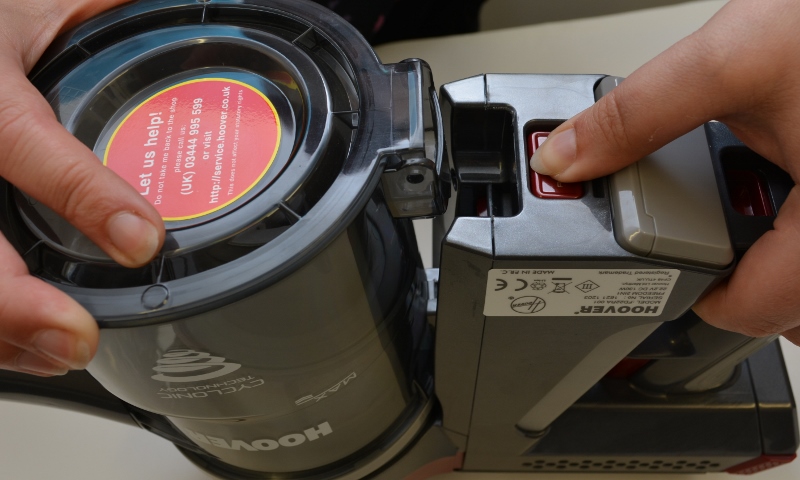
Twist the grey filter assembly anti clockwise and the pull it off the cleaner body.
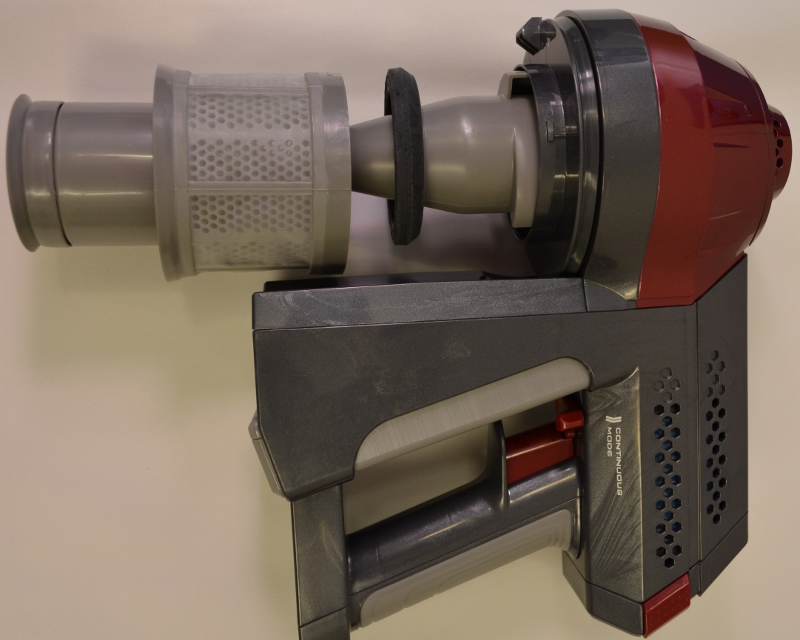
Twist the mesh screen anti clockwise to unlock it and pull down from the filter body. Wash both filter parts and the dust container in warm water and please ensure it is all thoroughly dry before putting it back together.
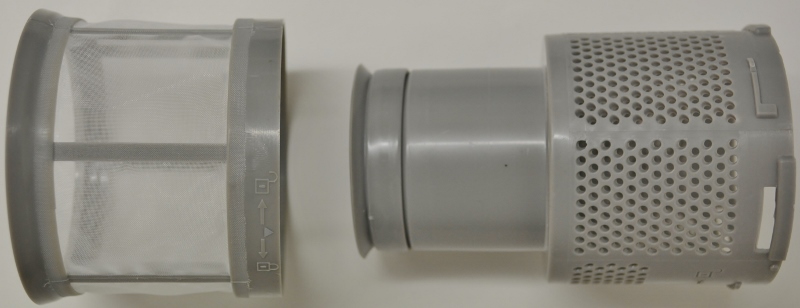
mesh (on the left) removed for cleaning
Clean the filters (5)
There are two filters inside the dust box of your cleaner and if you are finding that there is not much suction this may be down to the filters being blocked or require replacement. Keeping the filters clean makes your cleaner more efficient. Start by taking the dust container off and emptying it out in your dust bin. Press the release catch at the top of the dust box to remove it from the cleaner.
There are two filters inside the dust box of your cleaner and if you are finding that there is not much suction this may be down to the filters being blocked or require replacement. Keeping the filters clean makes your cleaner more efficient. Start by taking the dust container off and emptying it out in your dust bin. Press the release catch at the top of the dust box to remove it from the cleaner.
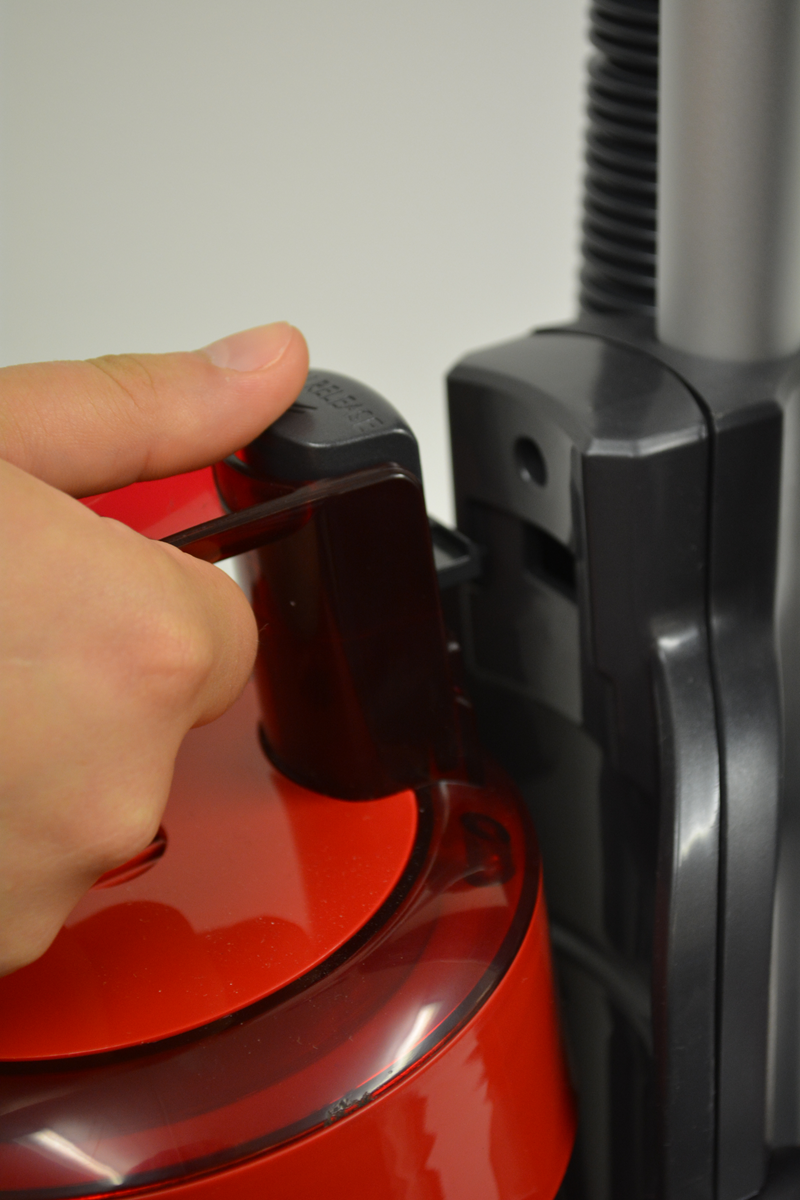
Release the bin lid by pressing the catch as shown, shake all of the dust out into your dustbin. The container may be washed with warm water but please ensure it is thoroughly dry before re fitting.
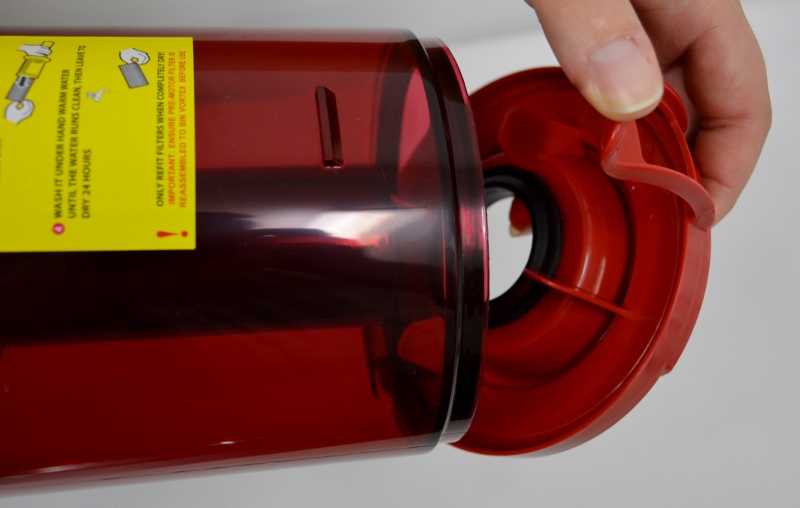
The filters can be removed for cleaning by twisting the dust box cover so that the arrow lines up with the open padlock symbol and in this position the lid will lift off.
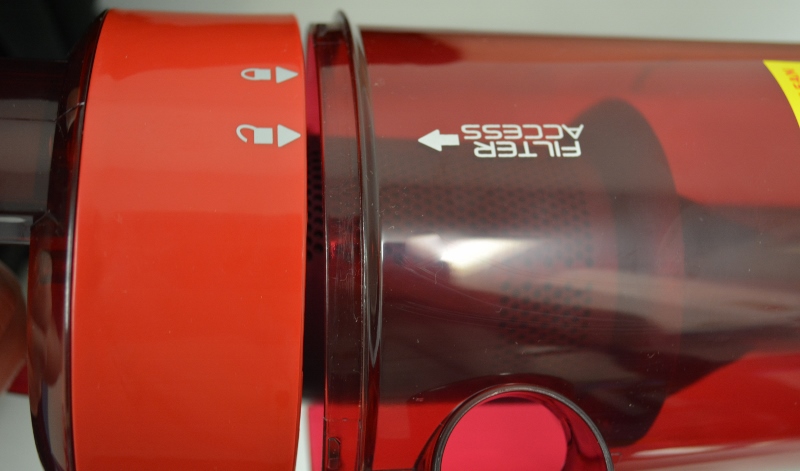
Twist the filter assembly to remove it.
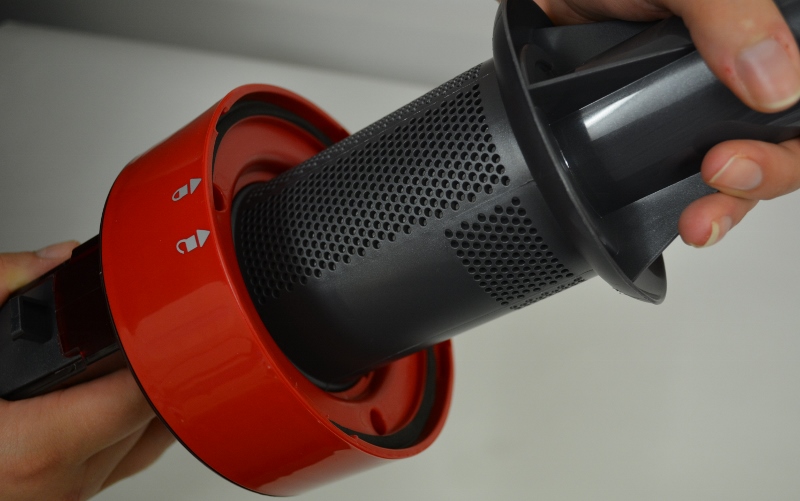
Remove the hepa filter and wash it and the grey cone in warm water. Allow them to dry thoroughly before putting it all back together. The grey cone will last the lifetime of the cleaner but for best results Hoover recommend that the white hepa filter is replaced once per year. Replacement filters can be purchased from the spares section of the website.
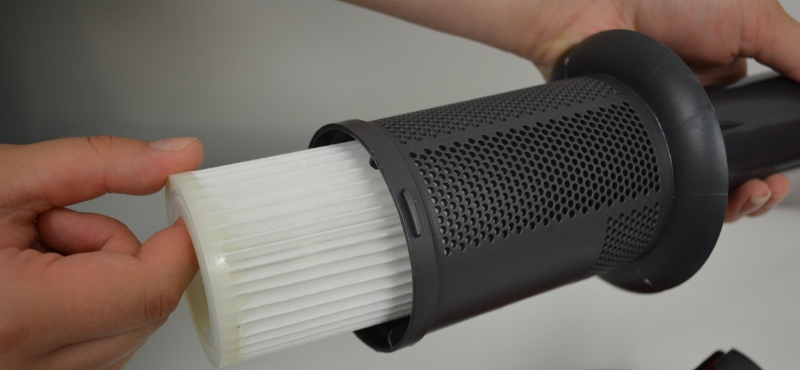
This solution applies to the following models:
Vacuum Cleaners
- WR71 VX04001 - 39100466
- WR71 VX05001 - 39100482
- WR71 WR03 - 39100480
- WR71WR01 - 39100460
- WR71WR02 - 39100459
- WRE01 001 - 39100514
- WRE02P 001 - 39100515
Clean the HSpin-core filter
The Discovery stick uses HSpin -Core technology to ensure that all of the dust collected ends up in the bottom of the dust container making it really easy to empty. However from time to time the filter will need to be cleaned. Start by detaching the extension tube and taking the cleaner body to your dustbin. Placed over your dustbin - release the dust flap by pressing the catch and empty out the contents of the container. Then twist the dust container anti clockwise to remove it.
The Discovery stick uses HSpin -Core technology to ensure that all of the dust collected ends up in the bottom of the dust container making it really easy to empty. However from time to time the filter will need to be cleaned. Start by detaching the extension tube and taking the cleaner body to your dustbin. Placed over your dustbin - release the dust flap by pressing the catch and empty out the contents of the container. Then twist the dust container anti clockwise to remove it.
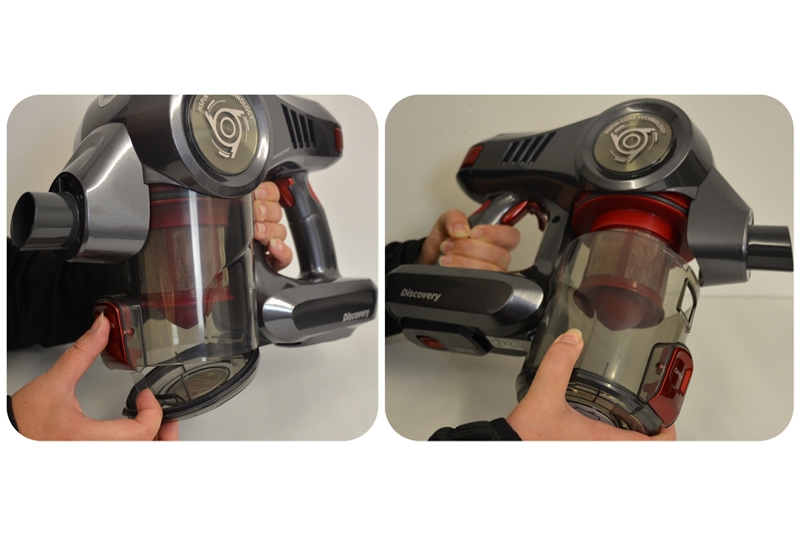
Now carefully grasp the filter and turn the cap at the bottom of the filter clockwise to remove it. Now slide the mesh filter down, dust it clean with a soft brush. We do not recommend you wash this area with water.
Once it has been cleaned slide back in place - note that there is a 'D' shape in the centre of the filter so line it up with the spindle on the motor before pushing it back on. Now re fit the locking cap and gently turn it anti-clockwise to secure it. Take care not to over tighten it.
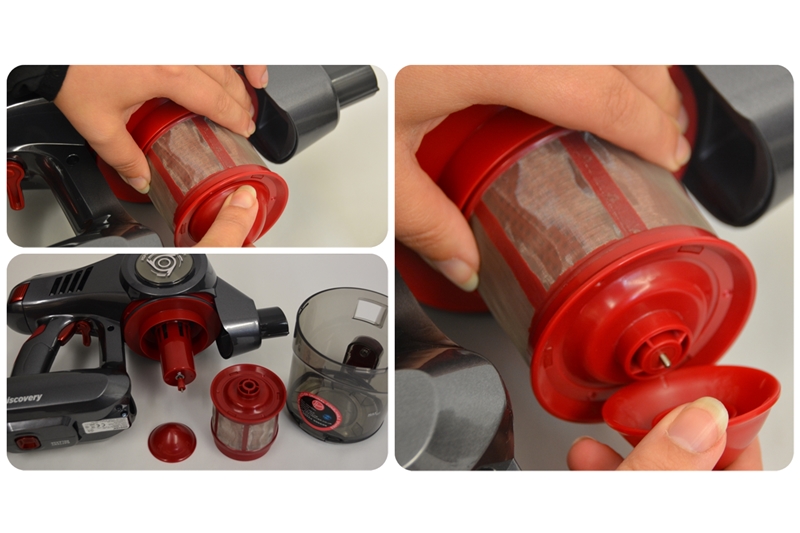
Empty the dust box (1)
To keep your cleaner working efficiently its a good idea to empty the dust box regularly. Remove the dust container from your machine by pressing down on the release catch as shown:
To keep your cleaner working efficiently its a good idea to empty the dust box regularly. Remove the dust container from your machine by pressing down on the release catch as shown:
Now place the container over your waste bin and press the catch at the bottom to allow the flap to open. Shake all of the dust out into your waste bin. Press the lid closed and re fit to the cleaner.
If the duct container is very dusty it may be washed in warm water but please make sure it has dried out thoroughly be for putting it back on your cleaner.
Give all of the filters a good clean
The filters on the Globe cleaner will need to be cleaned regularly to keep the cleaner working efficiently and picking up all of the dirt. Start by removing the dust box and emptying it out of your dustbin.
The filters on the Globe cleaner will need to be cleaned regularly to keep the cleaner working efficiently and picking up all of the dirt. Start by removing the dust box and emptying it out of your dustbin.

lift the handle and lift the dust box out

press the release catch to open the flap
Next open the top cover and remove the blue filter. Wash this in warm water.
lift the filter out for cleaning
There is a second filter found on top of the base of the cleaner. Take this off and wash in warm water. All filters should be thoroughly dry before re fitting. To keep the Globe working effectively its a good idea to replace the 2 filters and new ones can be purchased from our spares site.
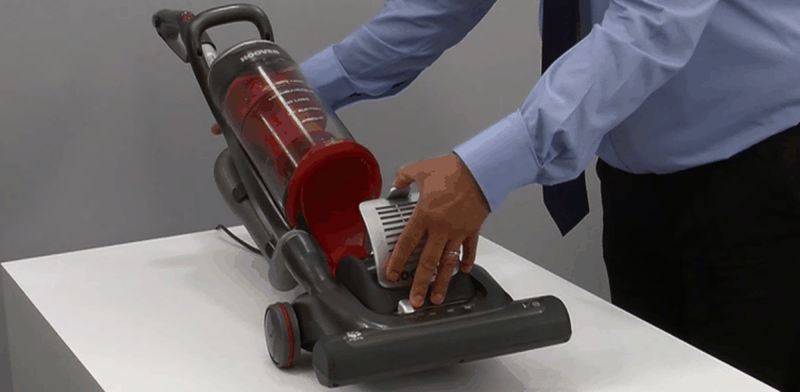
exhaust filter being removed for cleaning
This solution applies to the following models:
Vacuum Cleaners
- GL1103 - 39100292
- GL1106 - 39100293
- GL1108 - 39100360
- GL1109 - 39100294
- GL1110 - 39100349
- GL71GL01 - 39100384
- GL71GL02 - 39100385
- GL71GL02001 - 39100445
- GL71GL04001 - 39100426
- GLE900 - 39100379
The belt may be broken
If the belt snaps the brushes underneath the cleaner will not spin round and sweep up debris from the floor. Switch the product on, tip to one side and carefully look to see if they are rotating. If they are not then it is probable that the drive belt or rubber band has broken. Also if there is a large amount of debris tangled up around the brush that may stop the cleaner from picking up effectively. Hoover recommend that you replace the belt and brush assembly once per year, replacements can be purchased from the spares section on the web site.
If the belt snaps the brushes underneath the cleaner will not spin round and sweep up debris from the floor. Switch the product on, tip to one side and carefully look to see if they are rotating. If they are not then it is probable that the drive belt or rubber band has broken. Also if there is a large amount of debris tangled up around the brush that may stop the cleaner from picking up effectively. Hoover recommend that you replace the belt and brush assembly once per year, replacements can be purchased from the spares section on the web site.
In order to take the brush roll out or replace the belt follow these steps. Ensure the machine is unplugged from the mains electrical supply before doing any checks or maintenance.
turn the product over and remove 7 screws with a standard Phillips head screwdriver, lift off the cover and the brush and belt can now be removed and replaced
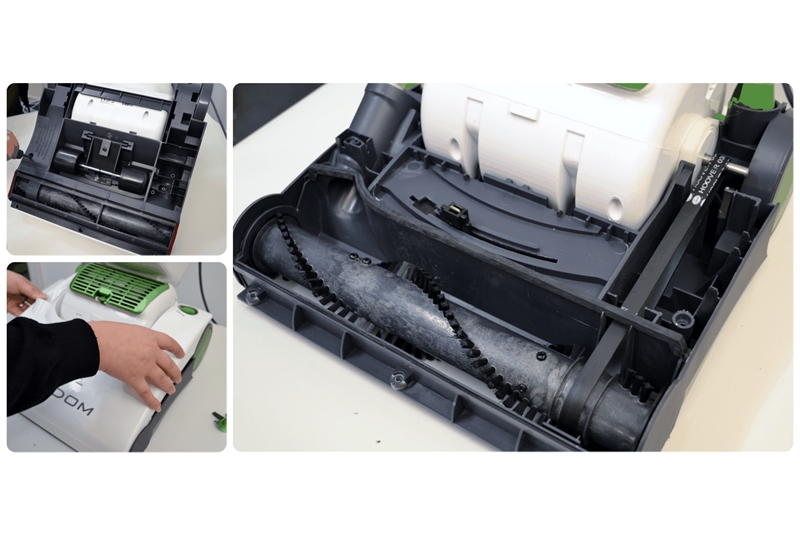
This solution applies to the following models:
Vacuum Cleaners
- DME7133 - 39100271
- FR7183 - 39100174
- FR7185 - 39100192
- FR7187 - 39100173
- FR71EG01001 - 39100424
- FR71FR01001 - 39100433
- FR71FR02001 - 39100425
Clean the brush roll
There are rotating brushes in the cleaning head and sometimes debris , hair and threads can become tangled around the brushes. You can take the brushes out to clean them. Brushes do wear down in time and they become soft of loose their shape the product will not pick up as good as it used to. You can purchase a replacement from our spares section on the website. To remove the brushes push the locking tab out as shown. This is found on the bottom of the floor head.
There are rotating brushes in the cleaning head and sometimes debris , hair and threads can become tangled around the brushes. You can take the brushes out to clean them. Brushes do wear down in time and they become soft of loose their shape the product will not pick up as good as it used to. You can purchase a replacement from our spares section on the website. To remove the brushes push the locking tab out as shown. This is found on the bottom of the floor head.
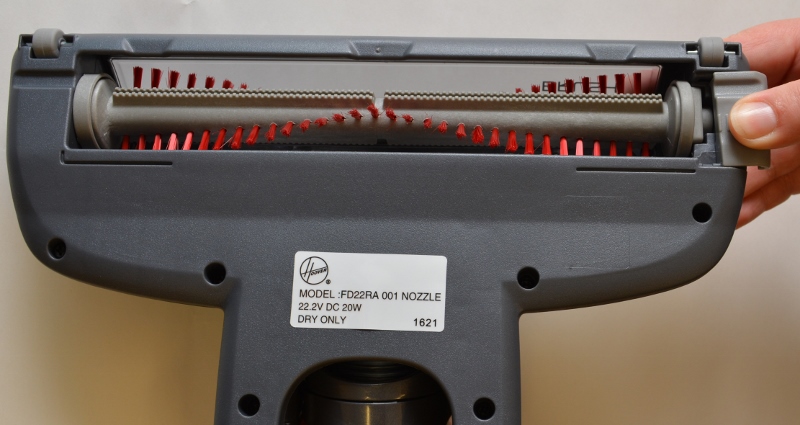
Now lift the brush roll out and clean away any debris tangled around it of blocking the floor head.
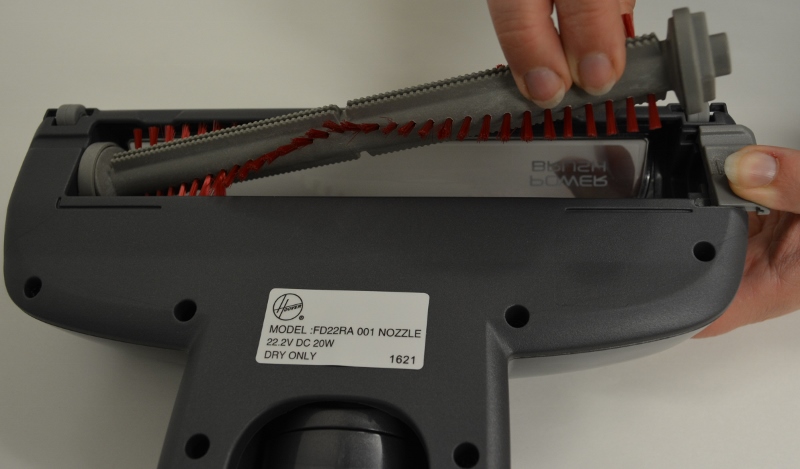
Clean the brush roll (1)
The brush roll fitted in the power head of the cleaner can become clogged with hair, threads and debris. Simply unclip securing tag and lift the brush roll bar out. Carefully remove any thing tangled around the bristles. Hoover recommend that you fit a new brush roller at least once per year or when the bristles become worn. This will keep the cleaner working efficiently, a replacement can be purchased from the spares section of the website.
The brush roll fitted in the power head of the cleaner can become clogged with hair, threads and debris. Simply unclip securing tag and lift the brush roll bar out. Carefully remove any thing tangled around the bristles. Hoover recommend that you fit a new brush roller at least once per year or when the bristles become worn. This will keep the cleaner working efficiently, a replacement can be purchased from the spares section of the website.